Wednesday, March 1, 2017

It's all about the shoes........

Poor Cinderella. What bad luck she's had. Losing her father at a young age. Growing up with a wicked stepmother and two nasty step sisters, forced into being a scullery maid in her own house, making a beautiful dress and having it torn off her body by those two jealous, mean old steps of hers.
And the girl was rocking the most awesome pair of shoes in fairy tale history and she goes and loses one running down the steps at the royal palace! That is harsh.
She does end up okay in the end.
She gets her shoe back.
That is the important thing, right?


This was a fun project with most of the supplies provided by the awesomeness that is Alpha Stamps!
Loved the beautiful papers that were in the Cinderella Kit. The one on the Cinderella Coach Album is called Serendipity Anticipation Scrapbook Paper and I used the paler side, inking the edges to give more contrast. The black escutcheon-y thing on the door (and parts of the same piece cut and placed under the windows) is part of the Stackable Labels Die-Cut Set that I painted black and used Liquid Pearls-Gold Pearl to pipe on some little Fleur-de-lis and embellishments.


I used the Cinderella Pining Collage Sheet for the image of Cinders hanging out the window pining for her lost shoe. She really isn't thinking about the prince.
Those shoes were epic.

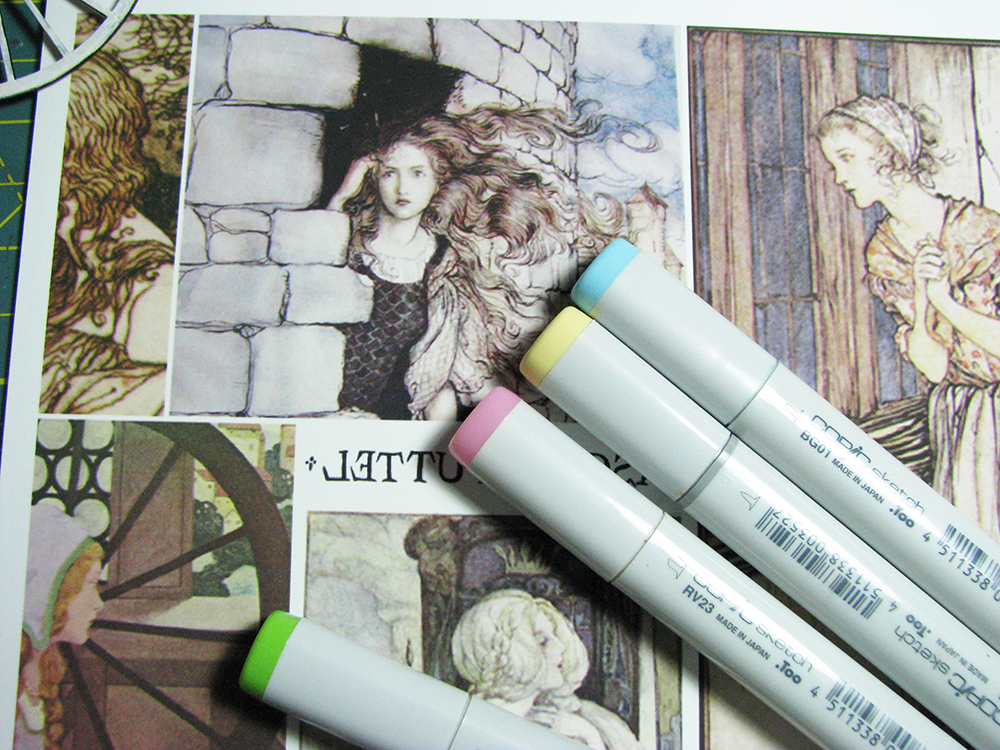
I've had a couple of questions recently about Copic Markers and how I sue them and thought this would be a good opportunity to demo adding color to a collage sheet to pump it up a bit when a little extra oomph is needed.

I got the digital download from Alpha Stamps of the Cinderella Pining Collage Sheet (see link above) and enlarged it by about 30%. I also reversed it as I wanted Cinders to look out the right side window, but she looks great on either side.
In the picture below, you can see the difference between the two images.
I used five colors on the image ( the picture only shows four because I was distracted by a kitty and didn't notice the other pink was missing)

In the next picture, I've partially colored in the hair, the body of the dress and the sleeve so you can see the difference.


The last picture is of the completed coloration of the image and an added dash of sparkle to the pink sleeve. I added a dot of blue to each eye and some pink to her lips.

After the Stickles dried, I cut the image out and fitted her into her window and voila!

For a link to all the supplies used from Alpha Stamps, click HERE.

Supplies:

Cinderella Coach Album
Cinderella Pining Collage Sheet
Serendipity Anticipation Scrapbook Paper (the pale side))
Stackable Labels Die-Cut Set
Liquid Pearls-White Opal
Liquid Pearls-Gold
8mm White Pearls
Tiny Embossed Gold Dresden Borders
8mm Looped Bead Caps-antiqued
India Ink Stamp Pad
Diamond Stickles
Various Copic Markers

Other:
Dresden Garland
White Acrylic Paint
Black Acrylic Paint
Stamped Brass Flower (coach wheels)

Thank you for stopping by!


Tuesday, February 21, 2017

Bronzino Beauties

I love the portraits of Bronzino. He lived his whole life in Florence (1503-1572) and was mainly the court painter for the Grand Duke of Tuscany, who happened to be a very powerful Medici, so there are many Bronzino portraits of the Medici family scattered throughout museums around the world. I particularly like his portraits of women. They are so finely done, rich and detailed and studying the faces of these ladies, I can really see their personalities come through the paint. And the jewelry.....holy 24 karats, Batgirl!
Let's just say Bronzino had embellishing down to, well , a fine art. (see what I did there?)


Here's how I started out....
I began with my usual routine of giving everything a good coat of gesso. Sigh....I do love gesso.
I wanted the Triptych-Tower Top to stand out in contrast with the color I was planning on using, so I painted everything that was going to show, black.


I began playing with the layouts of the ladies, moving things around to the spaces I felt they looked best, keeping in mind that there were going to be a bunch of contrasting watercolor flowers behind them.
I also connected the back pieces together using my favorite linen hinging tape and painted it black.

i painted the back completely black after the front dried.

After fussing around with composition some more, I decided that the black background was a bit too heavy and needed some relief, so I painted the top part of the black background gold where the pierced top of the towers show through.

After gluing down my cut-out images of the ladies and flowers to the back side of the front frame, I then glued the whole shebang on to the corresponding backs. I piled some weight on the piece to make sure they dried flat.

 I 'beefed up' the jewelry the ladies are wearing by using Liquid pearls and adding flat back crystals. The I painted some gold detailing around each frame, added some metal embellishments and gave it a good few hours to dry well before I touched up any gold paint. i also made sure that there were no bits of white peeking out the side of the piece and touched up the black where I need to.


SUPPLIES:
Triptych-Tower Top


Additional supplies:
Acrylic paint
Gesso
Liquid Pearls
Bronzini Portraits
Floral collage sheets
Metals embellishments
Linen Hinging tape
Crystals

Thank you for stopping by!


Saturday, February 11, 2017

Fairy Tale Trio

A trio of lovely fairy tale ladies to brighten your day. Or not.
The interesting thing about these ladies is that all the images are a bit ambiguous.


Lets take the one called 'The Fairest'. She's beautiful, but does she really look like a nice person?
And what about 'Poison Apple'? Is she about to bite into that apple or give it to some unsuspecting princess?
Hmmmm. The Queen has a rather pleasant face. She may not be evil. Who can tell?
There is always more than one way to tell a story.
I'll let you create your own!


I started out with three of the Blank Altoid Tins without the lids and used the Fairy Tale Frames Altoid Insert Set to create the outer frames around each tin. I painted the frames with pearlescent paints for richness and set them aside to apply after the background were in.
All the tins are covered on the outside with a dark, neutral paper. I used an old G45 Botanicabella paper called Secret Garden, but you can use anything you choose.
The backgrounds inside the tins are wonderful collage paper backgrounds from Alpha Stamps and are as follows;
Poison Apple is Forest Theatre Backdrops Collage Sheet
The Queen is Parrish Castles Collage Sheet
The Fairest is Grimm Covers #3 Collage Sheet
All the ladies are from the Fair Rosamund Collage Sheet
I used the little 7mm Round Red Cabochons as embellishments on Poison Apple.
The filigree pieces I used as the centers of the stamped brass flowers are the 20mm Antique Gold Filigree (for Poison and The Queen) and the Antique Gold Square Filigree for The Fairest.


All the ladies got a few sparklies in the way of some Swarocski flat back crystals and some Diamond Stickles.
And there was a liberal use of  Liquid Pearls from the Liquid Pearls-Neutral Colors Set in gold and white opal.
All the ladies were also put on pedestals (of course!) And I used the Medium Wooden Finial
painted with the appropriate pearl colors for each lady.


For a link to all the supplies used, click HERE.

Supplies:
Black Altoid Tins
Fairy Tale Frames Altoid Inserts
Collage Sheets:
Forest Theatre Backdrops
Parrish Castles
Grimm Covers #3
Fair Rosamund

7mm Round Red Cabochons
20mm Antique Gold Filigree
Antique Gold Square Filigree
Diamond Stickles
Liquid Pearls Neutral Colors Set (Gold and White Opal)
Liquid Pearls-Summer Colors Set ( Hydrangea and Key Lime)
Medium Wooden Finial

Thank you so much for stopping by!

Tuesday, February 7, 2017

Valentine Plaque

Hello folks! Valentine's Day is just around the corner so I was inspired to make a fun Valentine Plaque using the Mini Display Tray-Heart. I chose this partly because when I was thinking about making a Valentine, it struck me as I picked it up that it's about the same size as a smallish box of Valentine chocolates.
Having had that thought, I immediately had to paint it chocolate brown and then the rest of the piece fell into place.

I started out with my usual coat of gesso and while that was drying I cut and glued the paper to the back piece. A nice rich shade of brown with some gold highlights.

I painted the top frame piece with a matte acrylic brown, making sure I got the sides and all the inside bits.


I cut out my collage images and played with the arrangement until I got the visual I liked, and them trimmed off what wasn't going to show.


I glued everything in place and added all the details........


I used Liquid Pearls in gold and pearl to highlight her jewelry and to make her crown really pop, I put a few Swarovski flat back crystals in the centerpiece. Now she really has a great 'jewel' in there!


I added Liquid Pearl details and some Dresden trim to the phrase and the curly top piece. Which, by the way, is a portion of one of the frames from the Filigree Frames Shape Set. I use bits and pieces from these all the time to add pretty details to my pieces.

This piece is pretty straight forward to make and it's fun. Hope you make one yourself!

SUPPLIES:
  Mini Display Tray-Heart
  Filigree Frames Shape Set


Additional Supplies;
Acrylic paint
Liquid Pearls in gold and pearl
Various collage images
Matte medium
Glue
Bo Bunny Vintage Dot Scrapbook Paper in Chocolate Brown

Thank you for dropping in!


Tuesday, January 31, 2017

A Stroll Down Sweet Street

Yep, the holidays are over, winter has us all in her cold clutches. What better way to warm up than make some snuggly cute houses for Valentine's Day? Lora here playing with the House Oddities Box and having a grand time! I love this kit! I love anything house shaped and the possibilities with this awesome kit are pretty much endless.
I decided to take a stroll down Sweet Street,  a charming little block of confectionery delights.


It was lots of fun using pink papers and lots of glitter! And, of course, chocolate was eaten throughout the project. For inspiration. Just sayin'.


The papers kind of remind me of the Licorice Allsorts I got when I was in college in the UK.
I wasn't over fond of licorice, but the sweets were so colorful and pretty, they always looked like they should taste like something else.

A couple of detail shots.....


I started this project by gluing the box together and giving it a coat of gesso. I usually like to do this for two reasons. The main one is that matte medium loves to stick to gesso, so it's very easy to glue papers down. The second is that there is sometimes what I call 'burn residue' on die-cuts and this keeps your hands from getting ashy and transferring it to your papers when you're gluing them down.

I pre-cut all the papers I wanted to use for each house, back and front. Next I used linen hinging tape to connect all my little houses together.


I made sure to leave plenty of space between the houses to account for the bulk of papers and ephemera I wanted to add. If you tape the pieces too close together, the houses won't fold up properly.
Keep the bottoms of your houses straight and even so nothing is lopsided.

I glued all the papers on the houses and trimmed them where needed. I then inked the edges and the linen tape so it would blend in a bit with the whole ensemble.


I collected a bunch of fun little doodads and bits and composed little house layouts. I usually don't plan this part, as it's more fun to just be spontaneous and I'm not locked into  a fixed idea, so fun things start happening and my project starts to get a personality.
I made a little flap with a message underneath by cutting out a pretty shape from scrapbook paper and once again, using lined hinging tape.....


I laid the tape over the house and measured out (roughly...it's not brain surgery) the width and length I needed and stuck it down.

Now it's ready for embellishing and a cute little message.


Supplies List:
House Oddities Box
Window 6 Panel
Steampunk Shape Set (wings)
Stackable Labels Shape Set

Additional Supplies
Bo Bunny Sweet Moments 6x6 and 12x12 Scrapbook Papers
Stickles-Diamond
Linen Hinging Tape
Paper Roses
Collage images from Sandy Gordon (Art, Tea, Life)
White acrylic paint marker
Gesso
Matte Medium (I like Liquitex)

Thank you so much for stopping by!

Tuesday, January 17, 2017

Fairy Tales and Secret Doors

I've had a lot of fairy tales running around in my brain for the last couple of weeks and they are ripe with endless possibilities. So much so that it's very hard to get them out of ones head! Not that I'm complaining, I love fairy tales, but they do seem to have a mind of their own and tend to go galloping off with a person on little side trips!
I was thinking of pivotal moments in fairy tales and wandered down the Sleeping Beauty path whilst playing with the Hidden Drawer Book Box and this project is a result of that.
That moment before Aurora touches the spinning wheel needle. Open the box and it tells you a story.........


I had a lot of fun using Lumiere Metallic Acrylics and Liquid Pearls dots for embellishing the cover and inside the box. I like the pearls in her braid.


All the papers were from 'An Eerie Tale' by Graphic 45. The fancy green and purple curlicues are from the Wrought Iron Set.
I cut up various bits to suit the space they were going in to and primed them all with Gesso. After they dried I used Metallic Olive Green acrylic paint (from Lumiere) on the inside pieces. The purple bits on the outside of the box I colored with Jaquard Dye-na-Flow Violet fabric paint. Let me tell you, that stuff is fun to play with! The colors are fantastic and they mix well with each other. I spent far too long playing with them on various surfaces. Including my skin, accidentally. It was a little awesome....The violet made my skin look really cool.....kind of like Violet Beauregarde from "Charlie and the Chocolate Factory".


SUPPLIES:
Wrought Iron Set
Hidden Drawer Book Box
Windows 4 Panel
 (Window is the medium one and used behind the old spinner and Sleeping Beauty)


Additional supplies:
Lumiere Metallic Acrylic Paint in Olve
Jaquard Dye-na-Flow Ink in Violet
Liquid Pearls in Blackberry and Key Lime
Wooden knob
Swarovski Crystal in Aurora ( I thought it apropo)
Glue
Matte Medium (I like Liquitex)
Graphic 45 'An Eerie Tale' paper

Thank you for visiting!