Saturday, July 20, 2019

Fresh Fruits and the Bats Who Love Them

Yep, it's hot. SO hot that I don't want to cook or eat anything requiring a temperature above my own. And so much wonderful fruit is in season, it's all I seem to want to eat.
And guess who I share that craving with?
Yes, the wonderful fruit bat. Here are a few of the more exotic ones in.......
Chiroptera Rubus,

And then there's Chiroptera c. Limon,
And let's not forget Chiroptera Cerasum....
This was a pretty straight forward project, cutting papers using the book pages as a template, fitting and gluing all the background papers in and then playing around with all the great collage sheets that Alpha Stamps has on offer. Choices are pretty endless for about any theme you could think up. And the new 3x4 Tabbed Book along with the 3x4 Pocket Set (both included in the July Fruit Paradise kit) were a lot of fun to play with.
 Ooh, I am not sure how these two got in a fruit bat book. 
I'll have to speak to the management......
For a link to the supplies used in this project, click HERE.

SUPPLIES LIST :
3x4 Pocket Set
3x4 Tabbed Book
Fruit Paradise 6x6 Papers
Orange Slice Fruit Cab
Mini Vintage Catalog Covers Collage Sheet
Fruit Postage Stamps half sheet
Mini French Fruit Labels
Vintage Fruit Catalog ATC's Collage Sheet
Chipboard Bat Set
1 Inch Bronze Binder Rings
Mini Bronze Butterfly Paper Clips

Thanks for stopping by!


Tuesday, July 16, 2019

New Specimen Box at Gypsy Soul Laser Cuts

I love this new 6x4 Specimen Box! 
It's a great size and you can choose to put in as many of the inserts as you choose. Nice, flexible design.
 In my bug specimens theme, I chose to leave out the insert on the far right, so I could place some bigger critters in there.
Here's where I started:
I assembled the box frame and painted the sides (on the inside only), the top front edges and the inserts.
I cut paper to fit the inside back and all of the outside of the box. I glued in the papers ...
fitted and glued in the inserts, let them dry and then gave the whole thing a coat of matte medium and then a coat of Quinac gold, wiping most of it away with a damp paper towel, but leaving the 'goo' in the cracks and crannies to give the box an aged looked.
I also painted the Layered Flouishes Aria and assembled them for adding to the box later.
I then fussy cut my insects with a scalpel, glued them each on a tiny cork (you can get them HERE) and then glued them into the box.
After that was dry, I glued the flourishes on to the front of the box, added a few tiny brass stamped flowers et voila! A pretty little specimen box.
A fun project and most enjoyable.
 Supplies:
6x4 Specimen Box
Layered Flouishes Aria
Faux Metal Number Plates

Stamperia 'Spring Botanic' scrapbook papers
Acrylic paints
Stamped brass flowers

Thank you for visiting!

Tuesday, July 2, 2019

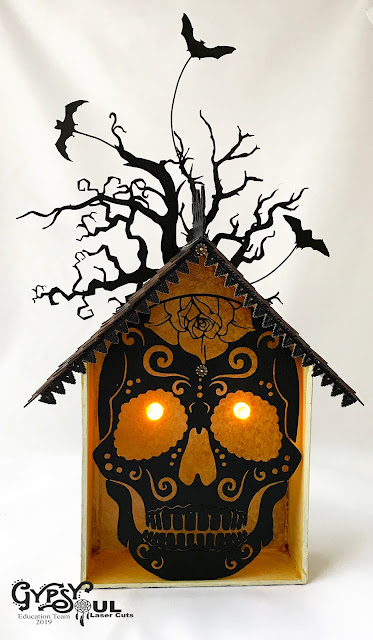
A Sugar Skull House for Halloween

I know it's only June, but I am all about Halloween lately, and most everybody knows how much I love doing houses, so here is a Sugar Skull in a house.
With bats.
And some scary tree bits.
Here it is lit up with glowing eyes.
 And unlit, but still looks pretty cool in the daylight.
  I started out with the Mini House Room Box 4x4 Open. I took away the attic floor to make room for the Sugar Skull 1.
I laid the skull on top of the large center piece and marked where I wanted to drill holes for my glowing eyes.
I drilled the holes to the size of the tea light flames, NOT the whole tea light. I'm going to glue the body of the tea light in place on the back of the house, but we'll do that in a later step. For now, I dry fit the tea light to make sure the flame fits through the holes I drilled.
I cut papers for the main body of the house, back, front and sides (outside only). I glued the sides and the roof on, painted the inside of the house walls, ceiling and floor and then glued all the papers on.
 Next, I painted almost everything else black. Sugar Skull, Creepy Tree (I used bits and  pieces of the 8-inch Creepy Tree and the 5-inch Creepy Tree) Chipboard Bats Set (you can get them HERE) and the ridge ornament, which is the Chipboard Fleur Border. (Get it HERE)
I shingled the roof and painted most of it brown, adding a few rows of black to accent the pattern. I glued the ridge ornament on as well. You can see some of the roof and ridge in the picture below. I apologize for not getting a WIP shot. I was all into the groove and forgot.
when all the glue and paint dried, I added the trees and the bats on the back. I used black double stick foam tape to stick the trees on and mounted the bats on wires and then glued them on to the tree and added some black roses to pretty up the joined bits. I got the roses from Alpha Stamps, the same place I got the bats and the ridge ornament and the Dresden trim, which I glued on to the base of the ridge ornament and the gable edge of the house front.
Last but not least, I added some corks to the sugar skull and glued into place and turned on the lights!
That's a good start on Halloween!

SUPPLIES:
Mini House Room Box 4x4 Open
Sugar Skull 1
Creepy Tree (8inch)
Creepy Tree 5inch
Chipboard Shingles-Pointed

From Alpha Stamps:
Chipboard Bat Set
Black Zig Zag Dresden Borders
Chipboard Fleur Border

Additional:
BoBunny Double Dot Vintage Chiffon
Graphic 45 Olde Curiosity Shoppe Genuine Article
Two tea lights
Black Paint
Thank you for stopping by!