Sunday, September 25, 2016

Day of the Dead Frame

Hello everyone! Lora here with my last project for Gypsy Soul Laser Cuts as a guest designer. It has been a boat load of fun and I want to thank Gina for letting me play!

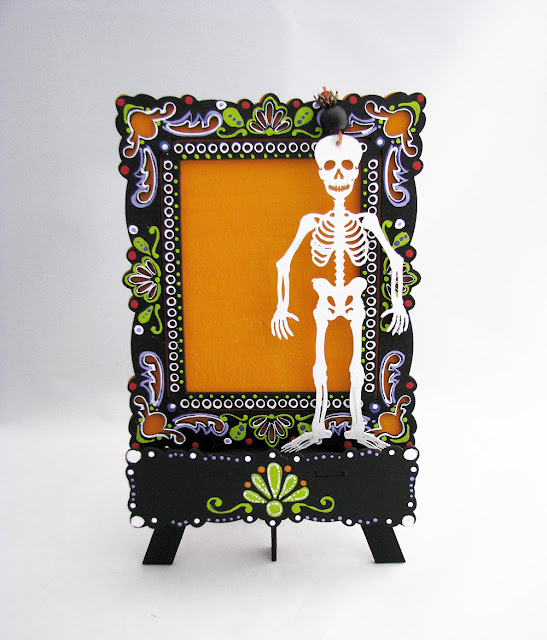
This weeks piece is all about the very cool Victorian Frame and Easel that I've transformed into a Halloween-ish Day of the Dead frame. I love all the bright colors on the skulls made of sugar and a hundred other medium nowadays to celebrate the holiday and I wanted to paint my version of them on the frame.
It really lends itself to this style of painting with all it's pierced swirls and curlicues.


This project is really straight forward....just the frame and some paint. I mostly used Ceramcoat Matte Acrylic Paints.
The first thing was to prime everything in a coat of gesso, and then I painted the back piece of the frame orange.


Everything else got a good coat of black and I gave it a lot of time to dry completely. Like about fifteen minutes, because that's a long time for me. Maybe in dog years it's about an hour and a half.


After that, it was mostly painting around the edges of the pierce work, emphasizing the shapes. I used mostly bright shades of green and purple with a little red and accents of white to make things pop.


This guy was hanging around on my work table and wanted to get into the pictures....


For the easel that the frame is resting on I drew (in pencil) the repeated flower design that is in the center of each side of the frame and painted it green to match the frame. I added some dots and a couple of curlicues that help tie both pieces together.

I really like that you can turn the frame long-ways to fit a different shape picture. I plan on using this frame to show off my business card at my market table this Halloween.


SUPPLIES from GSLCuts
Victorian Frame and Easel
Skeleton Shape Set


Additional Supplies
Ceramcoat Matte Acrylic Paint
Gesso
Golden Black acrylic paint

Tuesday, September 20, 2016

Some people have flying monkeys.......

I prefer flying pumpkins. Because a) they look ridiculous and b) they look ridiculously cute. And lastly, those flying monkeys always scared the terwillikers out of me and seeing as how this piece walks on the lighter side of Halloween, flying pumpkins fit right in.
Lora here again in my third installment as guest designer for Gypsy Soul Laser Cuts.
This time around I chose to mess with the Mobile Birds set but instead of using the pretty birds,  I decided to dangle GSLCuts Skeleton Shapes Set on it and put a Halloween twist on the whole thing.

A challenge to photograph, those elusive, pesky skeletons just did not want to cooperate, but I did get them in the end!

 A close shot of the little witch and her flying pumpkin minions.

I used little seed pods that look like pumpkins, painted a bright orange. You can get them HERE.
The cute little wings are GSLCuts Bat Wings Miniatures.

Here are a few how-to's for making this mobile....

I primered the mobile pieces and skeletons first. I find that gesso gives the matte medium and paints something toothy to stick to and I only need to use one coat of paint and a thin layer of matte medium on each piece.


A lick of paint on the skeletons and paper on the Mobile pieces and they're ready to go.

I cut five pieces of orange linen twine about 10 inches long.
I made holes in the top center of each skeletons forehead, pulled the orange linen twine through the hole and threaded a wooden bead (which I painted black) through the twine making sure the loose end was also inside the bead, and squirted some glue into the bead hole and let it dry.
After they dry you can add beads and doodads like I did to mine to fancy the skellies up.
It makes them happy.

Whilst they were drying, I used a black permanent marker on the bat wings. It's easier to do this before you pop those babies out of the cardboard...saves your finger tips from getting black and having the check out lady at the grocery store ask you if you have zombie rot.
No kidding.

I also dabbed some glue in the center of each pumpkin pod and stuck a piece of twine in there to dry.


After I popped the wings free I cut little tabs of black paper and glued them on the wings, leaving half of the tab free to glue on the pumpkin.
I then glued the wings on to the pumpkins, let them dry and then painted the pumpkin orange as well as the part of the tab that attaches the wings to the pumpkin, making the tabs 'invisible' and therefore making the wings appear to be growing out of the pumpkins.
This wordiness has happened because in my creative frenzy (hehe) I forgot to take pictures of this part of the process.

After all was safely dry and doodads and such were added to twine and the mobile itself was embellished with bits and bobs, all was put together. The results were pretty fun!


SUPPLY LIST
Mobile Birds
Skeleton Shape Set
Bat Wing Miniatures


Additional Supplies
8mm Looped Bead Cap
Thin Ornate Filigree
Black Zig Zag Dresden Borders
Pumpkin Pods
Brass Stamping
Orange Linen Twine
Acrylic Paint
Matte Medium
Wooden Beads

Thank you for visiting!

Monday, September 12, 2016

Halloween Tablet Stand and Business Card Holder

Hello everyone, Lora Mahaffey here again making stuff with the awesome designs that come from Gina at  Gypsy Soul Laser Cuts. It's great to be a guest designer at GSLCuts....I get to play with cool things and I get to make them for Halloween.
I love Halloween.
Just making sure that those who didn't know that are properly informed.
This post is all about the Tablet/Ipad/Phone Holder and the Business Card Holder. I occasionally sell at markets and craft shows and have needed something to hold my tablet in when I show slides of my work and a business card holder. Both needed to be nice enough to display on my table and since Halloween is just around the corner, I decided to bust out the G45 'Rare Oddities' 8x8 pad and play with it.


It's really well suited for both holders...I like the scale of the designs and the background paper (Bo Bunny Vintage Dot Shadow) is the perfect paper to set off the more muted tones of the G45 designs.


I decided to let the designs of the holders and the papers speak for themselves and didn't add any doodads, which is working well for me as they have been traveling around in a box of jewelry display pieces and get knocked around a bit.
I like the fact that they are practical, serve a purpose and still look good!


The other thing that's really nice about the Tablet Holder is that it holds a sign very nicely, so when I'm not using it for a slide show, it does duty identifying my table at the market.


To give them a nice long life, I gave them both a couple of coats of varnish. I used Liquitex Matte Acrylic Varnish which gives a nice finish and makes them easier to wipe down when needed.

Supplies
Tablet/Ipad/Phone Holder
Business Card Holder

Graphic45 "Rare Oddities" 8x8 Tablet
Liquitex Acryllic Matte Varnish
Liquitex Matte Medium
Brilliance 'Galaxy Gold Ink
Tim Holtz Distress Ink Vintage Photo

Thank you for stopping in!

Wednesday, September 7, 2016

Morticia's Dresser

Here's a little dresser I imagine someone like Morticia Adams would have. It's a little cluttered, a bit Gothic, elegant and feminine without being frou-frou. And a little bit on the creepy side.

Lots of skulls happening....both large and small. Maybe Morticia is a connoisseur collecting interesting skulls from fascinating places. She must have a sense of humor to put a crown on the big one at the top of her mirror.
Or maybe Gomez presented her with the head of an ancient king from the Carpathian Mountains.
One thing is for sure, he always brings her roses. Even if she is inclined to cut their little heads off.

A pet gargoyle, some spare body parts,  a couple of perfume bottles. Looks like she just set a cup of tea down on the edge of the dresser. Perhaps she was running late for a little soiree  or a midnight tango.

What's this in the bottom drawer? (we are such Nosey Parkers!)

Looks like a bit of spare chain from the dungeon. Well, I guess a girl never knows when some chain might come in handy. To fight off torch-wielding villagers, perhaps?


A couple of quick notes on construction and techniques;

I am always looking at different ways to do the legs and feet of furniture and on this dresser I went with a wooden bead and a mini spool, painted black and then decorated with gold to match what I painted on the drawers and mirror.


To make a skull candelabra, I cut the circle bit off of the center post of an Antique Candelabra Charm  and glued a White Turquoise Skull Bead to the tip. I glued a piece of black 12 gauge wire to the back and stuck it in a heavy bead cap I painted gold to match.


For a link to supplies, click HERE

SUPPLIES
Gothic Dresser
Victorian Dressing Table Set
Tiny White Turquoise Skull Beads
White Turquoise Skull Beads
Large White Turquoise Skull Beads
Ceramic Gargoyle Bead
Antique Candelabra Charm
Small Antique Brass Suitcase Handles
Nonbreakable Mirror Material
Bronze Teacup and Saucer Charm
Tall Bulb Perfume Bottle
Mini Rose Buds-Black
Small Rose Buds-Orange
Small Rose Buds-Black
Tiny Paper Roses Black
1 Inch Purple Roses (in top drawer)
1/2 Inch Scalloped Black Lace (in the drawer)
7/8 inch Fancy Fan Black Lace (in the drawer)
Summer Sea Silk Ribbon Set (orange trim in the drawer)
3-1/2 Inch Skeleton (parts in the silver box)
Miniature Square Metal Box with Lid
Antiqued Steel Chain-2 sizes (sub for copper chain in bottom drawer)
Large Bronze Fancy Filigree Set (fleur de lis behind the large skull on top of mirror)
Spell Book Box Covers Collage Sheet
Wood Mini Spool

Other;
Black and gold acrylic paint
Really large and heavy flower bead caps (holding the candelabra)
Round glass bottle
Wooden Bead 

Thank you for visiting!


Monday, September 5, 2016

Dimensional Travel, or Portal Number 4

 First off, Thanks to Gina at Gypsy Soul Laser Cuts for inviting me to be her guest designer for the month of September! And I'm starting off with something weird and (maybe) thought provoking....

If  such wondrous things as different dimensions of existence were real and a person could travel to them, how would you do it?
How about a Portal? What if you said to yourself, 'Hmmmmm, I think I'd like to have a picnic in the Great Forest of Silverhelme or chat with the folks in the Kraken Nebula?
Wouldn't it be cool to dial a location up and step through a portal with your cute little overnight bag or your picnic basket?
And here's a thought; if heaven exists and everybody's picture is different, maybe 'crossing over' is as simple as picking your favorite reality.
Just putting it out there.......


I started out with the Arch Top Cabinet with Doors (which I love and can see a bazillion possibilities for). I pre-cut the paper for the front outer frame that houses the doors and then I assembled and glued everything together except the doors.
I pre-cut the paper for the doors and set it aside.
To hinge the doors, I used linen book binding tape. For a tutorial on how to do this, click HERE and scroll down to near the bottom of the page.
The paper I chose for the outside of the cabinet is called Double Dot Vintage Gingerbread and you can get it at Alpha Stamps.


After gluing on all the papers and inking edges, I attached these hinges and applied little doodads to fancy them up a bit and added lots of hand painted details with gold acrylic paint.
A spare eyeball, a watch face and a couple of large brass findings I gave a wash of gold to, made a fine and dandy focal for the top of the cabinet.


Open the cabinet doors and I see a universe of possibilities.


Oh! There is somebody there. Is she a tour guide? Your friendly neighborhood bus driver? Or maybe she's riding the portal like you and looking for her stop. Better step aside, this may be it......


I opted to paint the inside of the doors instead of trying to paper doors that were already attached and chose this gorgeous blue as it went well with the nebula I painted in the background. I used GSLCuts chipboard Compass which I painted gold, cut in half and glued to either side of the doors. More hand painted details and some sparkly bits were added to the doors as well.


To make the nebula background, I started off with some water color washes in blues with a bit of pink and yellow thrown in there. Then I added some acrylic high lights to the lighter spaces, which added dimension (Ha. See what I did there?) and texture. And emphasized the lighter spaces, making them appear to be lit up from the back.

The girl with the house on her head is an original drawing I did about a year ago called (very cleverly) 'Girl with a House'. I scanned her into my computer and changed her size to accommodate the cabinet interior. I added lots of watch parts and glass beads to her face to make her look like she's from very far away. The tree represents the Tree of Life to remind folks that no matter where you're from, life is life and not to go pointing your laser gun or vaporizer at a harmless tourist.

List of Supplies:
 Gypsy Soul Laser Cuts
Arch Top Cabinet with Doors
Compass

Alpha Stamps
Double Dot Vintage Gingerbread Scrapbook Paper
25mm Round Antique Bronze Setting
14x10mm Flat Back Oval Eye Cabochons
Mini Fancy Latch Set


Other
acrylic paints
watercolors
gold micro beads
Swarovski flat back crystals
assorted watch parts
brass tree charm


Thank you Gina, for asking me to play with your wonderful products!
And thanks all, for stopping by.

Saturday, September 3, 2016

Haunted Pub Signs

I love the charming signs you see in the UK hanging from the buildings advertising various wares, restaurants and pubs. Most of them are suspended by wrought iron brackets and so many of them are funny, odd and eccentric. My favorite pub in England is in the beautiful and pretty dang old city of York. It's a tiny place in an authentic Norman building constructed in 1180.  (!!!) You wend your way up a very dark, narrow stairway that suddenly opens up into a beautiful and kind of creepy (but smallish) pub that cranks out some of the best food in the city. The beams up there are from a ship that sailed the seas eight hundred years ago.
The place is called The House of Trembling Madness.
Gotta love it.
And the icing on the cake, or the foam on the beer, is that to get to the stairway you have to walk through the most amazing beer shop I've ever seen.
It's a beer drinker's Nirvana.
And they have a really cool sign.
So I started thinking about pub signs as I was playing around with the Round Roman Pediment Tomb as the shape reminded me of the signs hanging like stiff banners down The Shambles in York.
And, no surprise, I'm sure, that led me to haunted pub signs.
Because Halloween is just around the corner.
Halloween is always just around the corner as far as I'm concerned.
Go Halloween.
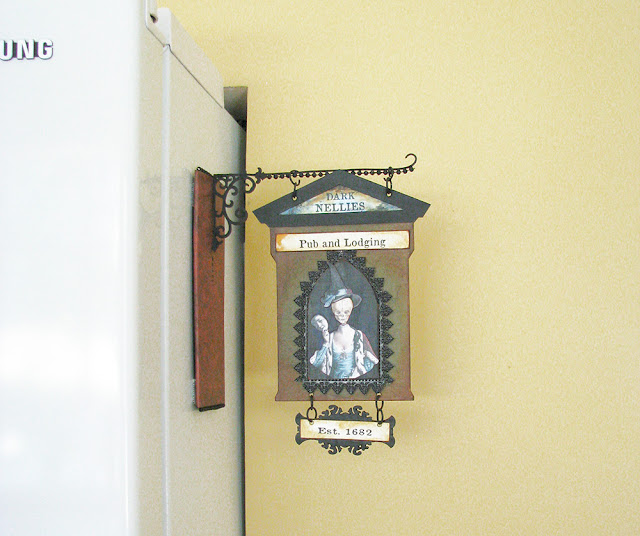
Here are a couple of signs I imagine would give a person a few goosebumps if you happened across one of them on a dark foggy night.......

For those of you that don't happen to have quarter-inch square dowels laying around and a handy drill press, I designed a simpler way to hang a pub sign.


I found some black 12 gauge wire at the hardware store and cut about 18 inches off the spool, bent about 8 inches and put a curl at the end. I bent the rest at a 90 degree angle and then bent that double.


I cut two 3x7 rectangles out of some 8x8 Heavy Chipboard. I opened the doubled bit of wire into a 'v' shape, laid it flat on one of the pieces of chipboard and taped it into place, making sure the hanging part of the wire is perpendicular to the chipboard.
Then I duct taped the two pieces of chipboard together, making a sandwich with the wire inside.
Don't be shy about taping the heck out that sucker. You want it to be really strong! After that, it was just a matter of covering the whole thing in paper and trimming it out with some trims I painted black to look like wrought iron. I used Rust Damask Wallpaper Scrapbook Paper and cut up sections of the  Chipboard Wrought Iron Flourishes Set to use as the L bracket under the hanging wire (and also in the stands).


The trim under the wire is just some scrap miniature Christmas garland I painted black.
To attach the bracket to my refrigerator, I stuck two Command Large Picture Hanging Strips on the backside of the bracket and attached the other two strips LOOP SIDE DOWN to the other two strips, then pealed the paper off of them and stuck the whole thing to the refrigerator. That way, you don't have to worry about getting them to line up.


Now you have a bracket you can hang your haunted pub sign from and the cool thing about this is you can change your signs out for holidays or for anything you want to hang up there!

For a complete supply list, click HERE.


Thank you for stopping by!