Wednesday, January 17, 2018

Snow Queen or Girl Next Door?

Sometimes appearances can be deceiving. Just a glance at this little box and you might think you're looking at a pretty young woman in cute wintery clothing. And that is partly correct. But she's also got a lot of swirling snow around her and is floating a few inches off the ground. Hmmmm.......
More here than meets the eye. More power and strength than what one might see at first glance. Maybe the Girl Next Door really is a manifestation of the Snow Queen? Don't  be deceived by delicacy and a pretty face. She might not Hulk out if you piss her off, but she may have a whole blizzard waiting for those pretty little gloved hands to give the signal and let it rip.
I wonder how many other women out there are snow queens or baba yagas or great warriors in cute purple skirts and stripey scarves?
It wouldn't be prudent to underestimate what you see everyday.
No, sir, not at all.
Just a thought.
I started out with the Shadowbox Lid-Taj Mahal and the 4x6 Shadowbox.(which I forgot to take a picture of)
I used the lid as a template and traced out the paper that would be glued on to the top.
After gluing the shadow box lid, I painted a coat of gesso on the shadowbox and the shadowbox lid in the places where the pieces would not be covered with paper. I then gave it all a coat of white paint.
I also painted the Snowflake Border and the Chipboard Snowflake Shape Set white and messed around with some Copic markers and a few colored pencils to deepen the colors of my ladies outfit.
And while I was about it, I glued the fronts piece paper on and piped all the edges with Stickles Diamond, including the inside edges.
Because glitter.
You can see in better detail on the picture below, where I glittered the edges of the shadowbox and deepened the color on her outfit. She got some glitter as well.
I decided on reflection (of about ten seconds) that I need to glitter all my snowflakes, so I did that. I also glued in the background collage image, but I did not glue it flush to the back of the shadowbox. I felt it was a little too deep for my purposes, so I pulled it forward about half an inch using a couple of layers of foam backed poster board.
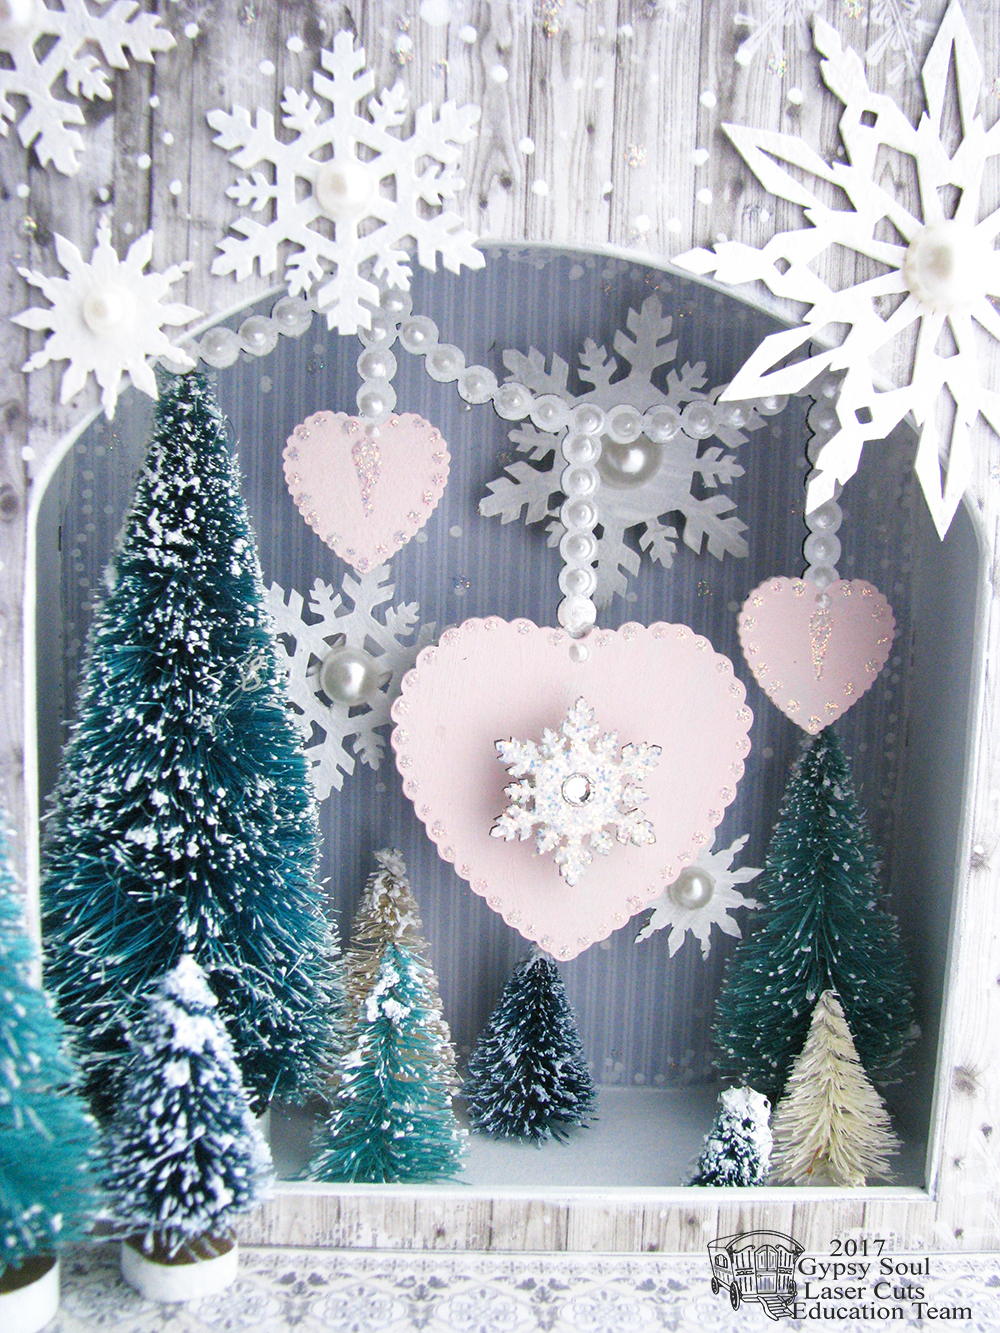
Using the same poster board, I glued my girl in, putting her into the foreground and then used tweezers to place all my snowflakes about mid range inside the shadowbox.
I used a Sharpie Poster Paint Marker to put little snowy dots on the inside and outside of the shadowbox. I cut the Snowflake Border up and used part of it at the top of the shadowbox. (I like it up there....it looks a lot like a crown) And glued the larger piece on the bottom of the box.
I added some scrolly Waterfall Stickles at the base of the crown and little dots of it on the bottom border and the snowflake behind her head.
Try and do that one before you glue it in place. Ahem.
A few extra dot of glitter here and there to look like snowflakes glittering in the light and that's my Snow Queen/Girl Next Door.
A pretty straightforward project and very satisfying to make!
For a link to all the supplies from the amazeballs Alpha Stamps, click HERE!

Supplies:
Shadowbox Lid - Taj Mahal
Chipboard Snowflake Shape Set
Snowflake Border
White Glitter Snowflake Embellishments
White 7/8 inch Satin Ribbon
Diamond Stickles
Waterfall Stickles
Snowy Winter Ladies Collage Sheet
Scrapbook Paper (on the front of the piece) is from Bo Bunny  6x6 Winter Wishes Pad

Other:
Snowflake Shape Set Mini (GSLCuts)
White acrylic paint
Colored pencils and a few Copic markers
Thank you for coming by!


Tuesday, January 16, 2018

I will Always Love You.....

Somethings in life never change. Like a sweet tooth. Chances are, if you started out with a sweet tooth, you'll always have one.
Some of us enjoy our penchant for a decadence a little more robustly than others.
Take me for example...I am never happier than when I have a good book and a box of chocolates.
And maybe a bubble bath.
And possibly a glass of champagne.
And don't forget the massage.

Here's a sweet little valentine for all of us hedonists.
 I started out with a coat of gesso on both pieces of the Reliquary-Arch Top and then painted it white.
You can also see in the picture above the image I chose for my inspiration. She is from a painting called 'La Simplicite' by Jean-Baptiste Greuze (1759) and I've used her a couple of times with a similar theme, mainly because I like her expression, but also because her eyes are looking in the direction I like to place things.
The little cake came from a scrap from a collage sheet by Sandy Gordon.
I cut my background paper (I changed my mind and used green but didn't photograph it) and glued it in place. Notice I didn't cut it to the edge of the back piece. I cut it so that the paper edge would be hidden by the front piece, but small enough so that the paper edge wouldn't show when both back and front are glued together.
Do not glue the front and back together yet.
I cut my image being mindful of edges showing, place it where I liked it and then glued it in, checking to see if the top fits well and no bits that aren't supposed to show are sticking out. Then I glued the top piece of the reliquary on, making sure all the edges of the top and the bottom line up.
I glued my little cake in........
And then started adding the details....like little pink and white dots and sparkly bits. A pretty flower and of course, glitter!
The bottom piece with the sentiment (which was written in Illustrator and then printed on cardstock) is from the Stackable Labels Shape Set which I painted pink, added the phrase, glitter and a couple of flower petals and glued it on the bottom of the reliquary.
I doubled over a white ribbon and glued it on the back to use as a hanger and then glued a pretty flower image on top to cover up the raw edges of the ribbon. I added some pink paint and glitter to the front of the ribbon for a little extra bit of charming detail.

Happy Valentine's Day!

Supply List:
Reliquary-Arch Top
Stackable Labels Shape Set

Additional Supplies
Wite paint Pink Paint
Gesso
Stickles Glitter Glue (Diamond)
Silk Flower
1 Inch White Ribbon
Collage Image (cake)
Aleene's Fast Grab Tacky Glue
Pink Heart Glitter

Thank you very much for visiting!
Lora Mahaffey for Gypsy Soul Laser Cuts

Tuesday, January 2, 2018

A Valentine for Winter

I love winter.
I know there are lots of folks who don't like it one bit and that is okay.
For me, winter has always been magical and a little bit mysterious. I love the beauty of a snowfall, the glistening and sparkling that happens on a calm moonlit night.
The dazzling brilliance of a white blanketed, blue sky day.
Winter sunrises....such beautiful, delicate light.
Snowflakes, brisk air, sleeping forests.
It's also a time of great creativity. The tasks of summer are all done until the next season. Everything is at rest and there is time to turn inward and let all those creative sparks grow into ideas and visions.
In the heat and loud fecundity of summer, I dream of the coldest, quietest season.
Here is a little offering for winter.
A valentine.
 This project began as a Half Scale Arch Front Room Box.
I assembled the box, setting aside the arch front. Painted the interior of the box and cut papers for the exterior.
You can see here, I was playing with various bits and decided on mot everything but the clock to add to the piece.
I used the Bead Strand Heart Dangle for the main focal point in the box, painting it a delicate pink and adding pearly details and a little sparkle.
In the picture below, you can see the little dot details I added to the inside rear of the box ( I used a Sharpie Poster paint Marker) and then added snowflakes from the Winter Shape Set and the Snowflake Shape Set popping them up a bit with foam core poster board. I did the same thing with the Bead Strand Heart Dangle, but used more foam core, setting it up closer to the front of the box.
After I got the major players glued down and dried, I attached the arch front of the box and then began playing with the placement of the trees and exterior snowflakes, adding little dots of 'snow' with my marker in the background on the arch front.
I added flat back pearls to the center of each snowflake with the exception of the one in the center of the big heart. That one I covered with glitter and glued a Swarovski flat back crystal to the center.
I glued a white painted candle holder to the bottom, but thought it was a bit too low. I had a tin Jello mold sitting on my desk and impulsively painted it white, turned it upside down and glued it to the candlestick.
Perfect! A little bit whimsical and rustic.
Thank you for stopping by and Happy New Year to all!!

Supplies:
Half Scale Arch Front Room Box
Bead Strand Heart Dangle
Winter Shape Set
Snowflake Shape Set

Additional Supplies from Alpha Stamps:
Retro Bottle Brush Tree Set - Green
Snow and Cocoa Bottle brush Tree Set
Stickles Diamond
Candlestick Holder
Mixed Sized Ivory Flat-Back Pearls

Other:
Bo Bunny Winter Wishes 6x6 Paper Pad
Tin Jello Mold


Monday, January 1, 2018

Happy New Year!

A new year...time for a fresh start and great changes. We are nearly done with the studio!
I am looking forward to many happy hours creating art, teaching art and hanging out with all of my girlfriends in this wonderful space. The champagne will flow!
Thank you all for your support and enthusiasm, I luvs you all!