Wednesday, May 28, 2014

The House of Underwear

Welcome to The House of Underwear! You need a foundation garment, The House of Underwear has got it! Need support hose? Something for a hot date at the library?  The House of Underwear has what you need. And no more hot dressing rooms and mirrors that make your derriere look too big. You don't have to try anything on...the ladies at the House of Underwear do it for you!
That's what I call good old fashioned customer service.

Just a little something with fancy French undies I made for Alpha Stamps. :-)


Ooh, the ladies are peering out the window......I wonder what caught their eye?
A slip showing underneath a hem line?
A sagging stocking?
Did someone pass out from wearing a damn corset?!!


Or maybe it's a handsome window cleaner.
Or a cute pair of shoes.
Oh.
It's the guy delivering the coffee and chocolate croissants.
Wow, the mademoiselle in the center window really wants to be in the middle of everything.
She must like those red petty pants a lot.
Or she really needs a cup of coffee.


C'est la vie.

Supplies List:
12 x 12 Die-cut Chipboard 
Vintage Lingerie Collage Sheet

ATC Window
Large Fleur-de-lis Charm
White Dresden Border Sampler Set
Brilliance Pigment Ink Pad-Galaxy Gold
Glamour and Grunge Scrapbook Paper-Nature Study
Glamour and Grunge Scrapbook Paper-The Old World
Double Dot Decaf Scrapbook Paper
Room with a View Collage Sheet
Liquid Pearls White Opal
1/2 Inch Paper Roses
(in various colors)
Various Copic Sketch Markers from the
Pale Pastels
and
Floral Favorites-2

Additional Supplies:
Small craft Jewelry Boxes
White Acrylic paint

Mini Tutorial on making window boxes below......

To make the wee window boxes, I started with a small craft jewelry box just large enough so that the lid of the box fits over the window, which is ATC size.


Turning the box on it's side, measure to how far you want your window boxes to stick out. I have this little ruler that is pretty skinny and used that to measure with. About 1/2 inch is what you'll need.


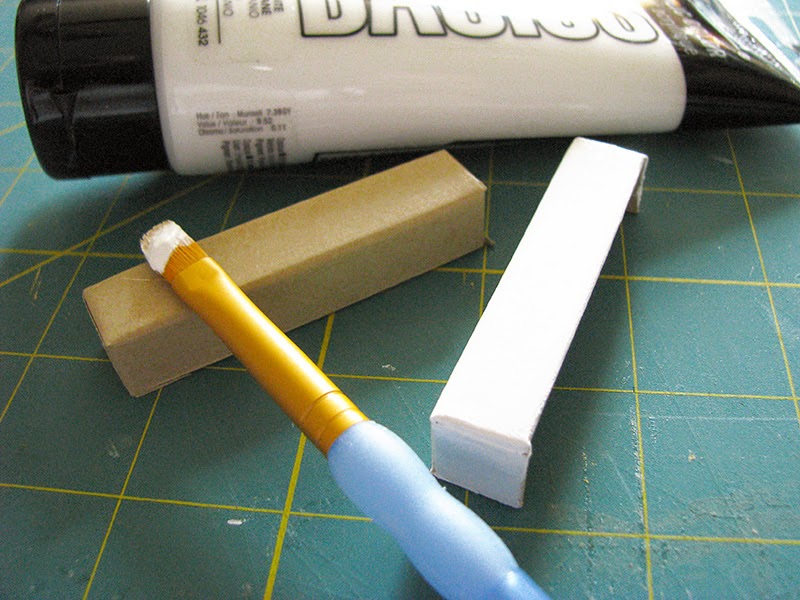
Cut the sides of the box first, then lay the box flat. Using a straight edge, cut the body of the box. Or you can draw a guideline and use a pair of scissors.


Paint your window box whatever color you like. I chose white for mine. while it was drying, I cut a little piece of styrofoam to fit inside the box, and I painted some Dresden trim white and glued that on  to the front of the window box. I did kind of let that dry as well, but I'm not very patient!


I used some inks to give the piece a little age.
I chose 1/2 inch paper roses for my window box. The paper roses have wire stems and I cut them to about an inch and a half and folded the stems double and stuck those in the foam after putting a dab of glue on the underside of each flower.
After everything dried completely ( I had to find another project to do so I wouldn't mess with this one!) I glued the window box under the window and Voila! Easy peasy.


There is the mademoiselle in red again.......

Thanks for visiting!

Wednesday, May 7, 2014

My Garden

It's an enchanted space that has always called for attention. I plant, weed, trim and water. I cajole and nurture plants I rescue from the hardware store. I defend them against predators and welcome ladybirds, praying mantis, bees, little birds and anything else beneficial to the garden to come and live there.


Freddie was born in the garden and it is his favorite place to be.


Right now, the early foxgloves are opened, the Lady Banks Rose is nearly past her bloom, shedding delicate little rose petals that look like sulphur butterflies.


The clematis, such a Vegas show girl, is displaying her fancy plumage.


Spring is so glorious here in the south and it's only the beginning!

Monday, May 5, 2014

My awesome friend Kathie Vezzani is doing a workshop!

While I was at the Art is...You retreat in Petaluma, California last year, I met an extraordinary and creative woman called Kathie Vezzani, a mixed media artist, passionate teacher and one very clever cookie!
She's a magician with plaster and wax and I'm very excited to announce her two week on line course called,
Plaster and Wax 101
portraits illuminated from within

And don't worry! If you don't know anything about encaustic wax and plaster, this is a beginning course, as the name implies, and we'll be in good hands. (Yep, I'm taking it too!) Kathie will guide us through the basics of working with both mediums, sharing her skills and humor in equal measure.
Plaster is an ancient medium that was used as the ground for the wonderful frescoes painted throughout Europe. It's luminous, yummy surface is the perfect place to paint our own creations.
Kathie will go over the basics of how to paint a 'pretty face' then she steps out of the box and shows us that we needn't conform to the rules. Yay!
She'll guide us through the steps of using layers of encaustic wax to make our paintings glow, adding oil paint to soften edges and add color.
This has so many possibilities for those of us who like to layer and distress. I'm looking forward to exploring ways to add to my mixed media skills and giving my imagination more language/tools to use.

This is a two week long online course and will be available for one full year, so you can learn at your own pace (I'm messy and a slow mover, so for me that translates into 'make a mess at your own speed'.) and begins;

May 19th!

Kathie is teaching her course online at Jeanne Oliver's great site 'Musings of a Creative Life' and you can get all the information you need to sign up HERE.

So come along with me and share an adventure!
I'll be blogging about my progress from time to time (I did say I was a slow mover) so look for some posts here as well.