Saturday, December 4, 2021

Twinkly Little Houses

 For your viewing pleasure, a wee village of small twinkly houses!

Thanks to the folks at Alpha Stamps for all the juicy glitter, bits and bobs and gorgeous papers!

Great little houses to decorate the center of my table this year. I want to mention that all the roofs lift off and those LED candles fit right inside. Because I am such a crap picture taker, I couldn't do the warm glowing windows justice when the candles were lit inside the houses so today they are shining on the outside. Perhaps trying to attract a Christmas gnome or two....

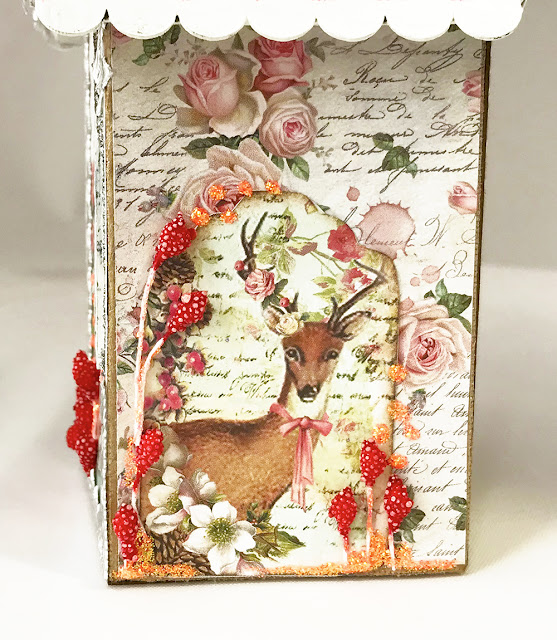
A detail of the house above....


The construction of the houses is not complicated, but it's a bit fussy until you figure it out. My solution was to pre-fold all of the dotted guidelines on each of the houses, burnish the lines down with the round edge of a burnishing tool (you could use something like the rounded bit of a Sharpie marker) and then straighten them all back out again. If you do that, you're not struggling with trying to get that line definition after you glue your papers on.

Since all of the houses are the same widths, the only difference is in how tall they are. That made it easy to cut papers. You only have to make one template...just make it from the tallest house and you can adjust the heights of the shorter ones thereafter.

After the papers are glued on the house sides I used the windows as templates and then cut them out using a scalpel.  A good exacto with a new blade works as well.


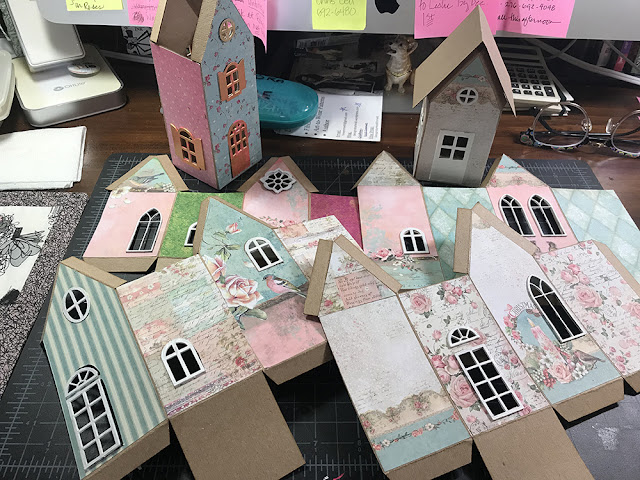
 In the picture below, you can see how all the houses are pre-folded, papers glued on after that and then windows and doorways glued in as the next step. (I painted all of mine white and glued them in after they dried)

Now you can glue the house 'box' together. Do that with all of them and set them aside to dry. Time to go on to roof shingling!

I love shingling little roofs. It's easy and when you are done they look wonderful. Just remember a couple of things....start at the bottom and work your way up to the top and alternate how you put the shingles on so they don't all line up. If you look at real roofs the shingles are never lined up. And neither are bricks on a house. 

Do the shingles on one side of the roof until you get to the fold line, turn it around and do the other side. Don't worry that they don't line up at the edges, you will fix that later.

Let the glue dry, turn your roof over with the shingles facing down, and using a sharp pair of scissors trim the edges down to the length you want them to over hang.

At this point you can paint your roof and glue it on your house if you like, but because I want to be able take my roof on and off so I can put tea lights in the houses, I am going to glue the 'Roof Trim for Tall houses' on to the gable ends of my roof. This will not only make it sturdy, the roof trim is at the correct angle for the pitch of the gable end of the house and makes it a worry free and strong for popping it off and then easily putting it back on again.

Below is a picture of the houses glued up, the roofs all assembled , everything ready for extra painting, details and trims!

More pictures of finished houses...you can see the many possibilities for decorating both the roof and the houses. Because I mostly used Stamperia's 'Pink Christmas' papers it was easy to choose colors to go with them regarding paint and doodads. 

A few of the papers I used like the stripe you see above (that is a G45 piece), were out of my scrap pile and were chosen for their color compatibility and to change up the textures a little. The back side of the 'Vintage Dot' paper from Bo Bunny was also used, but it's not necessary.

I even used the back of an old Christmas card on one side of a house just because I loved the pattern and the colors looked so pretty with the Pink Christmas paper.


I love this piece of paper. How cute are those squirrels?!! The German glass glitter adds so much texture and sparkle.


For a link to all the wonderful supplies used click HERE!

Thank you very much for stopping by!

Saturday, September 25, 2021

I think it was a mushroom party, but I don't remember.......

 Here are some wild and crazy fairies having a little fun with fungi. Thank you  Alpha Stamps for all the lovely goodies!


Front is the image above. The back image is below.

What's really fun about this is that all the pieces are built separately and can be moved into all different configurations. There are little tiny wooden cubes glued to the mushrooms and on the grass to hold them up. You can move stuff to a mantle or centerpiece on a table...lots of ways to play! Here is a slightly different arrangement....

Wow, those little Brownies really know how to party. Some fancy witch looks like shes flying in to join in the fun.

This was a great project that I especially enjoyed as I do like to move things around and play with my crafty little projects. See the supplies list below for the stuff and a tutorial on how to paint the mushrooms. It's easy peasy!

Click HERE to shop for all the goodies!

SUPPLIES:

4x4 Mini House Room Box
Graphic 45 Midnight Tales 8x8 pad (I've got something from just about every page on this piece)
2 - Wonky Mushroom Set
2 - Grass & Mushroom Border - 12 Inch
Fleur Dresden Borders Black
Zig Zag Dresden Borders Black
Tiny Paper Roses Orange  
Wooden Candle 

Additional Supplies:

Golden Fluid Acrylics, Liquitex White Gesso, Liquitex Matte Medium, 1/2 wooden cubes

How To Paint A Mushroom Or Two.....

It's easier than you think! Give it a go!

I started out giving the Wonky Mushrooms A nice coat of gesso. I didn't worry too much about seeing a bit of board underneath as I used a good paint with high pigment. After it dried I brushed matte medium over them and drew a pencil line delineating the underside of the mushroom.

And yep, the surface I'm working on top of is indeed a puppy pee pad. They are great for soaking up accidents (from paint pot spills) and for wiping excess water and paint from my brushes. You can see from the picture how much I've used this one. I save a lot of waste on paper towels and they offer good protection to the surface underneath.

Nest step is I used raw umber and a bit of water for the first coat of the stem and underside of the mushrooms.

I kind of squooge the paint around with my fingers some. This does not have to be perfect. Trust that it will all work out in the end. Just keep going. 

Next step I used some pthalo green and cad yellow to paint the smaller mushroom cap on the left and some  anthraquinone blue to do the cap on the right. there was a little bit of the green mix left on the brush and that's where the light green comes from (Lora didn't rinse her brush properly) but it looked cool so I left it.

Next I picked a bit of the umber up and darkened the underside of the 'shrooms and used a bit to define the fringey bit the you see sometimes coming down from the top of the stem and then brushed

it downward on the stem to create a bit of a shadow. Feel free to use your fingers if you get the urge. I do all the time. Now, using some white paint, I put a light coat on the fringey bit to start giving it some definition from the rest of the stem. I used the white brushing it from the bottom to nearly the touch the bottom of the mushroom cap but not quite.

Using a bit more umber, I delicately painted in some cracks in the mushroom fringey bit, on the bottom of the stem and a wee bit on the cap itself on the bottom edge.

I added some more shading on the cap underside, underneath the fringey bit and started adding some spots.

I continued to tweak the shadows a bit more, added spots to the bigger 'shroom and added a bit more white to the bottom of the fringey bit to make it stand out more. I let all of this dry for a few minutes and ten with a wee bit of watered down umber I carefully added a bit of shadow to the right sides of all the large spots I painted in.


After you do a couple of these and get the feel for it, you'll be be painting crafty mushrooms like a pro. Don't be harsh on yourself the first time you try this. Nobody ever does a thing perfectly the first time. Just have fun with it and don't give up! 

Let everything dry and give it a coat of matte medium or varnish. I use Liquitex glossy varnish, but matte medium will be just fine for this application. 

Thank you very much for dropping by. Have fun painting!


Wednesday, December 2, 2020

It's a banner! It's Tags! No wait, it's Ornaments!

 Howdy everyone! Getting into the Christmas spirit and doing a thing for the good folks at Alpha Stamps!

So, what is it? All of the above. I designed these tags so that they could be attached to garland or a stout ribbon and hug on anything that needs a bit of spiff. Hang the whole thing on your mantle or in a window, Christmas tree or door. Or divide them up and and hang them on your tree as ornaments, tags for a gift, anything you can think of. They are pretty enough to be the gift themselves. Hey, make a few pairs of really big earrings!


Here are a couple of groupings.....


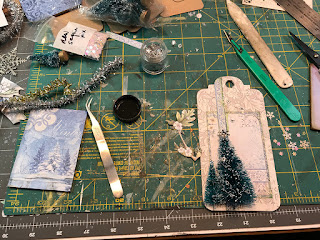
This is a pretty straight forward, easy project that I had a lot of fun with. Here is where I started...


I had numerous sized tags from which to pick and I chose these large tags (6x3 inch) and the 4 1/2 x 3inch tags because I liked the amount of space they had for the images I wanted to use. And by the way, I love the papers I had to play with. It is Stamperia's Winter Tales and it is gorgeous, so go over to Alpha Stamps and get some! I think i may have used elements from just a bout every page of the 8x8 stack and a lot of the background strips from the 12x12. Love it!

So anyway, I used the tags as templates and cut out all of my background papers front and back for every tag. Then without a concrete plan other than the fact that I was pretty sure about what primary images I wanted to use, I started composing the pieces.


Some things stayed and some went, but I wanted to use some three dimensional elements and I love bottle brush trees, so I cut the stands off and using a pair of scissors, I cut the backs of the trees off so they would lie flat for gluing. Take my word for it, hold them over a trash can. Please. Just sayin'.

After I glued all the background papers on the tags, I cut out some trees and glued them on this tag. I tore some paper in a dark blue and glue that on top of the tree layer. Lots more dimension already!

I wasn't happy with the way the trees faded into the background so I painted matte medium over the tag (I used Liquitex, but you could use Mod Podge if that's what you have). After that dried, using a watercolor pencil,  I outlined the edges of the trees (not too thick) and gently teased the color out with a wet (but not dripping) brush, letting the color gently fade away.

Using matte medium before you use water on your scrap paper seals moisture away from the scrap paper, keeping it from getting soggy and fragile. And look! The trees have a bit of an Aurora effect. They stand out and it looks pretty.

My fairie girl looks like she wants to decorate the tree so let's go with that! I cut out a strip of patterned paper and glued it on to where the tree will be, you know, more layers, more dimension and it takes your eye to the tree. I used the same watercolor pencil technique around the edges of the the strip, to give congruity to the piece.

I decided I liked the 3D look the fairies wings had without gluing them flat so I gave them a bit of a curl and just glued her body down. 

I glued the tree down. It is sometimes difficult to add tiny ornaments to little bottle brush trees and this tree is only 2 1/2 inches tall. Soooo.....
 

I have a bunch of fancy straight pins with multi-colored pearl balls on the ends. Using a pair of sturdy cutter, I cut off the pointy end (hold it over a trash can and use safety glass if you have them) leaving about 1/4 to 1/2 inch of metal. I dipped them into a puddle of glue and stuck them metal end down into the tree. They stay where you put them, which is a small miracle. After you do this everyting else on the tag is just adding little details like super tiny little iridescent snowflakes, lots of gorgeous German glass glitter and some Stickles glitter glue. I added lots of glittery bits with the idea that if these are used as ornaments they would sparkle and shine on a Christmas tree.

The basic steps I used here apply to all of the tags I made. I hope you give this a go and enjoy making them as much as I did!

For a complete list of all the beautiful, lush supplies I used from Alpha Stamps, click HERE

BUT WAIT! THERE'S MORE!

A Mini Tutorial on using watercolor pencils or in this case, Derwent Ink Pencils.

Both watercolor and ink pencils can be used, just play around and see which ones you prefer. I used a watercolor pencil on the Fairie tag above and these poinsettia tags were 'enhanced' with ink pencils.

Here's what I did.

This is so easy and so fun! First I put a nice coat of matte medium on the whole sheet of scrapbook paper. I like using Liquitex Professional Matte Medium, but you can use Mod Podge if it suits you.

Using a bit of the same kind of paper I will be using for the tags, I played a bit with some colors to see what I liked and how the pencils reacted to the paper. I chose my colors ( fucshia, cad orange medium, red violet, spring green, yellow green and sap green). This experimentation allows you to get used to how the pigments react to water (if you have never used watercolor pencils before) and see how the colors will look on the 'good' piece of paper you will be using without worrying about messing it up. Remember, art and creating should be a source of joy and fun, don't take it too seriously and don't worry about making mistakes. That is how we learn! Make a mess and keep going, you will improve with experience and experimenting!

This is what I put on my paper....I just roughly colored in a bit of the petals using a couple different colors and then using a wet paint brush (not drippy..swipe your brush over a paper towel -  it will help you control how much water you have on your brush. You will adjust to how much water you need on your brush to get the effect you want.

If you look at the flower on the bottom left side, you can see where I roughed in some color and am ready to use my brush to blend the color out toward the pointy outside of the petal. I did not color in the whole petal because the pencil color goes a long way! Better to start with too little than too much. Pretty soon you will be adding color and blending with confidence. 

After the flowers dried, I cut out what I wanted to use and proceeded to the steps in the fairie tag tutorial. It really is easy and I promise you, you will get better and better!


Remember, have fun! Don't forget the glitter!

Everyone stay safe. Thank you so much for dropping by!

Another surprise quickie step-by-step......


Tuesday, August 18, 2020

An Old Favorite, by Request

Revisiting an old favorite, by request. For the complete tutorial, click HERE


Monday, August 3, 2020

Little Summer Tag

One of the things that has sustained me in this crazy time we are living in is my garden. No matter how nuts and turned upside down things are in the world, things are as they should be when I am working in my garden.
This little tag is a small token that reminds me of what a special place a garden is and what peace and solace we can derive from them.
Perhaps you have a garden of some kind that has helped you as well. Make a little tag like this and stick it in your book or in your car our hang it near your desk to remind you that the garden will always be waiting for you.

In this piece I used four elements from Gypsy Soul Laser Cuts:

Here is where I began...
I glued the Tiny Bird House together and gave it a coat of white primer.

Using the smallest tag from the Stagger Tags set as a template, I cut the paper for the front and back and glued them on. I sanded the edges and inked them up with a little gold ink and a little Ranger Vintage Photo ink to give the piece a little bit of age.
I cut out the elements that I wanted to use in the collage composition.
Often these bits and pieces change as I go along, but this time they stayed pretty consistent.

I glued the portion of the Wrought Iron Set I wanted to use to the tag. (see above photo)
I then aligned the center of the window with the larger bit of the center of the scroll, which is to the right of the tag and glued it down. The flowers I butted directly against the window and glued them down.
I decided to paint the birdhouse green and after giving it about thirty seconds to dry (I hate waiting) I glued that at the bottom center of the window.
After the main elements were in, it was a matter of adding extras like the blue floral banner (which I glued on next) and the tiny paper flower buds.
I added little details to the bird house and dots of white acrylic paint.
I do love dots.
I also added micro beads by using white glue and a needle to guide the glue where I wanted it to go and then gently shaking the beads on the piece, thus allowing them to stick only where the glue was placed.
A pretty white paper flower and a bright green ribbon are the final touches to this cheerful little thing!
Hope you enjoy making your own!
Thank you for stopping by!
Additional Supplies:
Bits of scrap from Stamperia's Glory of the Garden
Grass Green Mocro Beads
White Acrylic paint Pen (I used a Sharpie Poster Paint Pen)
Paper Flowers
Ribbon