Saturday, December 4, 2021

Twinkly Little Houses

 For your viewing pleasure, a wee village of small twinkly houses!

Thanks to the folks at Alpha Stamps for all the juicy glitter, bits and bobs and gorgeous papers!

Great little houses to decorate the center of my table this year. I want to mention that all the roofs lift off and those LED candles fit right inside. Because I am such a crap picture taker, I couldn't do the warm glowing windows justice when the candles were lit inside the houses so today they are shining on the outside. Perhaps trying to attract a Christmas gnome or two....

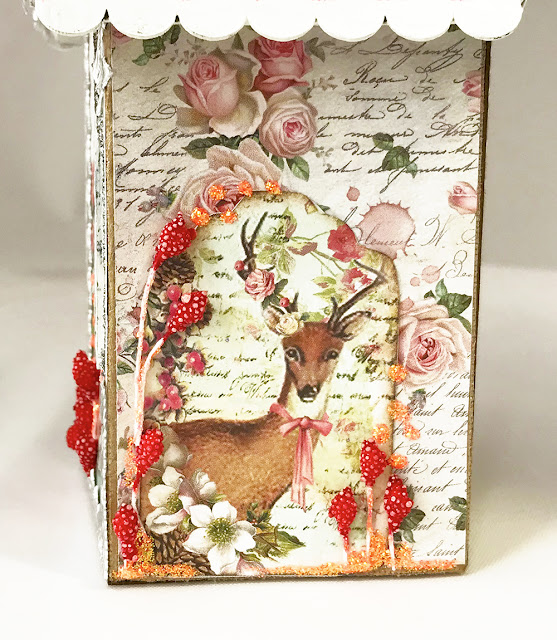
A detail of the house above....


The construction of the houses is not complicated, but it's a bit fussy until you figure it out. My solution was to pre-fold all of the dotted guidelines on each of the houses, burnish the lines down with the round edge of a burnishing tool (you could use something like the rounded bit of a Sharpie marker) and then straighten them all back out again. If you do that, you're not struggling with trying to get that line definition after you glue your papers on.

Since all of the houses are the same widths, the only difference is in how tall they are. That made it easy to cut papers. You only have to make one template...just make it from the tallest house and you can adjust the heights of the shorter ones thereafter.

After the papers are glued on the house sides I used the windows as templates and then cut them out using a scalpel.  A good exacto with a new blade works as well.


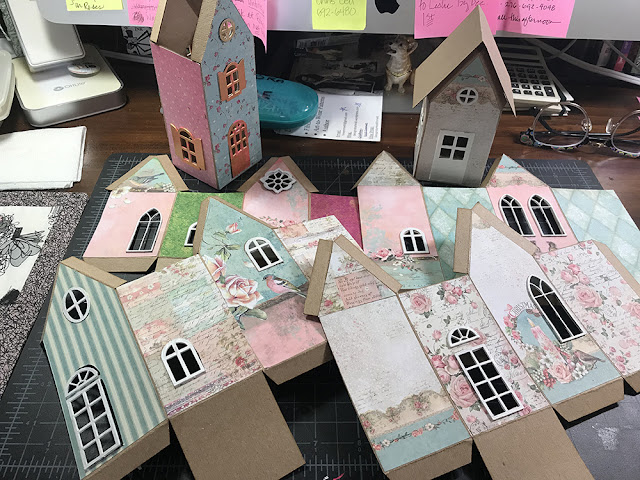
 In the picture below, you can see how all the houses are pre-folded, papers glued on after that and then windows and doorways glued in as the next step. (I painted all of mine white and glued them in after they dried)

Now you can glue the house 'box' together. Do that with all of them and set them aside to dry. Time to go on to roof shingling!

I love shingling little roofs. It's easy and when you are done they look wonderful. Just remember a couple of things....start at the bottom and work your way up to the top and alternate how you put the shingles on so they don't all line up. If you look at real roofs the shingles are never lined up. And neither are bricks on a house. 

Do the shingles on one side of the roof until you get to the fold line, turn it around and do the other side. Don't worry that they don't line up at the edges, you will fix that later.

Let the glue dry, turn your roof over with the shingles facing down, and using a sharp pair of scissors trim the edges down to the length you want them to over hang.

At this point you can paint your roof and glue it on your house if you like, but because I want to be able take my roof on and off so I can put tea lights in the houses, I am going to glue the 'Roof Trim for Tall houses' on to the gable ends of my roof. This will not only make it sturdy, the roof trim is at the correct angle for the pitch of the gable end of the house and makes it a worry free and strong for popping it off and then easily putting it back on again.

Below is a picture of the houses glued up, the roofs all assembled , everything ready for extra painting, details and trims!

More pictures of finished houses...you can see the many possibilities for decorating both the roof and the houses. Because I mostly used Stamperia's 'Pink Christmas' papers it was easy to choose colors to go with them regarding paint and doodads. 

A few of the papers I used like the stripe you see above (that is a G45 piece), were out of my scrap pile and were chosen for their color compatibility and to change up the textures a little. The back side of the 'Vintage Dot' paper from Bo Bunny was also used, but it's not necessary.

I even used the back of an old Christmas card on one side of a house just because I loved the pattern and the colors looked so pretty with the Pink Christmas paper.


I love this piece of paper. How cute are those squirrels?!! The German glass glitter adds so much texture and sparkle.


For a link to all the wonderful supplies used click HERE!

Thank you very much for stopping by!

Saturday, September 25, 2021

I think it was a mushroom party, but I don't remember.......

 Here are some wild and crazy fairies having a little fun with fungi. Thank you  Alpha Stamps for all the lovely goodies!


Front is the image above. The back image is below.

What's really fun about this is that all the pieces are built separately and can be moved into all different configurations. There are little tiny wooden cubes glued to the mushrooms and on the grass to hold them up. You can move stuff to a mantle or centerpiece on a table...lots of ways to play! Here is a slightly different arrangement....

Wow, those little Brownies really know how to party. Some fancy witch looks like shes flying in to join in the fun.

This was a great project that I especially enjoyed as I do like to move things around and play with my crafty little projects. See the supplies list below for the stuff and a tutorial on how to paint the mushrooms. It's easy peasy!

Click HERE to shop for all the goodies!

SUPPLIES:

4x4 Mini House Room Box
Graphic 45 Midnight Tales 8x8 pad (I've got something from just about every page on this piece)
2 - Wonky Mushroom Set
2 - Grass & Mushroom Border - 12 Inch
Fleur Dresden Borders Black
Zig Zag Dresden Borders Black
Tiny Paper Roses Orange  
Wooden Candle 

Additional Supplies:

Golden Fluid Acrylics, Liquitex White Gesso, Liquitex Matte Medium, 1/2 wooden cubes

How To Paint A Mushroom Or Two.....

It's easier than you think! Give it a go!

I started out giving the Wonky Mushrooms A nice coat of gesso. I didn't worry too much about seeing a bit of board underneath as I used a good paint with high pigment. After it dried I brushed matte medium over them and drew a pencil line delineating the underside of the mushroom.

And yep, the surface I'm working on top of is indeed a puppy pee pad. They are great for soaking up accidents (from paint pot spills) and for wiping excess water and paint from my brushes. You can see from the picture how much I've used this one. I save a lot of waste on paper towels and they offer good protection to the surface underneath.

Nest step is I used raw umber and a bit of water for the first coat of the stem and underside of the mushrooms.

I kind of squooge the paint around with my fingers some. This does not have to be perfect. Trust that it will all work out in the end. Just keep going. 

Next step I used some pthalo green and cad yellow to paint the smaller mushroom cap on the left and some  anthraquinone blue to do the cap on the right. there was a little bit of the green mix left on the brush and that's where the light green comes from (Lora didn't rinse her brush properly) but it looked cool so I left it.

Next I picked a bit of the umber up and darkened the underside of the 'shrooms and used a bit to define the fringey bit the you see sometimes coming down from the top of the stem and then brushed

it downward on the stem to create a bit of a shadow. Feel free to use your fingers if you get the urge. I do all the time. Now, using some white paint, I put a light coat on the fringey bit to start giving it some definition from the rest of the stem. I used the white brushing it from the bottom to nearly the touch the bottom of the mushroom cap but not quite.

Using a bit more umber, I delicately painted in some cracks in the mushroom fringey bit, on the bottom of the stem and a wee bit on the cap itself on the bottom edge.

I added some more shading on the cap underside, underneath the fringey bit and started adding some spots.

I continued to tweak the shadows a bit more, added spots to the bigger 'shroom and added a bit more white to the bottom of the fringey bit to make it stand out more. I let all of this dry for a few minutes and ten with a wee bit of watered down umber I carefully added a bit of shadow to the right sides of all the large spots I painted in.


After you do a couple of these and get the feel for it, you'll be be painting crafty mushrooms like a pro. Don't be harsh on yourself the first time you try this. Nobody ever does a thing perfectly the first time. Just have fun with it and don't give up! 

Let everything dry and give it a coat of matte medium or varnish. I use Liquitex glossy varnish, but matte medium will be just fine for this application. 

Thank you very much for dropping by. Have fun painting!