

Thursday, December 20, 2018
Site Reno
Now that the studio is finished, I am turning my thoughts towards redoing the blog. Poor thing is looking a bit long in the tooth and could use some changes. Just letting you know this will be happening after the holidays. 2019....new and fresh!

Tuesday, December 18, 2018
Ornament Making Event
Hello everyone! Lora here to share a couple very special days we had here in my neck of the woods!
We had two wonderful ornament making events for children (and grown-ups!) here in Patrick County, Virginia sponsored by The Reynolds Homestead and our own wonderful Gina, owner of Gypsy Soul Laser Cuts. Through Gina's generosity and kindness, we were able to make over 150 ornament kits for kids to put together at two separate events...one was at the Apple Dumpling Festival and the second was held this past week end, A Victorian Open House at the old Reynolds Homestead.
We all had a blast.
Here are some pictures of what went on.
A shot of two of the kits we made and had out at the Festival, ready and waiting for the kids...
 A snowman enthusiast having a good time!
 Working on the details...
 This little boy was so happy to be here. He worked very patiently through one kit after another, making presents for his family.
 The
Victorian Open House was challenged by weather, but we still had a
steady stream of kids and adults who enjoyed making the ornaments. Here
is a great picture of the Victorian ladies decked in their finest, ready
to do tours of the old house. Standing in front of the twelve foot
Christmas tree at the learning center.
The
Victorian Open House was challenged by weather, but we still had a
steady stream of kids and adults who enjoyed making the ornaments. Here
is a great picture of the Victorian ladies decked in their finest, ready
to do tours of the old house. Standing in front of the twelve foot
Christmas tree at the learning center.
 Lots of folks making ornaments.
 One of the Victorian ladies taking a break from house tours and the rain, making an ornament.
 A little girl and her grandma making ornaments together.
 The two most popular kits from both events were the Snowman and the Christmas tree.

 Thank you, Gina for helping to make these events so special!
We made kits from versions of these laser cuts:
Winter Snowman Banner
Gingerbread Family Shape Set
Christmas Shape Set
ATC Shrine Box
Thank you for stopping by!
We had two wonderful ornament making events for children (and grown-ups!) here in Patrick County, Virginia sponsored by The Reynolds Homestead and our own wonderful Gina, owner of Gypsy Soul Laser Cuts. Through Gina's generosity and kindness, we were able to make over 150 ornament kits for kids to put together at two separate events...one was at the Apple Dumpling Festival and the second was held this past week end, A Victorian Open House at the old Reynolds Homestead.
We all had a blast.
Here are some pictures of what went on.
A shot of two of the kits we made and had out at the Festival, ready and waiting for the kids...


We made kits from versions of these laser cuts:
Winter Snowman Banner
Gingerbread Family Shape Set
Christmas Shape Set
ATC Shrine Box
Thank you for stopping by!
Tuesday, December 11, 2018
We've come a long way.......part one.
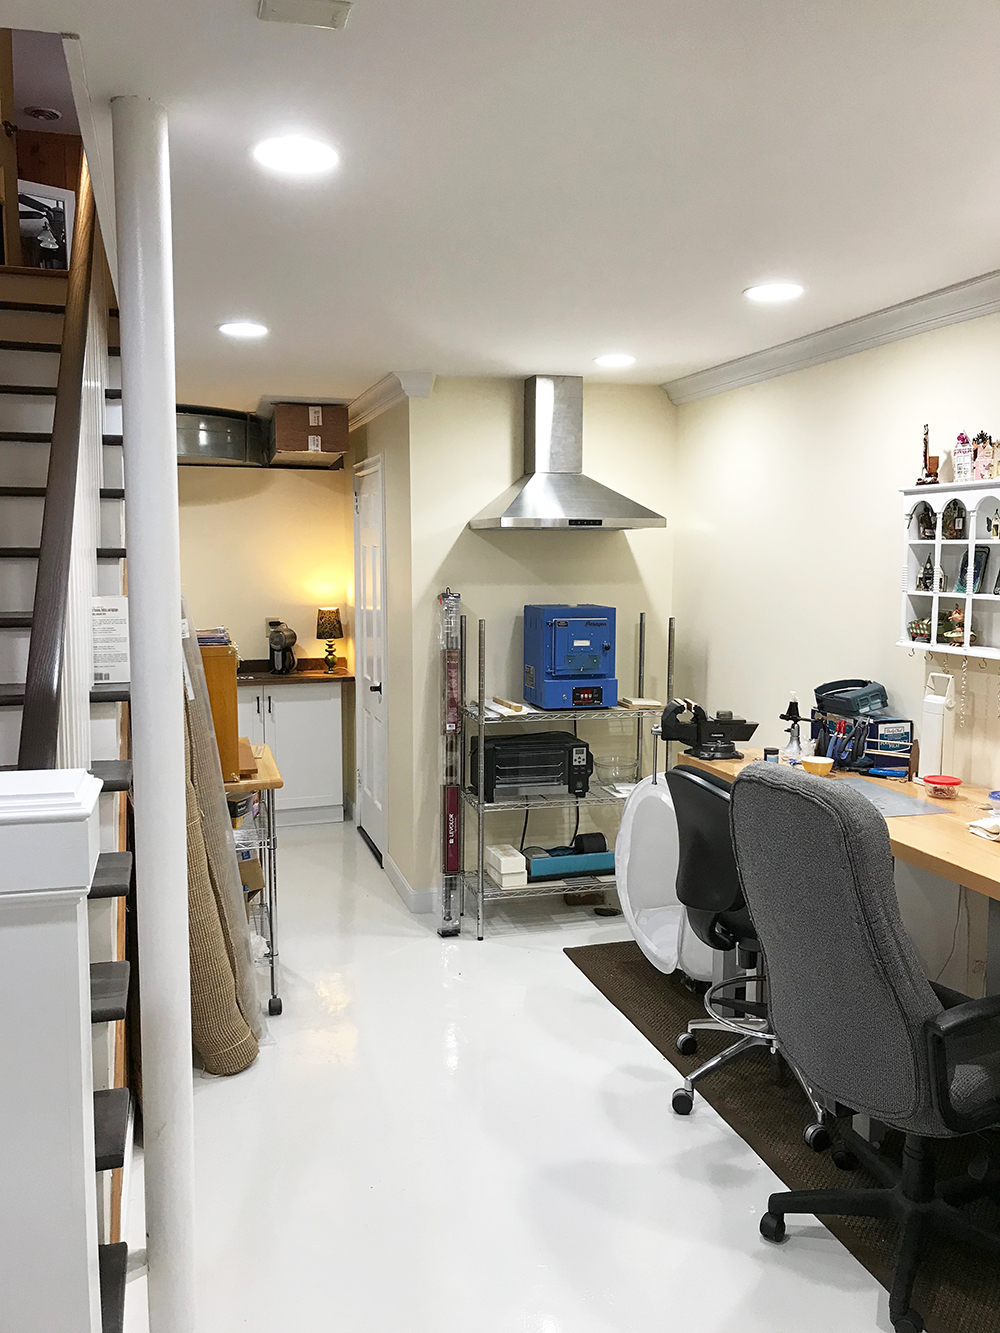
My studio is pretty much finished with the exception of a few minor details and I'm moved in! So very happy in this beautiful, creative space and I want to thank my uber wonderful husband who has mad skills, fortitude and tons of patience. And our fabulous contractor Ron, who breathed fresh life and confidence into what was once an overwhelming and discouraging project. Ron, we can't thank you enough! You got us back on track and made us feel that we could do this. Your hard work, creativity and masterful carpentry took this space over the top and the big bonus is we count you as a friend. Thank you, Thank you.
A few before and after pictures.
This is the north (ish) facing wall looking into the back garden and our woods.
Before:
 After:

This was taken standing with my back to the north (ish) wall facing the the other side of the studio and the stairway leading to the upstairs hall.
Before:
 After:

Standing in the doorway of the studio looking at the basement hallway.
Before:
 After:
 I was not kidding when I said this is my happy space. Somebody pinch me!
I'll post more shots soon with some details and explanations of some of the things that make this space personal and special.
Thank you for coming by, it means a lot to me!
A few before and after pictures.
This is the north (ish) facing wall looking into the back garden and our woods.
Before:


This was taken standing with my back to the north (ish) wall facing the the other side of the studio and the stairway leading to the upstairs hall.
Before:


Before:

I'll post more shots soon with some details and explanations of some of the things that make this space personal and special.
Thank you for coming by, it means a lot to me!
Tuesday, December 4, 2018
Little Christmas Tags
Hello everyone and Happy December! Here I am playing with the adorable Small Tag Set for Gypsy Soul Laser Cuts.
These are so cute and perfect for adding that sweet final touch to a special gift.
They come in a set of 10, so there are lots to play with and if you only use a few, you'll have some for gifts later on.
I decided to use five for tags and save the other five for special Christmas ornaments I want to make later on for my tree.
 Here is where I began...
I used the tags as templates for cutting my paper. There are three different shapes, so be mindful of that as you cut your paper.
 I glued the papers on front and back and set them aside. Whilst they were drying, I painted the Punch Elements Deco back pieces white and let them dry.
 I inked the edges of the tags and around the edges of the Deco label backs with gold ink.
I used Brilliance Galaxy Gold, but you can use whatever ink you like best.
Then, using a 1-inch hole punch, I cut out the birds and a poinsettia for the top circle bit of the Deco label and glued them on.
 I
cut strips of paper from the Nordic Greetings scrapbook paper page from
Graphic 45's Winter Wonderland and glued it down the center of each
tag, poked the holes through each tag top and glued on the completed
Punch Elements Deco labels.
I
cut strips of paper from the Nordic Greetings scrapbook paper page from
Graphic 45's Winter Wonderland and glued it down the center of each
tag, poked the holes through each tag top and glued on the completed
Punch Elements Deco labels.
 I added a lot of glitter.
Mostly because I can.
 I added green ribbon and a pretty gold bead to each tag.
A simple project that adds a lot of impact to a special present!
SUPPLIES
Small Tag Set
Punch Elements Deco labels
Graphic 45 Winter Wonderland papers
Ribbon
Beads
White acrylic paint
Stickles Glitter Glue in Christmas Red and Lime Green
Thank you for visiting!

These are so cute and perfect for adding that sweet final touch to a special gift.
They come in a set of 10, so there are lots to play with and if you only use a few, you'll have some for gifts later on.
I decided to use five for tags and save the other five for special Christmas ornaments I want to make later on for my tree.

I used the tags as templates for cutting my paper. There are three different shapes, so be mindful of that as you cut your paper.


I used Brilliance Galaxy Gold, but you can use whatever ink you like best.
Then, using a 1-inch hole punch, I cut out the birds and a poinsettia for the top circle bit of the Deco label and glued them on.


Mostly because I can.

A simple project that adds a lot of impact to a special present!
SUPPLIES
Small Tag Set
Punch Elements Deco labels
Graphic 45 Winter Wonderland papers
Ribbon
Beads
White acrylic paint
Stickles Glitter Glue in Christmas Red and Lime Green
Thank you for visiting!

Subscribe to:
Posts (Atom)