Hello everyone, Lora here for Gypsy Soul Laser Cuts.
Beatrix Mellifera likes honeybees.
A lot.
And they like her.
She draws them, studies them, talks to them and generally looks after their well being.
She
cultivates their favorite flowers and fusses over them when it gets
cold and shoos away naughty insects that might do them harm.
She is a great friend and guardian.
She's a little quirky, but aren't we all?
She has lots of personality and if you ask about bees, she can talk about them for a very long time. And she has great hair...
I began with the Art Doll Nicho (which is coming to the store soon).
I glued down the inside folds of the box and clipped them together until the glue set.
NOTE: the flaps are not glued down, just folded in to help the clips hold the wet gluey bits.
Next,
I painted the inside of the box cream and aged up the corners a bit
with some brown ink using a Q-tip and cut the papers front and back
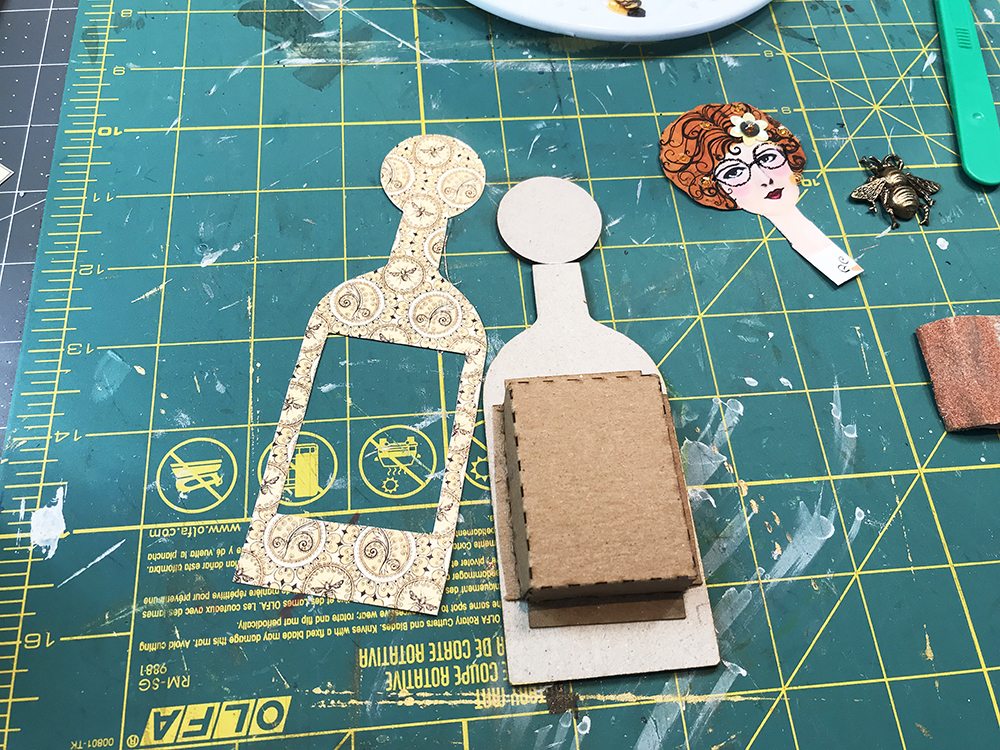
using the nicho as the template. Notice that when I cut the back paper, I
included the circle (head). I did this to give added strength to the
piece when I glue the collage sheet face onto the circle.
In
the picture above, I glued the box on to the backside of the nicho,
painted the side of the box cream and inked it up a bit to give it a
little patina. After it dried, I dry fit the paper on to the back,
pushing it over the box carefully, adjusting the fit as needed. I
carefully removed the paper after I had a good fit, added glued and
stuck it down.
I
glued Beatrix' head on and then the front papers. I added bits of
cotton lace around the nicho opening and gave her a pretty lace collar. I
attached the brass bee to a small cork and did the same with some of
the sequin flowers, cutting the corks to different heights to give
things depth.
I
put the flowers and little bits of glitter and sequins in the box
before I added the bee. That made it a lot easier to add or subtract
detail without having to work around a big object.
I
made a little skirt out of leftover paper and arms and legs for Beatrix
from a collage sheet (you can get this or something similar at Alpha Stamps)
I stuck a command strip on the back of the box to attach her to this pillar. You can do the same thing anywhere in your house.
A little lace, glitter, sequins and a pretty bee....... you can't go wrong!
Thank you for stopping by!
SUPPLIES:
Art Doll Nicho (coming soon!)
You can get the Art Doll Nicho HERE
Additional:
Acrylic paint
Graphic 45 Olde Curiosity Shoppe paper (HERE)
Collage sheet
Tea stained lace
Sequins
Glitter
Showing posts with label Graphic 45. Show all posts
Tuesday, March 26, 2019
Tuesday, February 19, 2019
A little dream of spring
Hello all! Lora here for Gypsy Soul Laser Cuts!
I love winter. But with all the bone chilling rain we have had, I admit
I am beginning to look forward to spring. Here is a little dream of
spring.....
I began with the Display Tray Dome.
The Henna Doodles 2
And the Delicate Frames and Ornaments
I gave the front of the dome tray, the Henna Doodles and the Delicate Frames a coat of gesso and then a good coat of white acrylic paint and set them aside to dry.
Using the back of the Dome Tray as template, I cut paper for the front and back side.
It looks pretty already!
I set it aside and started making fun little components for inside each of the frames within the tray. I used the Graphic 45 Flutter papers...perfect for spring.
I played around with the layout until I liked where everything was placed. Some things I used and some I didn't. I have a pretty box I save all the bits and bobs I don't use for another day.
I placed the top of the display tray dome on the back piece and lightly traced around each of the frames to give me some reference on where to glue things down. Then did just that, making sure to adjust things as they fit within the confines of the frame. Then I glued the frame down.
After things dried, I attached the Henna Doodles to the frame and added little details with some Stickles Cosmos glitter glue.
As you can tell in this photo, I used a lot of foam tape to make things pop off the background and give the piece some depth.
Come on Spring!
SUPPLIES
Display Tray Dome
Henna Doodles 2
Delicate Frames and Ornaments
Graphic 45 Flutter Collection
Acrylic paint
Gesso
Stickles 'Cosmos'
Ribbon and bead for hanging the piece
Thank you so much for stopping by!
I began with the Display Tray Dome.
The Henna Doodles 2
And the Delicate Frames and Ornaments
I gave the front of the dome tray, the Henna Doodles and the Delicate Frames a coat of gesso and then a good coat of white acrylic paint and set them aside to dry.
Using the back of the Dome Tray as template, I cut paper for the front and back side.
It looks pretty already!
I set it aside and started making fun little components for inside each of the frames within the tray. I used the Graphic 45 Flutter papers...perfect for spring.
I played around with the layout until I liked where everything was placed. Some things I used and some I didn't. I have a pretty box I save all the bits and bobs I don't use for another day.
I placed the top of the display tray dome on the back piece and lightly traced around each of the frames to give me some reference on where to glue things down. Then did just that, making sure to adjust things as they fit within the confines of the frame. Then I glued the frame down.
After things dried, I attached the Henna Doodles to the frame and added little details with some Stickles Cosmos glitter glue.
As you can tell in this photo, I used a lot of foam tape to make things pop off the background and give the piece some depth.
Come on Spring!
SUPPLIES
Display Tray Dome
Henna Doodles 2
Delicate Frames and Ornaments
Graphic 45 Flutter Collection
Acrylic paint
Gesso
Stickles 'Cosmos'
Ribbon and bead for hanging the piece
Thank you so much for stopping by!
Tuesday, October 2, 2018
The House has Eyes.....
Ever notice that some houses seem to have an extra something? How
often times one can walk into a house and feel the age it has, the
personality it has developed over years of inhabitants, events, lives
passing through it? Who loved it and who never noticed it was present?
I love imagining what stories a house holds, what shaped it over the years.
I made this House Room Box with 4 Cubbies with that thought in mind.
Back view....
I started with the House Room Box with 4 Cubbies.
I cut the intereior paper for the back, remembering to cut out the slots!
I painted the the rest of the interior black and glued the pieces in, starting with the inside, center 'shelves' and then the exterior walls.
After everything dried, I papered the outside of the box and began to glue the shingles on.
I used the Chipboard Shingles-Pointed and worked my way from the bottom to the top.
It took 12 pieces to cover one side - 6 bits with four points and six with five points. I cut them using a sharp pair of scissors. Centering the fist piece with four points and using that as a measurement for trimming the long (five points) after the glue dries.
One side completed and ready to trim.
To trim the shingles, I flipped the house upside down and using a sharp pair of scissors I cut along the edge of the short row of shingles (the four point). It gives you a bit of eaves.
I have tried using a sharp craft knife, but scissors seemed to work best for me.
I painted the roof black and added some Dresden Trim detail.....
I added more Dresden trim on the back and these great silhouettes from the Black Creepy Critters Set (coming soon)
I also painted a wooden candles stick holder black and glued it on the bottom of the house and added more trims for extra details, melted some white birthday candles and glued them on brass findings and stuck them in the house.
after that, it was me just adding lots of little things I have made or collected.
I used Graphic 45 scrapbook papers from the 'Olde Curiosity Shoppe' collection, including the great pair of eyes with the spectacles.
Little stamped brass flowers were added to the places were I didn't want raw trim edges showing. A book I made with a polymer clay cover was placed in the lower right cubby along with some fun bits and pieces including a polymer clay pumpkin. Fun!
SUPPLIES:
House Room Box with 4 Cubbies
Chipboard Shingles-Pointed
Black Creepy Critters Set (coming soon)
Additional supplies
Candlestick Holder (you can get HERE)
Dresden Trim (HERE)
Graphic 45 Olde Curiosity Shoppe Scrapbook Paper
Various brass findings and wee objects
Birthday Candles
Black acrylic paint
polymer clay
Thank you for stopping by!
I love imagining what stories a house holds, what shaped it over the years.
I made this House Room Box with 4 Cubbies with that thought in mind.
Back view....
I started with the House Room Box with 4 Cubbies.
I cut the intereior paper for the back, remembering to cut out the slots!
I painted the the rest of the interior black and glued the pieces in, starting with the inside, center 'shelves' and then the exterior walls.
After everything dried, I papered the outside of the box and began to glue the shingles on.
I used the Chipboard Shingles-Pointed and worked my way from the bottom to the top.
It took 12 pieces to cover one side - 6 bits with four points and six with five points. I cut them using a sharp pair of scissors. Centering the fist piece with four points and using that as a measurement for trimming the long (five points) after the glue dries.
One side completed and ready to trim.
To trim the shingles, I flipped the house upside down and using a sharp pair of scissors I cut along the edge of the short row of shingles (the four point). It gives you a bit of eaves.
I have tried using a sharp craft knife, but scissors seemed to work best for me.
I painted the roof black and added some Dresden Trim detail.....
I added more Dresden trim on the back and these great silhouettes from the Black Creepy Critters Set (coming soon)
I also painted a wooden candles stick holder black and glued it on the bottom of the house and added more trims for extra details, melted some white birthday candles and glued them on brass findings and stuck them in the house.
after that, it was me just adding lots of little things I have made or collected.
I used Graphic 45 scrapbook papers from the 'Olde Curiosity Shoppe' collection, including the great pair of eyes with the spectacles.
Little stamped brass flowers were added to the places were I didn't want raw trim edges showing. A book I made with a polymer clay cover was placed in the lower right cubby along with some fun bits and pieces including a polymer clay pumpkin. Fun!
SUPPLIES:
House Room Box with 4 Cubbies
Chipboard Shingles-Pointed
Black Creepy Critters Set (coming soon)
Additional supplies
Candlestick Holder (you can get HERE)
Dresden Trim (HERE)
Graphic 45 Olde Curiosity Shoppe Scrapbook Paper
Various brass findings and wee objects
Birthday Candles
Black acrylic paint
polymer clay
Thank you for stopping by!
Tuesday, September 4, 2018
Halloween ATC Ticket Journal
Hello everyone, my turn to show a fun project for the awesome Gypsy Soul Laser Cuts!
At this time of year I am all about Halloween.
Well, most of the year I am all about Halloween, but this time of year is full throttle and I transform into a Halloween locomotive, whistle blowing cheerfully and whooshing along.
Today, I've got a little Alice inspired ATC Ticket Journal to show you.
I really like this fun little thing. It's like an accordion book and I do love making books.
Here we go....
I started out with the ATC Ticket Journal.
I cut ten 2x3 inch pieces of scrapbook paper in colors I like and made a little template on graph paper from the curve on the corners of the Ticket Journal, traced them on to my scrapbook paper, cut them out and set them aside.
I reinforced the fold lines of the Journal with linen hinging tape (you don't have to do this if you choose not to) and painted the whole thing front and back, black.
I glued my papers on the Journal, being mindful about making sure they are centered.
Working on the 'back' of the piece first, I cut a strip of ribbon about 18 inches, drew a bead of glue across the center of the end panel (on the left.... that folds naturally so that it is on top when the journal is completely folded).
I centered the ribbon, so that an equal length is on both sides and glued it down, let it dry a bit and then glued down my chosen image on top of it.
I continued gluing down my images on each panel of the back side......
I kept the design simple and clean, let it dry and started working on the front panels,
repeating the process of gluing the images on to each panel, but I added more detail, like strips of pattern and Dresden trim before attaching the actual images on top.
You can see some of the layering in these detail shots.....
And of course, after everything was dry, I went back and added dots for a bit more detail!
SUPPLIES:
ATC Ticket Journal
Graphic 45 Halloween In Wonderland
Bo Bunny Double Dot Vintage Paper in Orange Citrus, Shadow and Bright Green.
Dresden Black Zig Zag Trim (you can get it HERE)
Sharpie White Poster Paint Marker
Black Acrylic paint
Ribbon
Linen Hinging Tape
Thank you for stopping by!
At this time of year I am all about Halloween.
Well, most of the year I am all about Halloween, but this time of year is full throttle and I transform into a Halloween locomotive, whistle blowing cheerfully and whooshing along.
Today, I've got a little Alice inspired ATC Ticket Journal to show you.
I really like this fun little thing. It's like an accordion book and I do love making books.
Here we go....
I started out with the ATC Ticket Journal.
I cut ten 2x3 inch pieces of scrapbook paper in colors I like and made a little template on graph paper from the curve on the corners of the Ticket Journal, traced them on to my scrapbook paper, cut them out and set them aside.
I reinforced the fold lines of the Journal with linen hinging tape (you don't have to do this if you choose not to) and painted the whole thing front and back, black.
I glued my papers on the Journal, being mindful about making sure they are centered.
Working on the 'back' of the piece first, I cut a strip of ribbon about 18 inches, drew a bead of glue across the center of the end panel (on the left.... that folds naturally so that it is on top when the journal is completely folded).
I centered the ribbon, so that an equal length is on both sides and glued it down, let it dry a bit and then glued down my chosen image on top of it.
I continued gluing down my images on each panel of the back side......
I kept the design simple and clean, let it dry and started working on the front panels,
repeating the process of gluing the images on to each panel, but I added more detail, like strips of pattern and Dresden trim before attaching the actual images on top.
You can see some of the layering in these detail shots.....
And of course, after everything was dry, I went back and added dots for a bit more detail!
SUPPLIES:
ATC Ticket Journal
Graphic 45 Halloween In Wonderland
Bo Bunny Double Dot Vintage Paper in Orange Citrus, Shadow and Bright Green.
Dresden Black Zig Zag Trim (you can get it HERE)
Sharpie White Poster Paint Marker
Black Acrylic paint
Ribbon
Linen Hinging Tape
Thank you for stopping by!
Labels:
ATC Ticket Journal,
Cackle and Hoot,
Graphic 45,
Gypsy Soul Laser Cuts,
Halloween,
Lora Mahaffey
Tuesday, May 1, 2018
Summer is icumen.....
Summer is icumen.....an old English round robin song that was going
through my head when I started playing with this sweet Small Trinket
Drawer Stand. Warm sun, sunflowers and butterflies....sweet summer and
all of it's pleasures is icumen!
Here's where I began......I made sure I had the proper pieces in the proper places.
And glued the main body together and then the drawer, securing the drawer with rubber bands for a tight glue-fit.
I cut and glued on my papers: Bo Bunny Double Dot Vintage Citrus on the inside and Graphic 45 Olde Curiosity Shoppe Optical Oddities (the striped side) on the back and sides. The little drawer has a pre-drilled hole for a knob, which makes things easy! I cut a sunflower out of some French Country paper (G45) and centering it on the hole, glued it down and the put my knob on.
I cut some more French Country to fit the Chunky ATC Blanks.
I love these Chunky ATC Blanks! They are super sturdy and come in a set of three. I use them all the time.
I also cut some zig-zag Dresden border to frame out the pretty sunflowers. I printed out the word 'Beautiful' and used an oval bookplate from the Miniature Bookplate Shape Set to frame it and attached it to the ATC. I glued on the borders and attached it to the Trinket box.
So cheerful and pretty!
After painting it black, I glued an element from the Stackable Labels Shape Set
to the top of the back side of the Trinket Box and then glued a great old 'sign' from the other side of the G45 Optical Oddities paper over the Label Shape and then framed out the bottom and top with more Dresden trim.
I like that it looks like an unfurled scroll. I added some more butterflies. While I could have kept going, I decided that less was more and jus added a couple of butterflies to the sides. After giving the whole thing a coat of matte varnish, I call it finished!
I love this color combination. I never get tired of it - orange and black is not just for Halloween!
Though I admit that it does make me miss my favorite holiday.
Thank you for stopping by!
Supplies:
Small Trinket Drawer Stand (coming soon)
Stackable Labels Shape Set
Chunky ATC Blanks
Here's where I began......I made sure I had the proper pieces in the proper places.
And glued the main body together and then the drawer, securing the drawer with rubber bands for a tight glue-fit.
I cut and glued on my papers: Bo Bunny Double Dot Vintage Citrus on the inside and Graphic 45 Olde Curiosity Shoppe Optical Oddities (the striped side) on the back and sides. The little drawer has a pre-drilled hole for a knob, which makes things easy! I cut a sunflower out of some French Country paper (G45) and centering it on the hole, glued it down and the put my knob on.
I cut some more French Country to fit the Chunky ATC Blanks.
I love these Chunky ATC Blanks! They are super sturdy and come in a set of three. I use them all the time.
I also cut some zig-zag Dresden border to frame out the pretty sunflowers. I printed out the word 'Beautiful' and used an oval bookplate from the Miniature Bookplate Shape Set to frame it and attached it to the ATC. I glued on the borders and attached it to the Trinket box.
So cheerful and pretty!
After painting it black, I glued an element from the Stackable Labels Shape Set
to the top of the back side of the Trinket Box and then glued a great old 'sign' from the other side of the G45 Optical Oddities paper over the Label Shape and then framed out the bottom and top with more Dresden trim.
I like that it looks like an unfurled scroll. I added some more butterflies. While I could have kept going, I decided that less was more and jus added a couple of butterflies to the sides. After giving the whole thing a coat of matte varnish, I call it finished!
I love this color combination. I never get tired of it - orange and black is not just for Halloween!
Though I admit that it does make me miss my favorite holiday.
Thank you for stopping by!
Supplies:
Small Trinket Drawer Stand (coming soon)
Stackable Labels Shape Set
Chunky ATC Blanks
Labels:
Cackle and Hoot,
Graphic 45,
Gypsy Soul Laser Cuts,
Lora Mahaffey,
Small Trinket Drawer Box,
Summer,
Sunflowers
Subscribe to:
Posts (Atom)