Tuesday, August 27, 2013

What a little devil!

Yes, I know it's still August and Halloween is sixty two days away. But it's not stopping me from getting into the holiday spirit. And honestly, I've been ready for Halloween since last March.
I love me some Halloween......


Here's a naughty guy and his chubby little demon buddy out looking to cause some trouble.
Maybe they will inspire you to make some early Halloween art. Maybe whilst sipping a glass of champagne. Or a dirty martini. Hic.
The ATC Hutch Kit-Halloween came from Alpha Stamps as did just about all of the supplies used including the devil image which was carefully cut out of the Black and White Halloween Borders
as well as all of the Black Dresden Trims I used. (three different kinds)


And I swear, it was my intention to make that little bead look like a pumpkin, not.......
well, what some people think it looks like. Ahem.


Thanks for stopping by and Happy (early)  Halloween!

Wednesday, August 7, 2013

Mr. Beed attends the Shenanigans


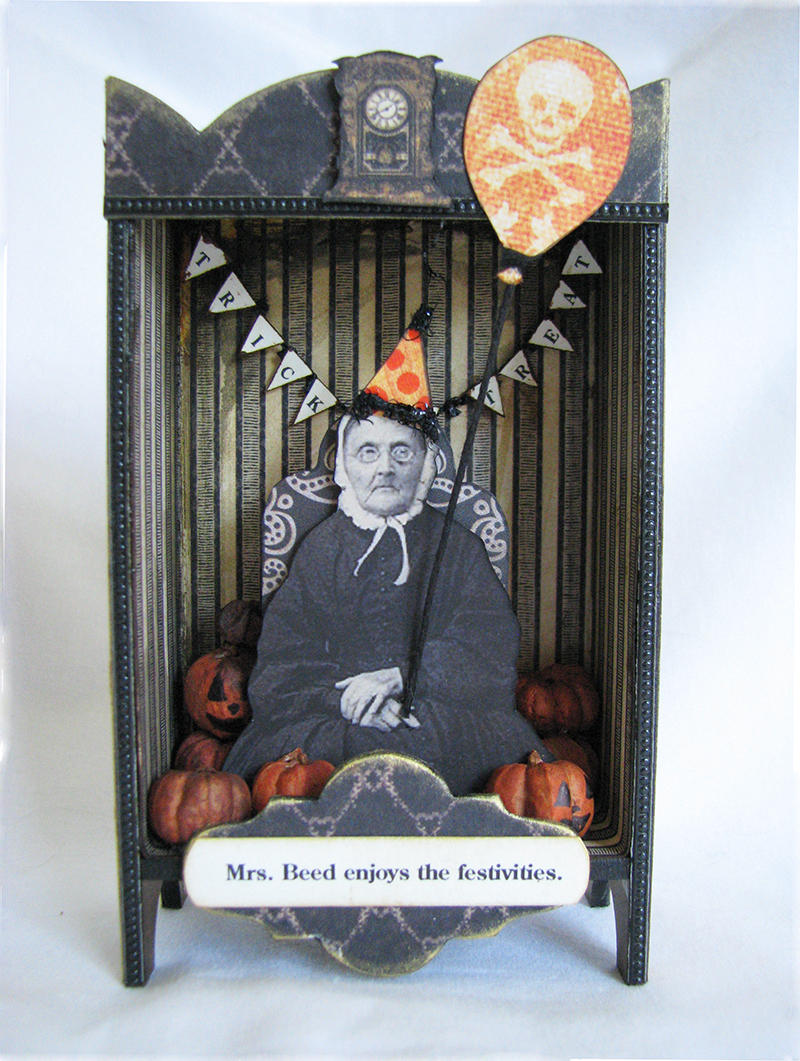
Poor Mr. Beed. He's such a buzzkill at the Halloween party. Time seems to drag by for the revelers waiting for him to take his leave, so the real shenanigans can begin.
Too bad he's waiting for Mrs. Beed, who likes to linger and look disapprovingly at all the carrying on.


Made for the wonderful ladies at Alpha Stamps using the fun (and versatile) ATC Hutch Shrine Kit.
Other supplies available from Alpha Stamps:
The awesome wee pumpkins! Love these! They are actually seed pods that look like teeny tiny pumpkins. I've used these in a number of pieces and they are the perfect size.
Pumpkin Pods
Tiny Dot Border Dresden Trim
Valance Curtain Die-Cut Chipboard
The clocks are actually cut from a 12x12 sheet of G45's Curiosity Shoppe, but a good substitute are these Clock Face Buttons.
They come in two different sizes and I use them a lot.
The little banners are hand made as are the title plaques on the bottom of each hutch.
I used teeny bits of ribbon from the Halloween Fiber Set to trim the hats the Beeds are wearing.
The hats are made from some scrap orange paper and I used a brighter shade of orange Copic marker to give the hats their stripes and polka dots.
I drew balloon shapes on the bit of scrap that had skellies on it, cut them out and attached them with black jute.
The photos are vintage.

And here are the Beeds together....a perfect couple.
Thanks for coming by!


Friday, August 2, 2013

Hatchery

A wee bird and it's nesty place. It lives in Australia now.


Sunday, July 21, 2013

Seaward Pendant

I've been dabbling in PMC for a  year and quite seriously for the past six months.
Everything I've learned has been through trial and error and reading a lot of books!
Here is a pendant I'm pretty happy with.
It's PMC3, the chain I made with fine silver wire (18 gauge jump rings and hammered wire). The stamps I used for the text and the seashell are from a collection I got at Alpha Stamps  called
Under the Sea Cling Stamp Set.
The pendant is about 2.5 inches long including the seashell and the chain is 28 inches.


I plan on many more pieces! PMC is a lot of fun to work with and you don't have to be an expert to make something thoroughly satisfying.

Thursday, July 18, 2013

Mermaid Lantern


Continuing in the beachy mermaid theme I've got going on here is a fun lantern I made for Alpha Stamps. I had so much fun making her! Most everything came from Alpha Stamps with the exception of the tentacle thingy, which I made from polymer clay and the disc that is in back of the mermaid figure-also made from polymer clay.


I just realized the wee pearl I glued into her hand has gone missing and she's gazing at her palm.
Oops.
Perhaps she's just wishing the artist that made her abode was more on the ball.
Thanks for stopping by!

Wednesday, July 10, 2013

Tunnel Book Love


Oh, I do love tunnel books! Here are three versions of the same kind of construction. I did these for the fabulous folks at Alpha Stamps with a wee tutorial on how to change the 'scenery' around if you have a hankering to do so!

First off, if you've never made a tunnel book, there is a great tutorial Here at Kira Nichols
awesome site, Oops, I Craft My Pants.
Secondly, what I am going to show you is easy peasy and a fun way to change out what you have in your tunnel book. You can design one to change with the seasons, or make a little beach babes fashion show like the one I've done here.


After I constructed the bones of my book, I cut pieces of card stock into 4x4 squares.
I tried to slide the squares down through the top of my book, but they won't fit, so I trim off the excess and dry fit it again. I've learned that even though I'm measuring to fit, they don't always, so it's best to check. After I get the size right, I trim out most of the paper leaving about 1/4 inch 'frame'.


I use the first frame I cut as a template for the additional frames. How many you cut is up to you. The more layers you have, the more depth and dimension you get. This book has slots for eight frames.
After all the frames are cut out, it's time to play!
Since I want this to be beachy and tropical with a vintage feel, I'm using these collage sheets from
Alpha Stamps:
Bathing Costumes Collage Sheet
Boardwalk Fashions Collage Sheet
Beach and Shore Backdrops Collage Sheet

I cut out a lot of foliage, ladies in swimsuits and a couple in street clothes and played around until I got things in positions I liked and glued the individual pieces on their frames.
I colored the bottoms of each frame so they blend into the scene.


After that, it's a matter of playing around with the order they go in and what you want to be in the background, foreground and mid-ground.
I also used one of the frames to change the background from the ship/beach scene to beach parasols.
Here are ladies with the parasol background.


Supplies lists and a couple of shots of the other tunnel books......

"Shipwreck"


"Waterbabies"


Supplies for 'Shipwreck'
Ships and Waves Backdrops Collage Sheet
Mermaids #3 Collage Sheet
4x4 Die-Cut Chipboard Frame Set
Travel Sea Shells Grand Adhesions


Supplies for 'Waterbabies'
4x4 Die-Cut Chipboard Frame Set
Mermaids #3 Collage Sheet
Ships and Waves Backdrop Collage Sheet
Children at the Beach Collage Sheet
Dimensional Mini Seashells
Sand Dollar Ledger Scrapbook Paper

The parasols in the Beach Babes are from Graphic 45 's Birdsong Collection, 'Endless Spring'.
The paper used for the front of Beach Babes is Fresh.

Additional Supplies
Vintage Plastic Beads
Copic Markers