Showing posts with label Pinterest. Show all posts

Wednesday, September 6, 2017

The Strange Kidlets Halloween Fold-out Book

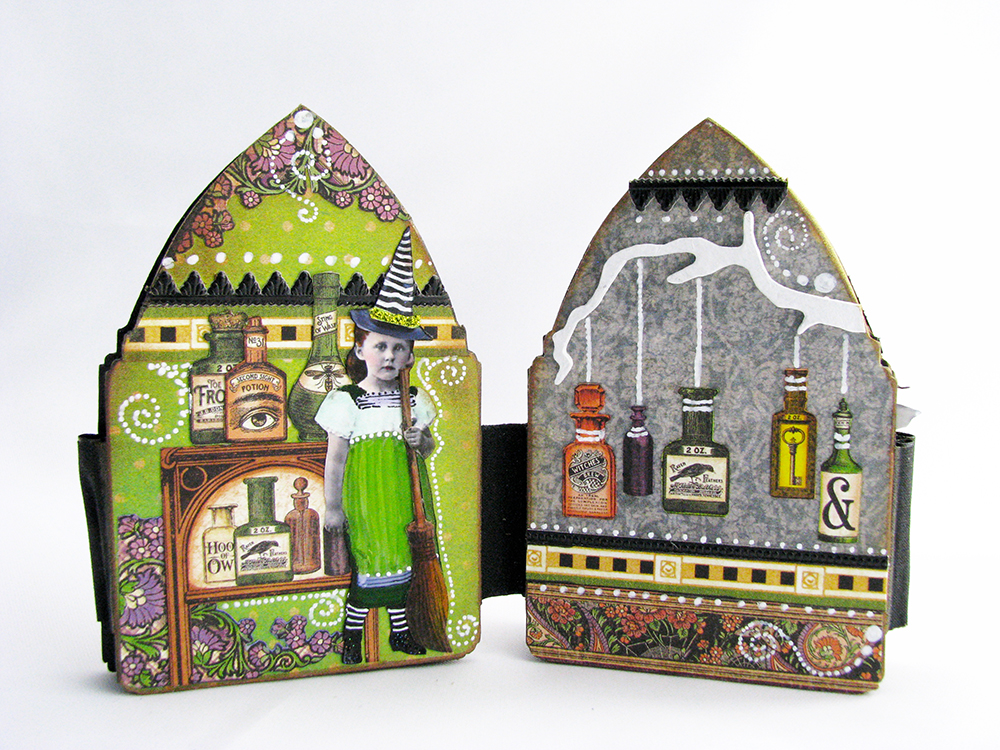
I cannot get enough of Halloween. I have been having fun with these little fold-out books and here's another one...this time it's strangely gifted children. Or maybe gifted kidlets who are strange. Whatever. They are all a bit peculiar in one way or another and that makes them interesting.
This little girl, let's call her Wilhelmina, shall we? Some children have lemonade stands or sell cookies. Little Willa looks like she could whip you up a good old repel spell or a homework charm faster than you can cackle.
And this kidlet, James-Luce has got himself a rather interesting sidekick. Both styling with their green top hats. I wonder which one of them is reading that stack of books?
James-Luce has informed me that Hodge (the cat) is currently reading "Anthropology and Mythical Creatures, a Study of Synchronistic World Tales" aloud at tea time. So there we have it.

And these two, Tyburn and Thalia have scarpered off to a large pumpkin patch where they have release the flying pumpkins and plan on joining them for a wild flight across the river and on to the local pub for some fish and chips and a fizzy lemonade. They look a bit guilty, but I don't think anyone has noticed that the flying pumpkins have gone missing again.
So yes, they are all a bit strange, but I certainly will not be pointing any fingers. Heh.


And  now, a quick little tutorial on how I did the letters on the back of the book.
Since I had already painted the backs of the book pages, I decided to attach the letters to some card stock for contrast and easier reading.
After edging the card stock with ink, I glued the letters down and let them dry. I glued them down to the page backs and gave them a coat of matte medium to take the shine off of them.
Once everything was dry, I used a fine tip Sharpie Paint Marker to outline the letters, and then filled them in with a broader tipped marker. Then added a couple of dots to each page for a little extra detail. Super easy and very effective!
Here you can see, using a larger marker, I filled in the letters to give them a bit more punch.
 If you would like to see a tutorial on how the book was constructed, click this LINK.

For a complete list of supplies from the wonderful Alpha Stamps click HERE.
Supplies:
Arch Top House Silhouette
Dresden Trim:
Black Zig Zag Dresden Borders
Tiny Dot Dresden Borders
Little Sweeties Collage Sheet
Halloween Dress Up Collage Sheet
I've been Mooned Collage Sheet (the peeking eyes at the bottom of the far right house)
Creepy Tree-8 Inch
Stickles: Lime and Black Diamond
various scrap bits from both G45 Olde Curiosity Shoppe and And Eerie Tale from the 8x8 paper pad.

Black acrylic paint
White acrylic paint 

Thank you for stopping by!


Tuesday, April 4, 2017

The Girl in the Garden

Hello all! Lora here continuing my obsession with old masters paintings in combination with mixed medium.
What I've got for you today is a beautiful painting done by Antonio del Pollaiuolo called 'Portrait of a Young Woman' that I have surrounded with very modern watercolor flowers. Love the juxtaposition!
I am calling her, 'The Girl in the Garden'.

A detail shot of her pretty face.....
I began with the ATC Shrine Box and the Layered Frame-Aria. I primed both pieces (well, three pieces as the Frame is two pieces) and then painted both background pieces black and the front filigree of the frame gold. After the filigree piece dried, I added a little Quinacridone Nickel Azo Gold over the top. It makes the gold pop and it looks oh so much richer.
After things were completely dry, I papered the outside of the box (which i forgot to take a picture of) and I began to play around with the composition of the interior of the box.
I thought I could work around the fact that the frame was a bit shorter than the box was, but I decided in the end to cut the bottom bar off of the frame.
I am always trying to find the perfect solution to getting different levels of depth inside of a shrine/box and this time I chose to cut up lengths of a semi translucent green straw.
Easy to cut and easy to glue....
I also used foam tape when I needed just a little lift.
After the interior was glued in and everything dried, I attached the frame around the shrine box with glue. (I love Aleene's Tacky Glue)
And was nearly there. However, I didn't like how unfinished the bottom of the piece was since I cut off the bottom of the frame.
Then I remembered I had those awesome Victorian Corners-2. I prepped one just as I did for the frame and attached that to the bottom.  Much better! My junk store find of a cute little brass candlestick finished the piece off.
As a finishing touch, I added some dot detail to the filigree to tie it in to the detail I added to the image of the girl.
 SUPPLIES
 ATC Shrine Box
 Layered Frame-Aria
 Victorian Corners-2

Additonal Supplies
Liquid Pearls in White Opal and Garnet
Black Acrylic Paint
Gold Acrylic Paint
Quinacrodone Nickel Azo Gold Acrylic paint
Antonio del Pollaiuolo's Portrait of a Young Woman
Floral collage images

Thank you very much for taking a look!


Saturday, April 1, 2017

The Little Book of Perfect Men

Oh, yes. We are going there. Back to the nostalgic days of the 1950's and 60's. Barbasol, Brylcreem and macho males in beautifully tailored suits. Think Rock Hudson and Cary Grant. William Holden, Burt Lancaster....did I mention Cary Grant?
And those hats. Men always look good in hats.
Well, here is a little treat for the lady or gentleman who has an eye for a well made um, suit.....


All of the supplies to make this piece came from the wonderful Alpha Stamps.
For those of you who have never done an ATC or Artist Trading Card, here is a quick tutorial....
An ATC is typically a 2.5 x 3.5 card made out of chipboard, heavy card stock or even playing cards. You can make one out of nearly anything and there aren't many rules to follow (or break) just the size of the card. Lots of folks put embellishments on them that stick out or are three dimensional and that is fine, too. Just keep in mind, if you are making one for someone else and they have a place where they display them, make sure they will fit.
I started out with Chipboard ATCs I traced and cut paper to fit for both sides.
I glued the papers on and inked the edges to give the card an aged appearance.
I chose my image from the Men In Hats ATC's Collage Sheet.
I didn't care for the pink background on the image, so I cut that away and tried the image on both sides of the card. And ended up using the 'graph ' paper side. I glued the picture down and re-inked the edges if needed and any raw paper edges from the image showed. And basically, there you have a simply made ATC! Just like a well tailored suit, there are a couple of rules and then the skies the limit. Go forth and create!


SUPPLIES
Hidden Drawer Book Box-ATC Size
Chipboard ATCs
Yes Dear! Text Collage Sheet
Satisfying Text Collage Sheet
Fifties Floating Heads Collage Sheet
Men In Hats ATC's Collage Sheet
Chipboard Pipes and Televisions (not sure what this one is called)
Brilliance Pigment Ink Pad-Galaxy Gold
Distress Ink Pad-Vintage Photo
Double Dot Vintage Scrapbook Paper in Gingerbread, Chiffon and Decaf.

For a link to all the supplies used, click  HERE


Thank you for stopping by!


Monday, October 3, 2016

A Trio of Tags

Hello everybody, it's my first gig as an official design team member for Gypsy Soul Laser Cuts (gslcuts.com ) and I'm thrilled to be part of the team!
Today I'm keeping it fairly simple with this pretty trio of tags......

I started out with the Chipboard Decorative Tags Large and the Chipboard Decorative Tags X Large. I used the tags as templates for the paper I chose and traced enough for both sides of the x large tags and for one side of the large tags. I brushed a light coat of matte medium on the paper and another, heavier coat for each tag and stuck 'em together.

After they all dried I inked the edges with gold and I glued the smaller tags (large tags) on to the bigger ones (x large tags) making sure the smaller tags were centered and that the papers were complimentary to each other.


Whilst they were drying, I painted the smaller three frames from the Filigree Frames Shapes Set a lovely shade of black.
I love the fun stencil 'opposite' the paint made when I lifted the frames up for drying. Hmmmm, that might be a fun project for another day!


Make sure you lift the frame up off of whatever you are painting them on and set them on a piece of plastic or wax paper to dry. Otherwise, the paint may act as glue and you'll be peeling the poor things off of your scrap cardboard. Not that I've EVER done that.


After everything is dry, I cut narrow strips of paper borders and glued them to the center of the smaller tags and then glued the frames on the tags. Once that is done, it's just a matter of embellishing and adding bits and pieces until you are happy with your results.


The papers I used were all from the Graphic 45 'Olde Curiosity Shoppe' 8x8 paper pad, which is one of my favorites. I also used a fine black marker to make dots and lines around the bits I wanted a little extra shading on. You can see that really well in the picture below;


I strung the tags on some pretty green velvet ribbon, threaded a big wooden bead through the ribbon and added a bit of glue on the bead to secure it. A little brass filigree flower and a tiny crystal added to the center for a bit of sparkle and glued on to the ribbon where it goes through the center hole of the tag completes the pieces.


SUPPLIES
Filigree Frames Shapes Set
Chipboard Decorative Tags Large
Chipboard Decorative Tags X Large


Additional Supplies
Graphic 45 'Olde Curiosity Shoppe' 8x8 paper pad
Black acrylic paint
Black permanent marker
Green velvet ribbon
Filigree brass flower stamping


Thank you for taking a look!