Lora here for the awesome Alpha Stamps!
Here is a piece with some interesting elements..... a stormy sea with a ship teetering on the brink of disaster.
A woman looking away from the ship, gazing into the 'room' with a sea serpent coiled around her ankles.
What is the story? Is she a transformed mermaid seeking vengeance on the sea captain that imprisons her?
Is she about to send the serpent to rescue the crew of the ship?
Whatever is happening, it's going to be a rough, wet night.
The sullen glow of an angry sunset, lightning flickering in the distance.
I started out with the Arch Shrine Shadowbox....
I cut the papers I needed for the front of the facade, the sides and back. And gave the inside a coat of gesso and white paint to keep it light and bright enough to see the images inside.
I also applied gesso and a coat of whit paint to the Double Layer Window-Plain, cut paper to fit around the edge, measuring the area of the inside of the box, and added 'legs' so it would stand away from the back of the box and also give me something to glue down to secure the window.
I set this aside to dry and put together and painted the Small Chipboard Victorian Wall Shelf and ivory color, adding gold details.
I painted the window frame ivory and set it aside once again to dry.
I drilled a hole in the top of the shadowbox big enough to fit a tea light flame. (I turned the tea light upside down with flame pointing down through the hole. Very easy to turn on and change the battery!)
I glue my window in after checking to make sure I had everything attached to the back of the shadowbox.
I glued the facade on and once all that is dry, began attaching all the details like the shelf I painted earlier, various bits of collage images and pearls.
So fun!
Thank you for stopping by!
For a link to all the supplies used click HERE.
Collage Sheets:
Sea Green Mermaids, Sea Serpents, Ocean Waves, Stormy Seas, Edwardian Women,
Seaside Collage Sheet
Candlestick Holder
LED Tea Light
Wide brass Filigree Header
1 Inch Tall White Vase
Small Chipboard Victorian Wall Shelf
Double Layer Window- Plain
Arched Shrine Shadowbox
All papers from Seaside and Me collection
Stickles in Lime Green
All the seashells and other squiddy bits are from either the paper
collection listed above or the Sea green Mermaids Collage sheet
Other: Acrylic paint (ivory, gold) mixed sized pearls
Wednesday, February 20, 2019
Tuesday, February 19, 2019
A little dream of spring
Hello all! Lora here for Gypsy Soul Laser Cuts!
I love winter. But with all the bone chilling rain we have had, I admit
I am beginning to look forward to spring. Here is a little dream of
spring.....
I began with the Display Tray Dome.
The Henna Doodles 2
And the Delicate Frames and Ornaments
I gave the front of the dome tray, the Henna Doodles and the Delicate Frames a coat of gesso and then a good coat of white acrylic paint and set them aside to dry.
Using the back of the Dome Tray as template, I cut paper for the front and back side.
It looks pretty already!
I set it aside and started making fun little components for inside each of the frames within the tray. I used the Graphic 45 Flutter papers...perfect for spring.
I played around with the layout until I liked where everything was placed. Some things I used and some I didn't. I have a pretty box I save all the bits and bobs I don't use for another day.
I placed the top of the display tray dome on the back piece and lightly traced around each of the frames to give me some reference on where to glue things down. Then did just that, making sure to adjust things as they fit within the confines of the frame. Then I glued the frame down.
After things dried, I attached the Henna Doodles to the frame and added little details with some Stickles Cosmos glitter glue.
As you can tell in this photo, I used a lot of foam tape to make things pop off the background and give the piece some depth.
Come on Spring!
SUPPLIES
Display Tray Dome
Henna Doodles 2
Delicate Frames and Ornaments
Graphic 45 Flutter Collection
Acrylic paint
Gesso
Stickles 'Cosmos'
Ribbon and bead for hanging the piece
Thank you so much for stopping by!
I began with the Display Tray Dome.
The Henna Doodles 2
And the Delicate Frames and Ornaments
I gave the front of the dome tray, the Henna Doodles and the Delicate Frames a coat of gesso and then a good coat of white acrylic paint and set them aside to dry.
Using the back of the Dome Tray as template, I cut paper for the front and back side.
It looks pretty already!
I set it aside and started making fun little components for inside each of the frames within the tray. I used the Graphic 45 Flutter papers...perfect for spring.
I played around with the layout until I liked where everything was placed. Some things I used and some I didn't. I have a pretty box I save all the bits and bobs I don't use for another day.
I placed the top of the display tray dome on the back piece and lightly traced around each of the frames to give me some reference on where to glue things down. Then did just that, making sure to adjust things as they fit within the confines of the frame. Then I glued the frame down.
After things dried, I attached the Henna Doodles to the frame and added little details with some Stickles Cosmos glitter glue.
As you can tell in this photo, I used a lot of foam tape to make things pop off the background and give the piece some depth.
Come on Spring!
SUPPLIES
Display Tray Dome
Henna Doodles 2
Delicate Frames and Ornaments
Graphic 45 Flutter Collection
Acrylic paint
Gesso
Stickles 'Cosmos'
Ribbon and bead for hanging the piece
Thank you so much for stopping by!
Tuesday, February 5, 2019
Twisted Little Valentine Cards
Hiya everyone, Lora here for the awesome folks at Gypsy Soul Laser Cuts
with a fun, fast project for a personalized Valentine's Day Card! I
love the macabre little twist on these, but you can put whatever spin on
it you want on them.
A view of the backs and the pithy little expressions of quirky Valentine love.
I love that instead of flowers, her/his true love chose poisonous mushrooms! SO romantic!
Here's how it went....
I chose these great Heart Cards (which are coming soon!). Using the solid 'back' side of the card as a template, I cut papers for the front and back of the solid half of the card.
I painted the fancy, front side of the card with ivory acrylic paint and set them aside to dry.
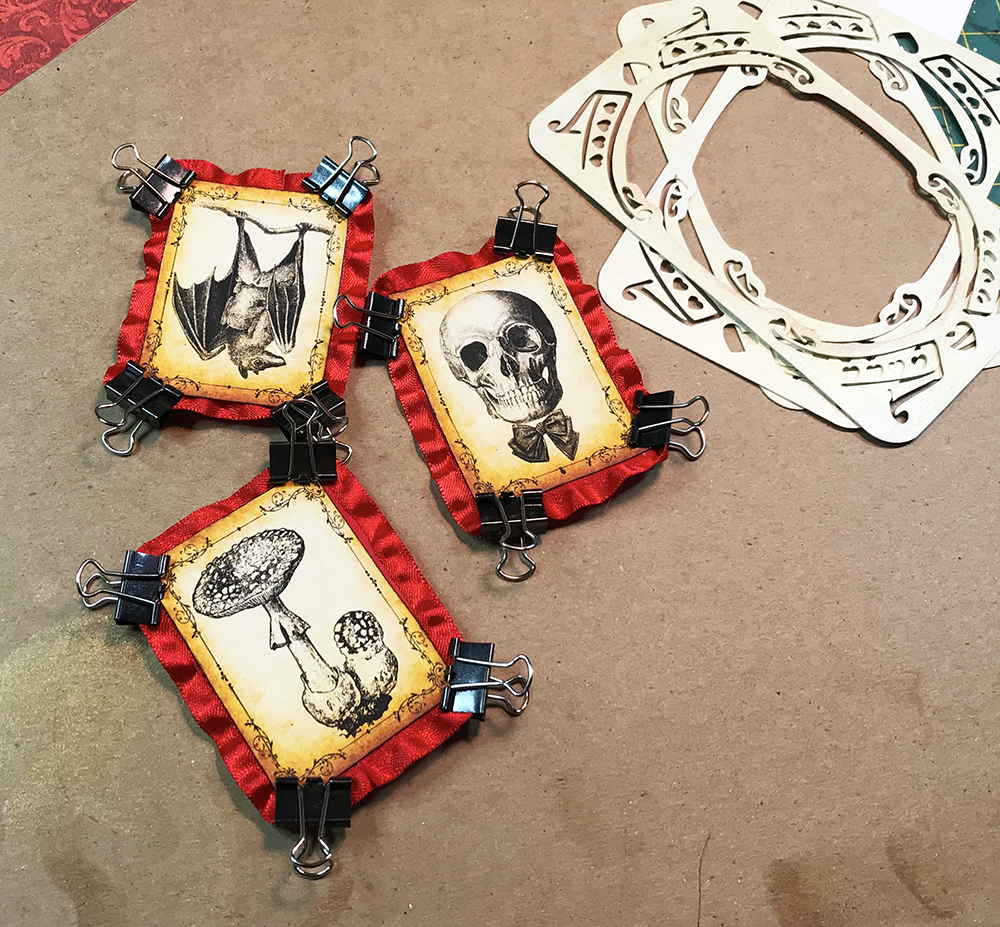
I then cut my collage images out and glued ruffle-y red ribbon to the back of the image, letting the ruffle-y bit show on the front. i used clips to keep the corner from popping up, giving the glue a chance to set.
After everything dried, I glued the fancy front of the cards to the background papers and then glued the beribboned collage images in the center of the cards. I did stick some heavy weight objects on them to flatten them out whilst the glue dried as the ribbon tends to make them pop off the card.
I glued other collage images on the back and came up with some amusing little expressions of Valentine love which I printed out, cut and glued on the back.
Lastly, I attached a ribbon to each one for hanging using a rose medallion of scrap paper I cut from the left over collage images used on the back.
Easy peasy and quite personal.
Ah, Valentine love........
SUPPLIES:
Heart Cards (coming soon)
Various Halloween collage images
Acrylic paint
Red ruffle ribbon
Bo bunny and Graphic 45 scrapbook papers
Thank you for stopping by!
A view of the backs and the pithy little expressions of quirky Valentine love.
I love that instead of flowers, her/his true love chose poisonous mushrooms! SO romantic!
Here's how it went....
I chose these great Heart Cards (which are coming soon!). Using the solid 'back' side of the card as a template, I cut papers for the front and back of the solid half of the card.
I painted the fancy, front side of the card with ivory acrylic paint and set them aside to dry.
I then cut my collage images out and glued ruffle-y red ribbon to the back of the image, letting the ruffle-y bit show on the front. i used clips to keep the corner from popping up, giving the glue a chance to set.
After everything dried, I glued the fancy front of the cards to the background papers and then glued the beribboned collage images in the center of the cards. I did stick some heavy weight objects on them to flatten them out whilst the glue dried as the ribbon tends to make them pop off the card.
I glued other collage images on the back and came up with some amusing little expressions of Valentine love which I printed out, cut and glued on the back.
Lastly, I attached a ribbon to each one for hanging using a rose medallion of scrap paper I cut from the left over collage images used on the back.
Easy peasy and quite personal.
Ah, Valentine love........
SUPPLIES:
Heart Cards (coming soon)
Various Halloween collage images
Acrylic paint
Red ruffle ribbon
Bo bunny and Graphic 45 scrapbook papers
Thank you for stopping by!
Tuesday, January 15, 2019
Something Summery
Hello all!
For a closer look and a mini tutorial on how to make this fun piece, pop on over to Gypsy Soul Laser Cuts blog!
Saturday, January 12, 2019
My Chocolate Valentine
Yes, Valentine's Day will be here before you know it. It's always been a holiday that catches me by surprise. Fortunately for moi, my husband knows exactly what to get me and it's the same every year and it never gets old.
A book and a box of chocolates.
It's the best.
I look forward to it every year.
If he doesn't get it for me this year (he will) I will get it for myself!
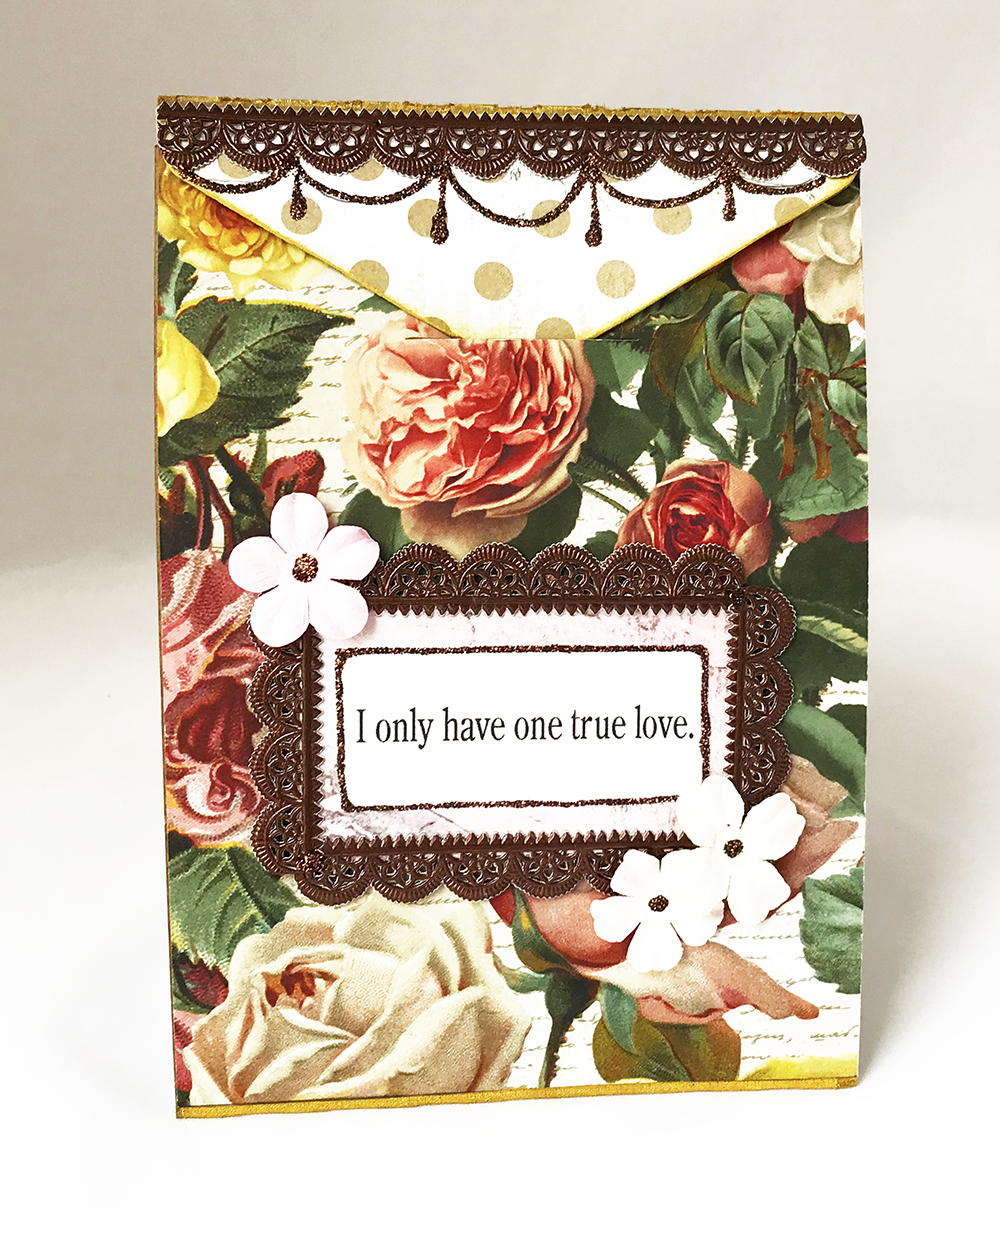
So when the wonderful Alpha Stamps sent me the Victorian Ephemera Kit-January and that luscious chocolate colored Dresden trim spilled out, well, that was it for me. It had to be a snarky chocolate valentine.
I began with the Victorian Ephemera Kit-January.
I used the Arched Tent Card Frame as a template to cut all my papers and set them aside for a moment.
I reinforced the bendy fold in the tent card (on one side) with some lined hinging tape and inked it gold.
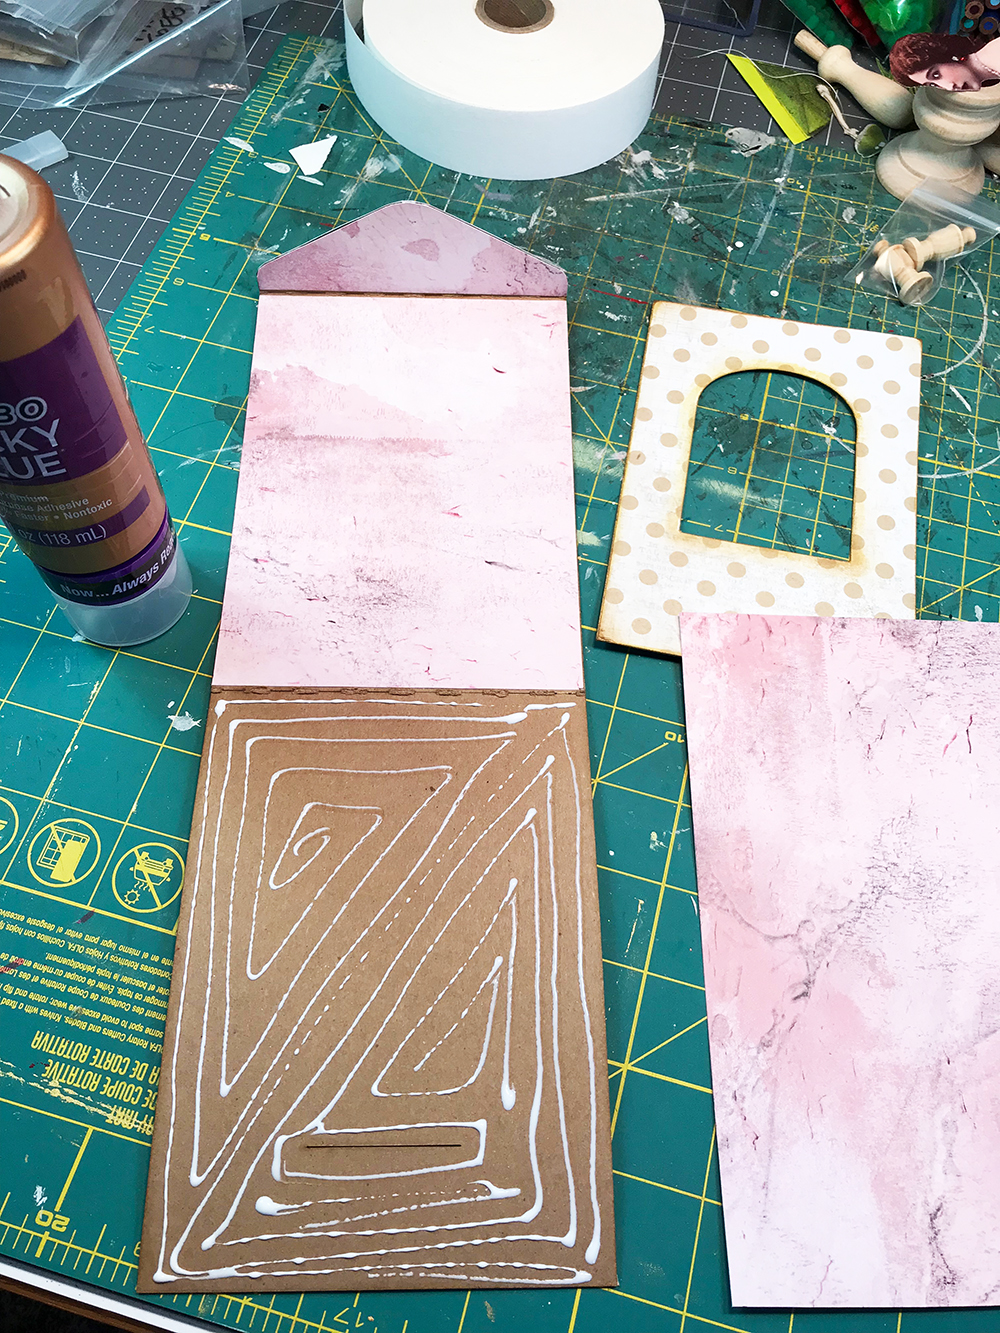
I glued in the surface papers, cut a bit of scrap chipboard into two rectangles and glued background paper on to them as well for the phrases I printed off of my printer.
After all of that dried, I glued in my image to the arched frame and added some cut out flowers from the scrapbook paper, added Stickles glitter to my chocolate lovin' lady and set it aside to dry.
I added the gorgeous Dresden trim to edges and anywhere else it looked good. Honestly, I just kept going with it until I ran out!
Then I penciled in where I wanted to add a garland of Stickles......
And step by step.....
Piped in on.
After you do one side of the tent card, set it aside and let it dry for an hour or so.
I did the outside of the tent card first and then glued in the arch top piece inside and embellished away with the Stickles.
(The phrases I glued and embellished separately, then glued them onto the tent card before I added the final touches of glitter.)
I also used a couple of Copic markers to pump up the color in her hair and put some roses in her cheeks.
A couple of pretty little paper flowers on the front and a couple drops of glitter in the centers and it's all good to go!
Have a chocolatey Valentine's Day!
For a link to all the supplies used in this piece, click HERE.
SUPPLIES:
Arched Tent Card Frame
Scrap Studio Roses & Gritty Scrapbook Paper
Victorian Ephemera Kit (all the papers and the Chocolate Dresden)
Caroline Otero Collage Sheet
Cinnamon Stickles
Christmas Red Stickles
Diamond Stickles
White acrylic paint
Linen Hinging Tape
Vintage Shades Paper Flowers-Orchid Pink (substitution suggestion)
Brilliance Galaxy Gold Ink Pad
Thank you for stopping by!
A book and a box of chocolates.
It's the best.
I look forward to it every year.
If he doesn't get it for me this year (he will) I will get it for myself!
So when the wonderful Alpha Stamps sent me the Victorian Ephemera Kit-January and that luscious chocolate colored Dresden trim spilled out, well, that was it for me. It had to be a snarky chocolate valentine.
I began with the Victorian Ephemera Kit-January.
I used the Arched Tent Card Frame as a template to cut all my papers and set them aside for a moment.
I reinforced the bendy fold in the tent card (on one side) with some lined hinging tape and inked it gold.
I glued in the surface papers, cut a bit of scrap chipboard into two rectangles and glued background paper on to them as well for the phrases I printed off of my printer.
After all of that dried, I glued in my image to the arched frame and added some cut out flowers from the scrapbook paper, added Stickles glitter to my chocolate lovin' lady and set it aside to dry.
I added the gorgeous Dresden trim to edges and anywhere else it looked good. Honestly, I just kept going with it until I ran out!
Then I penciled in where I wanted to add a garland of Stickles......
And step by step.....
Piped in on.
After you do one side of the tent card, set it aside and let it dry for an hour or so.
I did the outside of the tent card first and then glued in the arch top piece inside and embellished away with the Stickles.
(The phrases I glued and embellished separately, then glued them onto the tent card before I added the final touches of glitter.)
I also used a couple of Copic markers to pump up the color in her hair and put some roses in her cheeks.
A couple of pretty little paper flowers on the front and a couple drops of glitter in the centers and it's all good to go!
Have a chocolatey Valentine's Day!
For a link to all the supplies used in this piece, click HERE.
SUPPLIES:
Arched Tent Card Frame
Scrap Studio Roses & Gritty Scrapbook Paper
Victorian Ephemera Kit (all the papers and the Chocolate Dresden)
Caroline Otero Collage Sheet
Cinnamon Stickles
Christmas Red Stickles
Diamond Stickles
White acrylic paint
Linen Hinging Tape
Vintage Shades Paper Flowers-Orchid Pink (substitution suggestion)
Brilliance Galaxy Gold Ink Pad
Thank you for stopping by!
Tuesday, January 1, 2019
Art Girl Banner
A great way to start off the new year! A fun, easy project that looks great and declares your love of art to the universe.
Or maybe just to your cat.
No matter, let it bring a smile to your face each time you look at your project!
I started out with the Banner Builder Dovetail Set. It comes in a set of four, so you will need two sets.
I painted the back scalloped edge pieces black, front and back.
I used one of the top pieces as a template and cut all of my background papers.
I painted the Flower Stackers and the One Inch Scallop Punch Elements white.
I actually used three sets of the Flower Stackers because I wanted eight large flowers for the tops of my banner pieces, but you can use any size flowers you choose.
I glued the background papers to the top layer of the banner pieces and set them aside to dry.
I then glued them on to the scalloped black painted bottom layer of the banner pieces.
Next, I cut a green sheet of scrapbook paper into seven 2 3/4 inch squares and a creamy yellow sheet into seven squares that measured 2 inches.
I played around with some lettering on graph paper and then hand-lettered each yellow 2 inch square with A R T G I R L.....
After they dried, I glued them on to the green 2 3/4 inch squares, let them dry and then attached them to the banner pieces, making sure each one is centered consistently with the others.
When all was dry, I stacked and glued my flowers on at the top center of each banner piece.
I cut out lots of butterflies and a couple of bugs and attached them to each piece as I saw fit.
I added white paint dot around the edge of the black scalloped pieces and around the lettering to make it pop.
And of course, a little bit of glitter....
A little hot glue attaches the velvet ribbon to the back and it's ready to go!
SUPPLIES:
Banner Builder Dovetail Set
Flower Stackers
One Inch Scallop Punch Elements
Additional Supplies:
Acrylic paint
metal findings (foe embellishing your flowers)
Scrapbook papers: I used Graphic 45 8x8 Floral Shoppe, Bo Bunny Double Dot Vintage Chiffon and Evergreen. The butterflies and bugs are from Graphic 45 Flutter.
Stickles Glitter Glue in Diamond
Brilliance galaxy Gold Stamp Pad
Thank you for stopping by!
Or maybe just to your cat.
No matter, let it bring a smile to your face each time you look at your project!
I started out with the Banner Builder Dovetail Set. It comes in a set of four, so you will need two sets.
I painted the back scalloped edge pieces black, front and back.
I used one of the top pieces as a template and cut all of my background papers.
I painted the Flower Stackers and the One Inch Scallop Punch Elements white.
I actually used three sets of the Flower Stackers because I wanted eight large flowers for the tops of my banner pieces, but you can use any size flowers you choose.
I glued the background papers to the top layer of the banner pieces and set them aside to dry.
I then glued them on to the scalloped black painted bottom layer of the banner pieces.
Next, I cut a green sheet of scrapbook paper into seven 2 3/4 inch squares and a creamy yellow sheet into seven squares that measured 2 inches.
I played around with some lettering on graph paper and then hand-lettered each yellow 2 inch square with A R T G I R L.....
After they dried, I glued them on to the green 2 3/4 inch squares, let them dry and then attached them to the banner pieces, making sure each one is centered consistently with the others.
When all was dry, I stacked and glued my flowers on at the top center of each banner piece.
I cut out lots of butterflies and a couple of bugs and attached them to each piece as I saw fit.
I added white paint dot around the edge of the black scalloped pieces and around the lettering to make it pop.
And of course, a little bit of glitter....
A little hot glue attaches the velvet ribbon to the back and it's ready to go!
SUPPLIES:
Banner Builder Dovetail Set
Flower Stackers
One Inch Scallop Punch Elements
Additional Supplies:
Acrylic paint
metal findings (foe embellishing your flowers)
Scrapbook papers: I used Graphic 45 8x8 Floral Shoppe, Bo Bunny Double Dot Vintage Chiffon and Evergreen. The butterflies and bugs are from Graphic 45 Flutter.
Stickles Glitter Glue in Diamond
Brilliance galaxy Gold Stamp Pad
Thank you for stopping by!
Subscribe to:
Posts (Atom)