Hello everyone, Lora here for Gypsy Soul Laser Cuts.
Beatrix Mellifera likes honeybees.
A lot.
And they like her.
She draws them, studies them, talks to them and generally looks after their well being.
She
cultivates their favorite flowers and fusses over them when it gets
cold and shoos away naughty insects that might do them harm.
She is a great friend and guardian.
She's a little quirky, but aren't we all?
She has lots of personality and if you ask about bees, she can talk about them for a very long time. And she has great hair...
I began with the Art Doll Nicho (which is coming to the store soon).
I glued down the inside folds of the box and clipped them together until the glue set.
NOTE: the flaps are not glued down, just folded in to help the clips hold the wet gluey bits.
Next,
I painted the inside of the box cream and aged up the corners a bit
with some brown ink using a Q-tip and cut the papers front and back
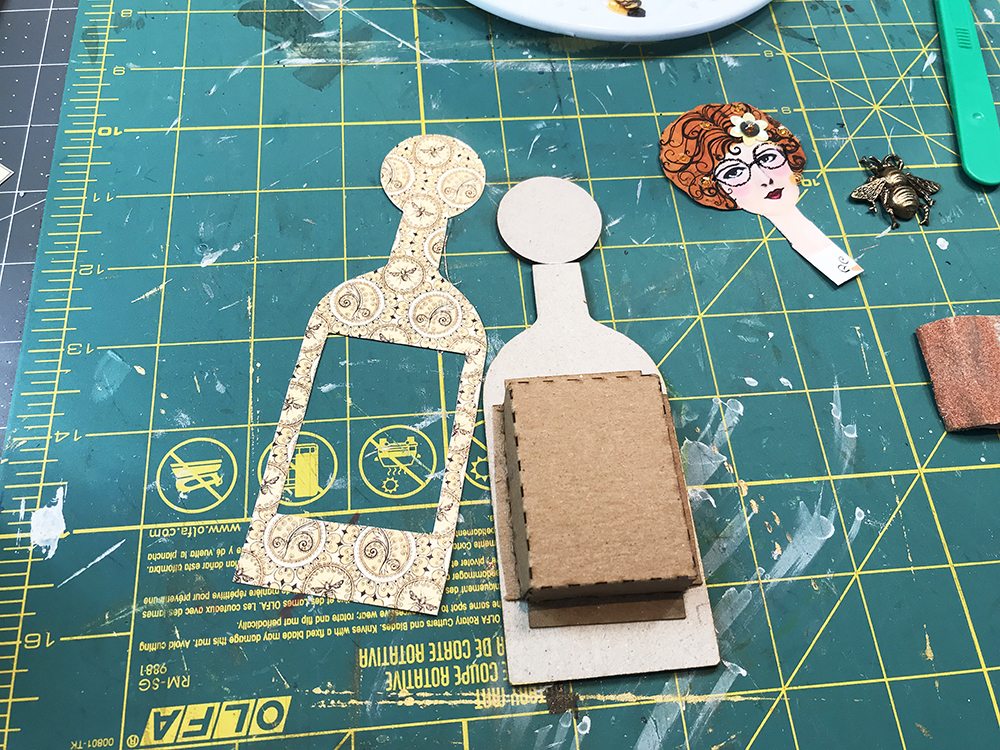
using the nicho as the template. Notice that when I cut the back paper, I
included the circle (head). I did this to give added strength to the
piece when I glue the collage sheet face onto the circle.
In
the picture above, I glued the box on to the backside of the nicho,
painted the side of the box cream and inked it up a bit to give it a
little patina. After it dried, I dry fit the paper on to the back,
pushing it over the box carefully, adjusting the fit as needed. I
carefully removed the paper after I had a good fit, added glued and
stuck it down.
I
glued Beatrix' head on and then the front papers. I added bits of
cotton lace around the nicho opening and gave her a pretty lace collar. I
attached the brass bee to a small cork and did the same with some of
the sequin flowers, cutting the corks to different heights to give
things depth.
I
put the flowers and little bits of glitter and sequins in the box
before I added the bee. That made it a lot easier to add or subtract
detail without having to work around a big object.
I
made a little skirt out of leftover paper and arms and legs for Beatrix
from a collage sheet (you can get this or something similar at Alpha Stamps)
I stuck a command strip on the back of the box to attach her to this pillar. You can do the same thing anywhere in your house.
A little lace, glitter, sequins and a pretty bee....... you can't go wrong!
Thank you for stopping by!
SUPPLIES:
Art Doll Nicho (coming soon!)
You can get the Art Doll Nicho HERE
Additional:
Acrylic paint
Graphic 45 Olde Curiosity Shoppe paper (HERE)
Collage sheet
Tea stained lace
Sequins
Glitter
Tuesday, March 26, 2019
Tuesday, March 19, 2019
Mice Like Candy too....Part Two
Greetings! Lora here for the terrific Gypsy Soul Laser Cuts and Part Two of Mice Like Candy Too. Today I am going to do the do the four remaining tags.
In the picture below, you can see the top row is what I did a couple of weeks ago and the bottom row are the four I am going to chat about today.
Most of the elements are the same - the background color, candy jars, dots and flowers all help with cohesiveness and tie all the tags together, making them a set.
I began with cutting out all the bits and pieces I may (or may not) use. I wanted some different mice and these cute little fellows fit in with the look I was going for. (I darkened up their color so they would pop a bit more) I cut out a bunch of circles and various sweets and jars and played with the mix until I got layouts I liked....
I started gluing my layers on starting with what will be in the background-the circles.
With a little daub of glue at the bottom of the mouse, I attached him to where I wanted him on the jar and then glued the whole piece down and attached the number, adding dots after everything dried.
Next, the ribbon was added and glitter was used for a sparkly bit of detail. The flower was glued on as the last thing.
Not a difficult project, but I think they are so cute. I decided that I did not want to make a banner of them as a friend of mine is having a little baby shower for her grand daughter and we are going to use them for place cards for the table. Now I have to make a 'few' more!
SUPPLIES:
Small Tag Set
Faux Metal Number Plates
Bo Bunny Double Dots Vintage Pink Punch and Cotton Candy
Bo Bunny Sweet Moments
Mouse Collage images came from Digital Antiques (Etsy)
Acrylic paint
Silk Flowers
Green silky ribbon
For the supplies I used on the Mice Like Candy set #1, click HERE
In the picture below, you can see the top row is what I did a couple of weeks ago and the bottom row are the four I am going to chat about today.
Most of the elements are the same - the background color, candy jars, dots and flowers all help with cohesiveness and tie all the tags together, making them a set.
I began with cutting out all the bits and pieces I may (or may not) use. I wanted some different mice and these cute little fellows fit in with the look I was going for. (I darkened up their color so they would pop a bit more) I cut out a bunch of circles and various sweets and jars and played with the mix until I got layouts I liked....
I started gluing my layers on starting with what will be in the background-the circles.
With a little daub of glue at the bottom of the mouse, I attached him to where I wanted him on the jar and then glued the whole piece down and attached the number, adding dots after everything dried.
Next, the ribbon was added and glitter was used for a sparkly bit of detail. The flower was glued on as the last thing.
Not a difficult project, but I think they are so cute. I decided that I did not want to make a banner of them as a friend of mine is having a little baby shower for her grand daughter and we are going to use them for place cards for the table. Now I have to make a 'few' more!
SUPPLIES:
Small Tag Set
Faux Metal Number Plates
Bo Bunny Double Dots Vintage Pink Punch and Cotton Candy
Bo Bunny Sweet Moments
Mouse Collage images came from Digital Antiques (Etsy)
Acrylic paint
Silk Flowers
Green silky ribbon
For the supplies I used on the Mice Like Candy set #1, click HERE
Labels:
Cackle and Hoot,
Faux Metal Number Plates,
Gypsy Soul Laser Cuts,
Lora Mahaffey,
Small Tag Set,
Spring
Tuesday, March 5, 2019
Tiny Little Mice Tag Banner - Part One
Now if they can just figure out how to get the lids off the candy jars.........
Hello all, Lora here for Gypsy Soul Laser Cuts with a trio of tiny tags with even tinier mice on them.
Part one of two....first easy peasy tag making. Second, an easy peasy banner made out of the cute tags.
I chose the Small Tag Set and covered seven of the pieces, back and front with pretty pink paper.
Here is a picture of me messing around with how I want the layout for the final banner...
You can see I settled on using bits of the House Jewelry Pieces and the Petal Corner Minis.
I also used the Faux Metal Number Plates in the picture below.
I also cut little background circles of the paper I used on the backs of the tags to keep a consistent theme running through them, and added some white dots a ribbon a little silk flower at the top. And a tiny little white mouse. So cute!
More on this process in the next installment of the Mouse Tag Banner!
Thank you for stopping by!
SUPPLIES:
Small Tag Set
House Jewelry Pieces
Petal Corner Minis
Faux Metal Number Plates
Additional supplies:
Bo Bunny Double Dot Vintage Pink Punch and Passion Fruit Scrapbook Paper
Bo Bunny Sweet Moments Scrapbook Paper
White Acrylic Paint
Silk Flowers
Teeny Tiny White Mice (from Alpha Stamps)
Hello all, Lora here for Gypsy Soul Laser Cuts with a trio of tiny tags with even tinier mice on them.
Part one of two....first easy peasy tag making. Second, an easy peasy banner made out of the cute tags.
I chose the Small Tag Set and covered seven of the pieces, back and front with pretty pink paper.
Here is a picture of me messing around with how I want the layout for the final banner...
You can see I settled on using bits of the House Jewelry Pieces and the Petal Corner Minis.
I also used the Faux Metal Number Plates in the picture below.
I also cut little background circles of the paper I used on the backs of the tags to keep a consistent theme running through them, and added some white dots a ribbon a little silk flower at the top. And a tiny little white mouse. So cute!
More on this process in the next installment of the Mouse Tag Banner!
Thank you for stopping by!
SUPPLIES:
Small Tag Set
House Jewelry Pieces
Petal Corner Minis
Faux Metal Number Plates
Additional supplies:
Bo Bunny Double Dot Vintage Pink Punch and Passion Fruit Scrapbook Paper
Bo Bunny Sweet Moments Scrapbook Paper
White Acrylic Paint
Silk Flowers
Teeny Tiny White Mice (from Alpha Stamps)
Saturday, March 2, 2019
Little Topiary House
Lora here for Alpha Stamps!
Here is a fun, fast and pretty project that let me get a little of the 'I-wish-it-was-spring-already!!' out of my system.
I love this little Mini House Front Box. It's so versatile and just the right size...about 4x4.5 and you can put stuff in it. So it's practical, right? And it's cute as a button.
I decided to put a topiary in mine.
I had thought of making this a giraffe house just because a giraffe neck and head sticking out of a house is kind of cute, but the topiary won. Mainly because there's no poo to clean up.
Kidding.
Here's where I started...
I used the pieces of the house as templates to cut my paper. I glued the sides of the house together and ONLY DRY FIT it to the base. I wanted the pieces to dry square but still wanted to remove the top of the house from the base.
After the house dried, I painted the inside of the house white and glued the papers on the outside. I glued the papers to the base and then attached the house. I wanted to be able to look down inside the house and see pretty paper, not just a white bottom, and it's a lot easier to paint the inside of a house while it's not attached to the base if you want to avoid getting paint on your 'floor'.
I also gave my trims (the Mini House Doors and Windows) and fence (the Chipboard Fleur Border) a coat of white paint and then painted the 'fence' an iridescent green.
I set all that aside for some drying time and worked on my topiary.
I used 1inch, 1.5 inches and 2 inch foam balls. I poked each one through the paper stem wire I got at WalMart and put a dab of glue at the base of each one to keep them stationary.
After that, I simply tore of bits of moss and glued them on in pieces until each ball was covered. It was a bit messy, but it didn't take long.
You can use a glue gun which would be faster, but I have a tendency to glue myself to things, so I avoid glue guns whenever possible.
I drilled a hole in the center of a wooden block (about 1.5 inches) and painted it white. I inked it up around the edges with gold and pink stamp pads.
I gave my now dry topiary a bit of a trim and glued some flowers on it.
I decorated my little house with the Mini House Doors and Windows and with cute images from the papers from Spring Farm House 8x8 Paper Pad and some sweet Felt Flowers in pink and white. I also used the Small Wooden Finials as feet for the little house.
Small White Mulberry Blossoms were used on the topiary.
Dresden White Zig Zag Trim was arched over the door and window.
Cute!
For a link to all the supplies used from Alpha Stamps, click HERE.
SUPPLIES :
Spring Farmhouse 8x8 Paper Pad
Mini House Front Box
Mini House Doors & Windows
Chipboard Fleur Border
One and a half inch Wood Block Cube
Medium Wooden Finials
Felt Flowers (in pink and white)
Small White Mulberry Blossoms
Dresden White Border Sampler Set
Sheet Moss
Additional:
Gesso
White Acrylic Paint
Green Iridescent paint
Foam balls
Paper Stem Wire
Thank you for stopping by!
Wednesday, February 20, 2019
It's going to be a Dark and Stormy Night.....
Lora here for the awesome Alpha Stamps!
Here is a piece with some interesting elements..... a stormy sea with a ship teetering on the brink of disaster.
A woman looking away from the ship, gazing into the 'room' with a sea serpent coiled around her ankles.
What is the story? Is she a transformed mermaid seeking vengeance on the sea captain that imprisons her?
Is she about to send the serpent to rescue the crew of the ship?
Whatever is happening, it's going to be a rough, wet night.
The sullen glow of an angry sunset, lightning flickering in the distance.
I started out with the Arch Shrine Shadowbox....
I cut the papers I needed for the front of the facade, the sides and back. And gave the inside a coat of gesso and white paint to keep it light and bright enough to see the images inside.
I also applied gesso and a coat of whit paint to the Double Layer Window-Plain, cut paper to fit around the edge, measuring the area of the inside of the box, and added 'legs' so it would stand away from the back of the box and also give me something to glue down to secure the window.
I set this aside to dry and put together and painted the Small Chipboard Victorian Wall Shelf and ivory color, adding gold details.
I painted the window frame ivory and set it aside once again to dry.
I drilled a hole in the top of the shadowbox big enough to fit a tea light flame. (I turned the tea light upside down with flame pointing down through the hole. Very easy to turn on and change the battery!)
I glue my window in after checking to make sure I had everything attached to the back of the shadowbox.
I glued the facade on and once all that is dry, began attaching all the details like the shelf I painted earlier, various bits of collage images and pearls.
So fun!
Thank you for stopping by!
For a link to all the supplies used click HERE.
Collage Sheets:
Sea Green Mermaids, Sea Serpents, Ocean Waves, Stormy Seas, Edwardian Women,
Seaside Collage Sheet
Candlestick Holder
LED Tea Light
Wide brass Filigree Header
1 Inch Tall White Vase
Small Chipboard Victorian Wall Shelf
Double Layer Window- Plain
Arched Shrine Shadowbox
All papers from Seaside and Me collection
Stickles in Lime Green
All the seashells and other squiddy bits are from either the paper collection listed above or the Sea green Mermaids Collage sheet
Other: Acrylic paint (ivory, gold) mixed sized pearls
Here is a piece with some interesting elements..... a stormy sea with a ship teetering on the brink of disaster.
A woman looking away from the ship, gazing into the 'room' with a sea serpent coiled around her ankles.
What is the story? Is she a transformed mermaid seeking vengeance on the sea captain that imprisons her?
Is she about to send the serpent to rescue the crew of the ship?
Whatever is happening, it's going to be a rough, wet night.
The sullen glow of an angry sunset, lightning flickering in the distance.
I started out with the Arch Shrine Shadowbox....
I cut the papers I needed for the front of the facade, the sides and back. And gave the inside a coat of gesso and white paint to keep it light and bright enough to see the images inside.
I also applied gesso and a coat of whit paint to the Double Layer Window-Plain, cut paper to fit around the edge, measuring the area of the inside of the box, and added 'legs' so it would stand away from the back of the box and also give me something to glue down to secure the window.
I set this aside to dry and put together and painted the Small Chipboard Victorian Wall Shelf and ivory color, adding gold details.
I painted the window frame ivory and set it aside once again to dry.
I drilled a hole in the top of the shadowbox big enough to fit a tea light flame. (I turned the tea light upside down with flame pointing down through the hole. Very easy to turn on and change the battery!)
I glue my window in after checking to make sure I had everything attached to the back of the shadowbox.
I glued the facade on and once all that is dry, began attaching all the details like the shelf I painted earlier, various bits of collage images and pearls.
So fun!
Thank you for stopping by!
For a link to all the supplies used click HERE.
Collage Sheets:
Sea Green Mermaids, Sea Serpents, Ocean Waves, Stormy Seas, Edwardian Women,
Seaside Collage Sheet
Candlestick Holder
LED Tea Light
Wide brass Filigree Header
1 Inch Tall White Vase
Small Chipboard Victorian Wall Shelf
Double Layer Window- Plain
Arched Shrine Shadowbox
All papers from Seaside and Me collection
Stickles in Lime Green
All the seashells and other squiddy bits are from either the paper collection listed above or the Sea green Mermaids Collage sheet
Other: Acrylic paint (ivory, gold) mixed sized pearls
Labels:
Alpha Stamps,
Cackle and Hoot,
Collage sheets,
Mermaid,
Sea Serpents,
shrine
Tuesday, February 19, 2019
A little dream of spring
Hello all! Lora here for Gypsy Soul Laser Cuts!
I love winter. But with all the bone chilling rain we have had, I admit
I am beginning to look forward to spring. Here is a little dream of
spring.....
I began with the Display Tray Dome.
The Henna Doodles 2
And the Delicate Frames and Ornaments
I gave the front of the dome tray, the Henna Doodles and the Delicate Frames a coat of gesso and then a good coat of white acrylic paint and set them aside to dry.
Using the back of the Dome Tray as template, I cut paper for the front and back side.
It looks pretty already!
I set it aside and started making fun little components for inside each of the frames within the tray. I used the Graphic 45 Flutter papers...perfect for spring.
I played around with the layout until I liked where everything was placed. Some things I used and some I didn't. I have a pretty box I save all the bits and bobs I don't use for another day.
I placed the top of the display tray dome on the back piece and lightly traced around each of the frames to give me some reference on where to glue things down. Then did just that, making sure to adjust things as they fit within the confines of the frame. Then I glued the frame down.
After things dried, I attached the Henna Doodles to the frame and added little details with some Stickles Cosmos glitter glue.
As you can tell in this photo, I used a lot of foam tape to make things pop off the background and give the piece some depth.
Come on Spring!
SUPPLIES
Display Tray Dome
Henna Doodles 2
Delicate Frames and Ornaments
Graphic 45 Flutter Collection
Acrylic paint
Gesso
Stickles 'Cosmos'
Ribbon and bead for hanging the piece
Thank you so much for stopping by!
I began with the Display Tray Dome.
The Henna Doodles 2
And the Delicate Frames and Ornaments
I gave the front of the dome tray, the Henna Doodles and the Delicate Frames a coat of gesso and then a good coat of white acrylic paint and set them aside to dry.
Using the back of the Dome Tray as template, I cut paper for the front and back side.
It looks pretty already!
I set it aside and started making fun little components for inside each of the frames within the tray. I used the Graphic 45 Flutter papers...perfect for spring.
I played around with the layout until I liked where everything was placed. Some things I used and some I didn't. I have a pretty box I save all the bits and bobs I don't use for another day.
I placed the top of the display tray dome on the back piece and lightly traced around each of the frames to give me some reference on where to glue things down. Then did just that, making sure to adjust things as they fit within the confines of the frame. Then I glued the frame down.
After things dried, I attached the Henna Doodles to the frame and added little details with some Stickles Cosmos glitter glue.
As you can tell in this photo, I used a lot of foam tape to make things pop off the background and give the piece some depth.
Come on Spring!
SUPPLIES
Display Tray Dome
Henna Doodles 2
Delicate Frames and Ornaments
Graphic 45 Flutter Collection
Acrylic paint
Gesso
Stickles 'Cosmos'
Ribbon and bead for hanging the piece
Thank you so much for stopping by!
Subscribe to:
Posts (Atom)