Saturday, May 21, 2016

The Tweedles Wedding Cake

It's a big day down the rabbit hole! Dum and Dee are tying the knot! Everyone is invited to the ceremony and of course, an afternoon tea reception will follow.
I don't think they will run out of cake.
There is Alice trying to coax Humpty Dumpty down gently. Though goodness knows how he got up there in the first place.
Other members of the wedding party waiting patiently for the drama to end so they can get on with things and eat cake. Looks like the Mad Hatter might be giving useless advice.


And here's the Cheshire Cat popping in to watch how it unfolds.

The Tweedles are looking very smart with their shocking pink socks and rose bud boutonniere pins.


Everyone had a grand time eating cake and drinking lashing of tea, but the Doormouse heard from the Chesire Cat the the Queen was on her way to arrest everyone on trumped up charges, so they hid where she would never think to look.......


And the party continued inside the cake. Because, hey, cake is cake no matter how you slice it!


 Most everything I used came from the wonderful Alpha Stamps!
Here is a supplies list:

House of Roses on the Porch Scrapbook Paper
Cube Box 1 Inch
Cube Box 2 Inch
Cube Box 3 Inch
1 Inch Curly paper Roses-Pale Pink
1 Inch Curly Paper Roses-Ivory
Mini Rose Buds-Pink Cream Variegated
Small Pale Pink Mulberry Blossoms
Small Bright Pink Mulberry Blossoms
Tiny Paper Roses-Pink Cream Variegated
3 Inch Tall Candlestick Holder
7/8 Inch Fancy Fan Ivory Lace
Liquid Pearls-Gold Pearl
Liquid Pearls-White Opal
Tenniels Alice Collage Sheet
Tin Sized Alice Collage Sheet
12x12 Chipboard

other supplies:
Pink Acrylic Paint
White Acrylic paint

Thank you for visiting!


Wednesday, May 11, 2016

Lonely Heart Shrine

It's deceptively simple, this little shrine.
But if you take a closer look, there are hundreds of individual polymer clay tiles in the background.
Kind of a metaphor for how simple a person can appear and how complex a human being really is.
Well, most of us, anyway.
And most of us want the same thing...just a little love.
So here, on this Thursday morning, is some love. Take it.
It's free. There's enough for everyone.


There was no pattern I followed to make the tiles. I used black polymer clay and cut lots of sticks. I painted each stick of clay with lots of different iridescent acrylic paints, cut those sticks into various sized squares and baked them off in a toaster oven. Polymer clay manufacturers use different temperatures, so make sure you follow the directions on the package. (I used Primo! by Sculpey)

I chose the Open Front 4.5 x 5.5 Shadowbox as the frame for my shrine and primered the inside back with gesso to give some good tooth for the glue to stick to.
I lined the sides of the inside of the shadowbox and the entire outside (including the back) with Double Dot Vintage Blueberry Scrapbook Paper, but you can use whatever works with the colors you choose to paint your tiles. Here's a LINK to some other gorgeous colors available in this paper collection.


While the papers were drying, I painted the Flaming Heart Shrine that is the big centerpiece, with more iridescent paints and set it aside. After the papers dried on the shadowbox, I stated gluing in the tiny tiles. There really wasn't an order in which I did this. My placement decisions were based on colors and how things fit together. On occasion, I would cut a piece to fit a difficult spot.

After all the pieces were in place and the glue was dry, I 'grouted' the tiles by squeezing Liquid Pearls - Gold Pearl into the gaps between the tiles, like you would with real floor tiles. I used my finger to smooth it in and then frequently wiped the surface of the tiles with a slightly damp paper towel to remove excess gold from the surface of the tiles.

After the grout was dry, I sealed the tiles with a mixture of matte medium and glazing medium. I wanted a satin finish and a mixture of the two gave me the look that I wanted.

When things were dry, I painted white details on the tiles and around the flaming heart. I attached a Large Red/Gold Glass Heart Bead to an old dolls hand and glued it into the flaming heart and glued the piece into the shadowbox, making sure it was centered.

Here's a detail shot showing the gold grout. Notice I didn't use it in all the tiny gaps....I missed a few spots but I kind of liked how it looked so I decided to leave them.


I glued some pretty gold ribbon on the sides of the box for hanging and attached a finding on the bottom of the ribbon ends to finish it off.
For a page of supply links, click HERE.

Supplies list:
Relics and Artifacts Casts-Flaming Heart w/ Support
Large Red/Gold Glass Heart Bead
Liquid Pearls-Gold Pearl
Open front 4.5 x 5.5 Shadowbox
Double Dot Vintage Scrapbook Paper
Gold Metallic Mini Braid
One Inch Wrought Iron Bronze Connector Filigree

Additional Supplies

Doll Hand
Various Iridescent Acrylic Paints
Matte Medium
Glaze Medium

Thank you for stopping by!

Wednesday, April 27, 2016

Fair Maidens and Evil Queens

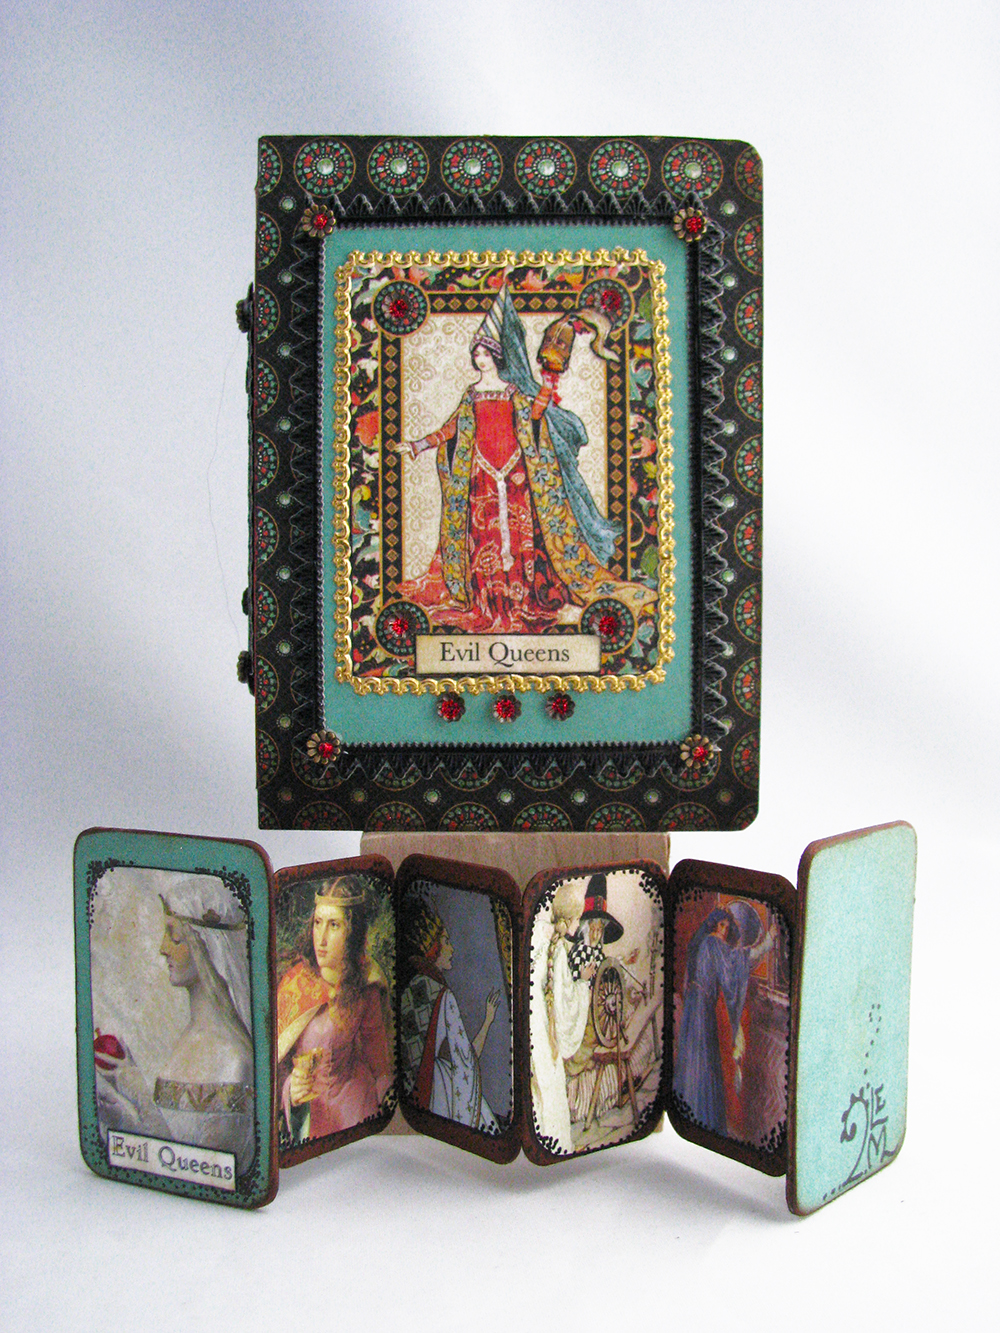
I'm having a little bit of a love affair with this ATC Sized Faux Book Box, so I've carried on making a couple more, but this time it's all about fairy tales.....specifically ''Fair Maidens and Evil Queens".
A book box for each, and I admit, though you probably already guessed this, the Evil Queens were my favorite!
I've also had a couple of e-mails asking how I used the linen hinging tape from my last two books, so I have included a wee tut on that as well. Easy peasy and thanks for asking!


Let's start with the Fair Maidens, shall we?
Those girls, always getting into trouble! Whether from their own choices or others machinations, the situations they get themselves into are pretty crazy.
Curses, sleeping for a hundred years, household slavery, poisoning, betrayal....it's a real soap opera!
Here are a few of the girls tucked away in their box.


And here they are having a bit of a stretch. I'm not going to leave them out too long. There's no telling what mischief they'll get themselves into!


I used a lot of pretty luscious collage sheets from Alpha Stamps for the images of the girls and they are listed in the supplies below.


We'll say goodbye to the girls for the moment and move on to the queens.


Ah, Evil Queens......they're just not happy without a good poisoning or a beheading, are they? Looks like this one is holding the head of a knight. He must have really pissed her off. That or Mrs. Grumpy Pants got up on the wrong side of the royal bed.


Here's a lovely shot of Queen Eleanor forcing some poison upon the pretty, but hapless Fair Rosamund.

And an array of nasty tempered ladies just looking for someone to whack with their scepters.


Overall, I think they are a fairly sneaky group of pestilential ladies and prefer less obvious means of torture, murder and mayhem. Ooh, this is interesting. A secret stash of poisons! Okay, which one of you 'ladies' smuggled those in here?
Or did all of you connive together? Hmmmm, better keep my eye on you!


For a link to supplies, click HERE for supplies for Fair Maiden and HERE for Evil Queens Supplies.

Supplies list:
Fair Maidens Supplies

ATC Sized Faux Book Box
Graphic 45 Enchanted Forest Scrapbook Papers
Rapunzel Collage Sheet
The Ball Collage Sheet
Midnight #1 Collage Sheet
Cinderella Cleaning Collage Sheet
Sleeping Beauty #2 Collage Sheet
Fair Rosamund Collage Sheet (?)
Thin Fleur Dresden Borders-Black
Gold Mini Rosette Dresden Borders
Liquid Pearls-Platinum
Liquid Pearls-Gold Pearl
7mm Flower Washers
Old Fashioned Roses-Red
12x12 Chipboard

Other
Burgundy Ribbon
Linen Hinging tape


Evil Queens Supplies

ATC Sized Faux Book Box
Graphic 45 Enchanted Forest Scrapbook Papers
Evil Queens Collage Sheet
Fair Rosumund Collage Sheet
Skeleton Slides Collage Sheet
7mm Flower Washers
Gold Mini Rosette Dresden Borders
Black Zig Zag Dresden Borders
12 Tiny Glass Bottles
Corked Vials
12x12 Chipboard
Sparrows Compass Brass Link (substitution for the filigree flower on the Evil Queens Mini Book Holder)
Stickles Christmas Red
Stickles Lime Green
Stickles Black Diamond
Liquid Pearls Blackberry

Other
Round Corked Glass Vial
Craft Jewelry Box Lid (cut in half)
Manila File (cut into a strip and folded accordion style for the Evil Queens mini book)
Linen Hinging Tape

BUT WAIT! THERE'S MORE!

A little tutorial on linen hinging tape and how I use it;

For hinging the Fair Maidens Book Box, whose cover opens and lies flat, I first cut two pieces of tape slightly shorter than the length of the box.
I 'loosely' stuck them on making sure I left enough wiggle room in the space between the covers to allow for the width of scrapbook papers. If you don't allow for this important step, your book may close properly at this point, but won't later on after you've covered the chipboard with papers.
I measured the gap and it's about a quarter inch (1/4) of tape showing between each chipboard piece.


After I was satisfied with the placing of the tape, I used a bone tool to rub the tape onto the chipboard, making sure I had good adhesion.
For extra strength, I laid a piece of tape vertically across the book and used the bone tool on that one well.


Now that the fussy part is finished, I prepped the surface by painting the tape black just over the actual hinge-y bit. It's easier to do this at this stage rather than trying to fuss with painting after you've got your papers on.


While I've got the paint out, I prep any other surface I need to before the papers go on, including the corners of the inside of the box so no light brown from the chipboard shows.

For the Evil Queens box it's the same thing, more or less.
Since there is only one hinge to deal with, it's one piece of tape vertically, making sure once again to leave an appropriately sized gap for papers.
For this application I use two pieces of tape horizontally for strength. Then prep with paint as needed.


I should also mention that I pre-cut all of my papers before I tape things together. Much easier that way!

Thank you for stopping by!

Wednesday, April 20, 2016

Birds, birds and more birds.

We are having a lot of fun over at Alpha Stamps with our bird themed April! Here are a couple of fun and fairly uncomplicated projects I came up with noodling around with ATC sized book boxes.


Two very different styles, but both with lots of blue. Same theme, same boxes, but so very different from each other!

The darker, Blue Bird Box, I constructed using all the pieces, including the side binding that enables the book to open and the top to lie flat.


Inside I have a sweet set of bird ATC's to browse through......


For the pale blue Trellis Box, I omitted the 'spine hinge and attached the cover directly to the box. I love having options!


To attach the spine and covers of the books, I used linen hinging tape (which you can get HERE), I taped the pieces together and used a boning tool to polish the tape on, making sure I got a good bond, then I attached my scrapbook papers using matte medium. That way, the only part of the linen tape that actually shows is the itty bitty line of 'hinge' connecting the pieces, but there is enough tape on both sides of the covers to give a really strong hold.


Inside the Trellis box is a (surprise!) trellis that I painted white and use as a mid-ground piece between the nest of eggs in the background and the bird sitting in the front.

I really enjoyed using the same platform for two very different pieces!

For a link to supplies from Alpha Stamps, click HERE for the Blue Bird Book Box and HERE for the Trellis Book Box.

SUPPLIES LIST

(Blue Bird Book Box)

Bees,Birds and Butterflies Collage Sheet
Bird Book Covers Collage Sheet
Victorian Garden Collage Sheet
Blue Birds Collage Sheet
Bird Words Collage Sheet
M For The Magpie Collage Sheet
Vintage Dot Orange Citrus Collage Paper
Vintage Dot Chiffon Collage Paper
Vintage Dot Island Mist Scrapbook Paper
Serendipity Glee Scrapbook Paper
Serendipity Chronicle Scrapbook Paper
Vintage Dot Blueberry Scrapbook Paper
Antique Brass Birdhouse Charm
Liquid Pearls-Platinum
Fancy Bronze Mirror Frame Setting

( Trellis Book Box)

Bees,Birds and Butterflies Collage Sheet
M For The Magpie Collage Sheet
Frolic Petits Moments Scrapbook Paper
Mini Rose Buds-Pink cream Variegated
Tiny Paper Roses Pink Cream Variegated
Antique Silver Birdcage Charm
Doodled Cage With Solid Back
Liquid Pearls-Platinum
Ivy ATC Frame
Mini Birds and Nests Shape Set


Additional Supplies:
Linen Book Binding Tape
White Acrylic Paint
Colored pencils in purples and blues


Thank you so much for popping by!


Sunday, April 3, 2016

Estelle

Just a quick and fun card I made for the folks at Alpha Stamps!


For a list of supplies, click HERE. Thanks for coming by!

Wednesday, March 23, 2016

The Old Folly

Out in the countryside far away from the noise of the village, nestled in it's own copse of woods is a very large, very grand house. It's been quite a while since the old girl had a butler to open her doors and housemaids scurrying about and a red cheeked cook.
But still, she's a beautiful, if a bit shabby house and is well loved by the family that lives there.
There is no gardener, but the flowers and lawns are cared for as best the family can.
In the copse of woods (the 21st century children of the house have named Follywood) lies, you guessed it, an old folly. Like the big house, it's a bit shabby and a little overgrown but still beautiful. The children love to play there, but there is always an element of awareness to their play. A spicy ingredient of feeling they are being watched. They never see anyone, never feel frightened, but it's a fact that the children never question, having absorbed it into the everyday imaginings of their pretendings and play acting.


The Folly remains empty, yet it always feels as if someone has just left.


Once in a while late at night, one child will wake the others and they silently watch the light that gently shines from the wood. It's friendly, gauzy warmth embraces them until they begin to feel quite drowsy and stumble back to their beds.
Morning brings sunshine and adventure and the magic moment of the night before is dismissed for a pirate theater and frog catching in the pond.

If they'd followed the friendly light into the wood they might have seen that it was shining through the shingles of the roof.


Looks like someone has a comfy little hiding place where they stash their books and read into the night. Fairy tales, a lamp and a cushy stool to sit on. Perhaps a child of another sort likes the Folly for the same reason the others do? Maybe the big old house is home to more than meets the eye!

A Brief Summation of Parts and Details

The basic structure of this folly is from a kit from the awesome folks at Alpha Stamps.
After a dry fit of the basic box, and before I permanently assembled it, I pre-cut the interior and exterior papers, taking into consideration the flangey bits that need to be left bare in order for the walls to fit into each other properly.


I used matte medium and attached all the papers inside and out and painted the inside walls and ceiling.


At the last minute I decided I wanted the front to have a door, so I cut off the flanges on the piece that I chose as the door, and the flanges on the two side pieces on the panels that butt up to the door. I used linen book binding tape as a hinge on the inside of the door. I'm so sorry I didn't get a photograph of this part of the process. It wasn't a planned maneuver and I was in the moment.

I also decided that the windows needed awnings and trim. (I did take pictures of this after kicking myself about the door!)
I made a template using graph paper of the shape I wanted the awnings to be and cut them out.


The paper awnings wouldn't have been very sturdy just glued directly on to the window arch, so I cut some thin strips of heavy weight chip board, gently bent them to shape and glued them on the window arches. This gave the awnings a good base to stick to.


After everything dried, I added some more chip board strips to finsh out the molding on the windows, cut out and glued some wooden doll house trim under the windows and primed and painted all the window trim.

I glued all the parts together and began added Dresden Trim to the windows to disguise the chip board and trimmed out the base of the folly and the shingled roof.
(the shingles come in strips and they're dead easy to apply. You can get them HERE )
After making sure there were no gaps in the corner joins (I filled any there were with wood putty) I painted everything that need touching up inclued all the Dresden trim and then aged the piece using acrylic paints.
This was the result before I started adding the flora.


Then it was a matter of bending and gluing lots of pretty rose vines and moss in the spots that pleased me.


SUPPLIES
For a link to the supplies from Alpha Stamps click HERE.

List
Fortune Teller Booth
Pineapple Finial
Mansard Roof for Fortune Teller's Booth
Pink Rose Garland
Fern Garland
Sheet Moss
Frolic Adorn Scrapbook Paper
Mini Adhesive Rosette Trim-Ivory
Little Library Collage Sheet
Miniature Hurricane Lamp
Baroque Dresden Borders-Black


Additional Supplies
Acrylic paint
1/24 scale diamond shingles


Thank you so much for stopping by!