For your viewing pleasure, a wee village of small twinkly houses!
Thanks to the folks at Alpha Stamps for all the juicy glitter, bits and bobs and gorgeous papers!
Great little houses to decorate the center of my table this year. I want to mention that all the roofs lift off and those LED candles fit right inside. Because I am such a crap picture taker, I couldn't do the warm glowing windows justice when the candles were lit inside the houses so today they are shining on the outside. Perhaps trying to attract a Christmas gnome or two....
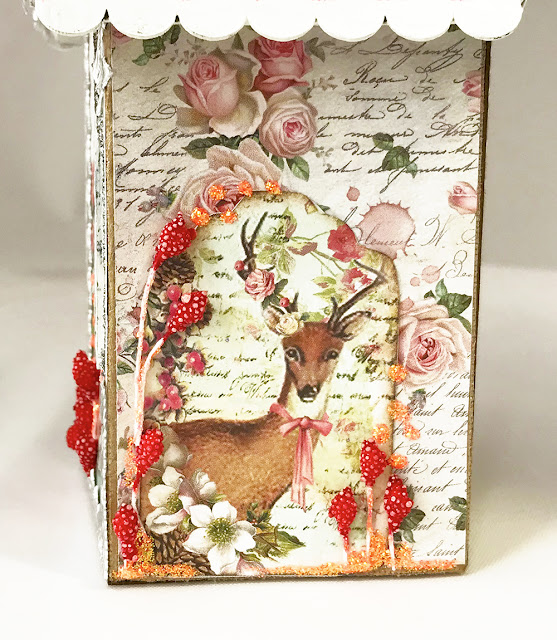
A detail of the house above....
The construction of the houses is not complicated, but it's a bit fussy until you figure it out. My solution was to pre-fold all of the dotted guidelines on each of the houses, burnish the lines down with the round edge of a burnishing tool (you could use something like the rounded bit of a Sharpie marker) and then straighten them all back out again. If you do that, you're not struggling with trying to get that line definition after you glue your papers on.
Since all of the houses are the same widths, the only difference is in how tall they are. That made it easy to cut papers. You only have to make one template...just make it from the tallest house and you can adjust the heights of the shorter ones thereafter.
After the papers are glued on the house sides I used the windows as templates and then cut them out using a scalpel. A good exacto with a new blade works as well.
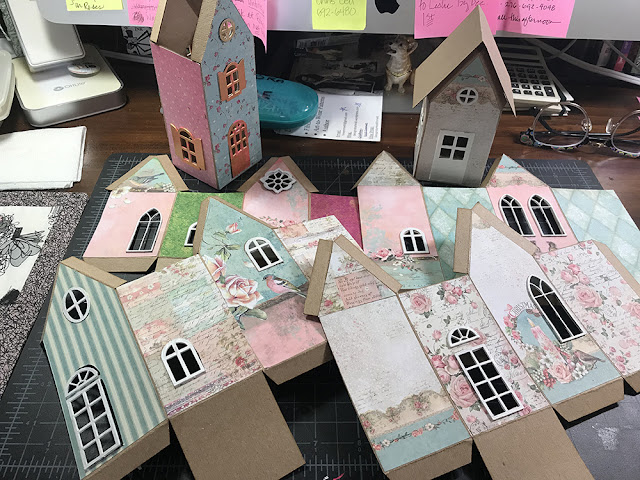
In the picture below, you can see how all the houses are pre-folded, papers glued on after that and then windows and doorways glued in as the next step. (I painted all of mine white and glued them in after they dried)
Now you can glue the house 'box' together. Do that with all of them and set them aside to dry. Time to go on to roof shingling!
I love shingling little roofs. It's easy and when you are done they look wonderful. Just remember a couple of things....start at the bottom and work your way up to the top and alternate how you put the shingles on so they don't all line up. If you look at real roofs the shingles are never lined up. And neither are bricks on a house.
Do the shingles on one side of the roof until you get to the fold line, turn it around and do the other side. Don't worry that they don't line up at the edges, you will fix that later.
Let the glue dry, turn your roof over with the shingles facing down, and using a sharp pair of scissors trim the edges down to the length you want them to over hang.
At this point you can paint your roof and glue it on your house if you like, but because I want to be able take my roof on and off so I can put tea lights in the houses, I am going to glue the 'Roof Trim for Tall houses' on to the gable ends of my roof. This will not only make it sturdy, the roof trim is at the correct angle for the pitch of the gable end of the house and makes it a worry free and strong for popping it off and then easily putting it back on again.
Below is a picture of the houses glued up, the roofs all assembled , everything ready for extra painting, details and trims!
More pictures of finished houses...you can see the many possibilities for decorating both the roof and the houses. Because I mostly used Stamperia's 'Pink Christmas' papers it was easy to choose colors to go with them regarding paint and doodads.A few of the papers I used like the stripe you see above (that is a G45 piece), were out of my scrap pile and were chosen for their color compatibility and to change up the textures a little. The back side of the 'Vintage Dot' paper from Bo Bunny was also used, but it's not necessary.
I even used the back of an old Christmas card on one side of a house just because I loved the pattern and the colors looked so pretty with the Pink Christmas paper.
I love this piece of paper. How cute are those squirrels?!! The German glass glitter adds so much texture and sparkle.
For a link to all the wonderful supplies used click HERE!
Thank you very much for stopping by!


These are wonderful! I love the soft colors.
ReplyDeleteThese are so beautiful, Lora!
ReplyDeleteOh my goodness, these are so adorable!
ReplyDelete