Hello all my wonderful Make and Take ladies! I sure have missed seeing you all.
In lieu of us all gathering together I have made this picture tutorial of a craft that just makes me smile. I hope it does the same for you.
I love all of you and can't wait to see you in person again.
Okay, let's do this!!
This is a fun and super easy way to upcycle something that we all have in our house and a nice way to use up bits and scraps of ribbon and whatever else you want to embellish your loverly toilet roll.
The basic things you need to make this craft.....
1) A toilet paper roll
2) A sheet of craft paper (you can use copy paper if that is what you have)
3) White paint
4) Black paint
5) Glue (Elmer's, Aleene's or any white glue will do)
6) A battery tea light
7) Bits of ribbon and silk or paper flowers (All the ribbon came from WalMart and the flowers were left over from another project. Most of us have a few silk flowers somewhere in the house...don't be shy about using large ones if that's what you've got. They look adorable!)
8) Black Marker (I used a Sharpie)
9) Scissors
Yay! Let's play with crafty stuff! Here we go........
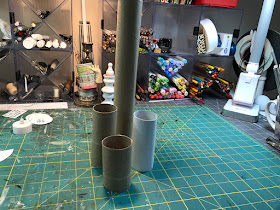
Toilet paper rolls. Or paper towel rolls you can cut to the heights you want. If you've got 'em use 'em!
Draw windows on your wee TP Tower of Power with your black marker. Use a pencil if you need to practice
Cut the windows out with a pair of sharp scissors. (If you are doing this with a child, you might want to do this bit for them.)
Give it a coat or two of white paint- I did two coats. Set aside and let it dry.
NOTE:
I used wax paper I taped down to my work surface and poured a small amount of paint directly on the wax paper. It saves a lot of clean up!
Okay moving on...
When the paint is dry, put a dab of black paint on your wax paper and paint around the inside edges of your windows and paint little frames/window sills around each one.
You can use your marker for this bit if that is more comfortable.
Next step might look weird, but it makes a big difference.
Take your marker or you paint brush of black paint and paint along the bottom edge (the base) of your tower.
Doing this will fill in any bits of white that might show after you add you ribbon and you don't have to go in afterwards and try to fill in the white bits.
It doesn't have to be super tidy, just do your best to make it neat and just a thin lie at the very bottom. Set it aside for the moment.
Have a piece of chocolate!
Or maybe a couple slices of apple and some cheese.
That is so perky.
Next we are going to work on the little roof and the base.
First the roof. make a pointy little cone by doing this.....
Draw a circle that is 2 1/4 and cut a quarter-size slice of pie out of it. Graph paper helps, but you can eyeball it or use the bottom of something round as a template.
Like this.....
Put a thin line of glue down one side of the 'pie slice' and bend the other side to meet it to form a cone. Use a paper clip to hold it together until it dries.
Next step.....paint the roof and the base black and let them dry.
Now comes the SUPER FUN PARTS!
Oh, how I love embellishing things.
All my Make and Take ladies know how this part works.
There isn't really a plan to this. I sort of compose what I think looks nice out of the scraps of ribbon and flowery bits I hunted around for and play around with how they look on the pieces before I glue anything down.
Then I start sticking stuff down. I start with the ribbon on the base of the tower and then painted and decorated the wee roof.
I DID NOT glue the roof on the tower. That come a bit later. If you painted dots or stripes on your roof, let that dry before you put on flowers or beads or fringe or anything else. Paint first. Let it dry. Add embellishments and details.
All the details that are on the tower, the arches and decorative stuff around the windows I did with a Sharpie marker
When you have your tower detailed the way you like it, glue the roof on by applying glue around the top edge your tower and pop the roof on taking care to make sure the roof isn't on wonky unless that is what you want, then go for it!
And you are essentially finished. You don't want to glue the base to your tower or you won't be able to turn your tea light on and off. You can, however, glue the base to the top of something fun like a little candlestick (see picture below) or anything else you think is fun or you happen to have on hand.
Once you get one of these under your crafty belt, you can make a million variations, so use your imagination and craft something uniquely you!
EXTRA
Here's a quick flower to draw step-by-step.
Thank you so very much for visiting!


So fun and ingenious
ReplyDeleteThese are the best!
ReplyDeleteQue divertida manualidad! Incluso para hacer con los niños,muchas gracias por la idea!
ReplyDeleteBesos.