Pages

Tuesday, August 22, 2017

The new studio is underway!

It's been a while coming, what with MacGyver having hand surgery and lots of house guests, etcetera and blah, blah blah, life happens.
And we felt overwhelmed about this huge task before us. We decided that we needed a good contractor to get us organized and on task, that had a lot of experience and did quality work. It's also very inspiring knowing you have someone showing up everyday that gives 100 percent and enjoys the work. After searching a bit, we found not only a good contractor, but a GREAT one. His name is Ron and we think he's pretty spiffy.
Ron and MacGyver have been working together for several weeks and here is the beginning of the journey.
Last year we gutted the basement and here is where we left it:
A door had been installed, but it is too small for the space and doesn't let in enough light. (I got talked out of the double French doors that I originally wanted)
The first step that needed to happen was to replace this door with new double doors.
They've removed the single door and have cut out the concrete block on the inside.

It's an exhausting and dirty job!
Many wheel barrows of rubble were hauled away.
Preliminary cuts were made on the out side brick and a large board was screwed into the brick above to support the upper wall after the header was removed. Eventually, this board will be removed and replace with the support for the copper awning that will be installed.
Hey! There's a big hole in my house!
Door wrassling. Getting it level and plumb.
The door is nearly in! Our friend Douglas dropped by to supervise for a moment or two.....
Aaaand the doors are in! They look great!
The timeline photographs don't convey how much work, blood and sweat went into getting this big step done. The guys worked super hard over a period of several days to get those doors in. Our contractors confidence and experience lifted our spirits and encouraged us to move forward, so thank you, Ron!

Next: There's a bunch of studs in my basement!! Stay tuned......


Sunday, August 13, 2017

Sometimes a pig's gotta fly...........

Hello all, Lora here taking my turn for Gypsy Soul Laser Cuts with this little piggy whose just gotta fly. Having escaped the confines of the balloon, she grew some wings and has taken off into blue skies. Skimming over the trees, enjoying the view, she's a happy little porker!
She is pretty fancy with her necklace of flowers and her glittery wings.

Here is where I began......
 I started off with the new ATC Shrine-Steampunk. (which will be coming soon!)
I dry fit it together using a couple of pieces of tape, working out the order that I needed to assemble it in.
Because the piece is designed with a 'hinge' already, I decided that I would not glue the bottom or the door on until I was finished working on the inside of the shadowbox and both sides of the door.
I gave everything a good coat of gesso and started cutting out my bits and pieces.
Worked with the bottom open. I painted a blue sky and built up a little scene for my pig to fly over.
Whilst things were drying, I painted the door and embellished the front. I mixed a bit of glaze with cobalt blue paint and coated the balloon with it, adding some sparkles. I papered the gears, added gold and brown ink around the edges. A little sparkle on the banner, then glued it on. And added some white dots for detail.
I like adding dots to things.
I glued the bottom and the door on the piece and added a bit of moss (for shrubbery) on the bottom piece. Voila.
A cute and cheerful little box of piggy happiness!
Thank you for stopping by!

Supplies:
ATC Shadowbox-Steampunk (coming soon)

acrylic paint
collage images
Graphic 45 'Olde Curiosity Shoppe 6x6 Scrapbook Paper (for the pig and the gears on the balloon)
florist moss
Stickles Diamond

Saturday, August 5, 2017

Good Fortune Fairy Pocket Cards.....and a trio of Snarky Witches for balance.

I do believe in balance. So when I made these sweet Good Fortune Fairy Cards, though I really like them, I felt a bit nauseous. I made the Snarky Witch cards as a sort of psychic Rolaids. Now I'm happy.
 I began with Stars Playing Cards (for a complete list of the great stuff supplied by Alpha Stamps click HERE )
I gave them a coat of Gesso....
And using the back side of the cards a s a template, I cut out all of the papers I needed, front and back and glued them to the back board of the cards.
I cut out my images from the Star Fairies Collage Sheet and pumped up their color with some Copic Markers.
After the color was done, I positioned the fairies inside the front frames (which I painted with Lumiere Halo Blue Gold) and glued them in.
I then glued the front piece on to the back, let them all dry and gave them a good sanding.
I inked the edges with gold.
After all that dried, I went to town with Stickles and added lots of sparkle and detail. Fun!
A couple of close-up pictures where you can see the sanded edges and the gold inking and sparkly bits.....


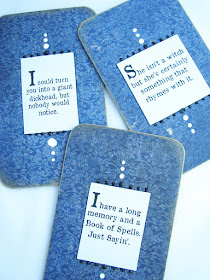
And here are my Snarky Witches to give a little tartness to all the sweet. Sigh....I do love some snark!

 For a complete list of the supplies used, click HERE.
Thank you for stopping by!


Tuesday, August 1, 2017

Little Haunted House Fold Out Book

Ah, Halloween....my favorite! Seems like we're all starting to get into the spooky season a little early, but there are quite a few of us who love creating Halloween treasures all year.
I'm certainly one of them! Lora here taking my turn for the awesome Gypsy Soul Laser Cuts and I'm very excited to show you my latest project.
Here's a little fold out book of wee houses that I couldn't resist making with the new Arch Top House Silhouettes. (they'll be coming soon!)
I love these little buggers....they're small enough not to be overwhelming and large enough to add lots of little details to. And you can put together as many as you like or just do one. Super fun.
 I like odd numbers, so I chose to do seven panels.
And serendipitously the perfect word fit on the back.
 Here's where I started out....first, I cut all the papers I wanted to use on the front. I used linen hinging tape to connect my houses (about 1/4 inch exposed as hinge) and then painted the backsides, including the tape, black.
I then flipped the whole thing over and painted the front hinges black. You don't have to paint the whole front pieces, as the houses will be covered in paper.
After everything dried I glued my papers on and inked up the sides. I started playing with different components that I wanted to use and rearranging things as they fit together.
I try not to waste materials and you can see that the green house only has trim going about halfway across. That's because I planned on putting a big face on the right side and was avoiding using excess materials and also was trying not to add unnecessary thickness to the house, keeping in mind that I want to fold it up.
 When I had all the major elements glued down I added the little white dots to all the houses to add some delicate detail. The dots, the repeating borders and the white tree limbs all add coherency and theme to the overall look of the book.
Ooh, what a pretty spider!
This gal looks like she might be hungry for a little appetizer.....
Thank you so much for stopping by!
Supplies:
Creepy Tree 8 inch (cut up and used throughout the houses)
Spider and Web Corners (coming soon)
Graphic 45 An Eerie Tale 6x6 papers
Bo Bunny Vintage Dot papers
Black Dresden Trim (all papers and trim came from Alpha Stamps)
Art Tea Life digital scrapbook images
Black acrylic paint
Linen hinging tape
White poster paint marker ( you can get them at Amazon HERE)