Pages

Friday, December 18, 2015

You better watch out.........

You better not cry, you better not pout, I'm tellin' you why....

Krampus could be coming to your house to whack the crap out of you with a bunch of birch branches, give you nightmares for a year or, if the horror stories are accurate, spirit you away in his big black sack and eat you alive.

Pretty cheerful Christmas legend!
This is kind of what I picture him riding around in. Kind of the anti-Santa's sleigh...all dark and sooty with horns that he shed from the previous year mounted on the back of his great big chair, his sack-o-children and birch branches tossed in the back.


Krampus has only just started his rounds so his sleigh is all tidy and clean. I imagine that toward the end of the night it's looking pretty grotty and run down.


You can see a little hand sticking out of his bag. Hmmm....
And his old horns are starting to look a little rotten already.
All you really nasty kids (you know who you are!!) better start being very sorry for all the bad things you've done all year.


The best you can hope for is getting the stuffing scared out of you seeing hairy, mean old Krampus waving that big stick around.
The worse I'll leave up to your imagination....but if I were you, I would try really hard not to think about that big black sack!

This was a pretty straight forward project. I assembled the Chipboard Sleigh (Tabletop) all but the outer sleigh railings which I set aside. I painted everything black, including the outer railings, let it dry completely, and cut and fitted my red paper. You can use any paper you like...I just liked the sooty quality of the red paper. It sort of looks like a cast-off Santa sleigh to me.
I glued the paper on and let it dry.

I painted the pieces of the Arch Top Reliquary black and glued my paper on the back piece of the reliquary and then glued the frame over it.


The base of the chair is a little wooden scrap I had kicking around that I padded with a piece of jewelry box padding and covered with black fabric.

I made polymer clay horns and two arm rests for the chair and glued them on after I painted them.

I made a black sack by folding over a piece of fabric and gluing (you probably noticed by now that I don't sew) up the seam.
I turned it inside out and voila, a sack.

I stuffed tissue in the bottom to poof it out and added my little, erm, touches to it. I admit, I had a doll arm kicking around too.

I bent up a piece of black electrical wire and glued it inside the sleigh and hung a lantern on it. Krampus doesn't have a fancy Rudolph to light his way, so he's got to do it the old fashioned way.
Maybe that makes him even more grumpy.
I imagine he's got something less glamorous pulling his sleigh like yaks or water buffalo.
Or maybe something far less substantial like a couple of night mares......


SUPPLIES LIST From Alpha Stamps

Chipboard Sleigh-Tabletop
Lantern
Arch Top Reliquary-Single
Weekend Market Around The World Scrapbook Paper
Bronze Fancy Filigree Set

Additional bits:
The red paper I used was called Distressed Couture Vines from Glitz
Polymer clay
Black Wire
Black acrylic paint
White acrylic paint
Quinacrodone Nickel Azo Gold Acrylic paint
Black fabric Twine
Dolls arm
Sticks from my back garden

Thank you for stopping by!


Thursday, December 10, 2015

Some eye candy...

A few pictures of what I've been up to for the last couple of months.
Why houses, of course!

Baba Yaga Longshanks


Butterfly House


Isabella's Red Wheels


A few grouped together.....The Maiden, Number 48 and Mona's Place.
Thank you for visiting!

Saturday, November 28, 2015

Christmas Ornaments

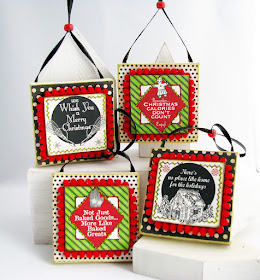
I love making Christmas Ornaments. Working small, with cheerful Christmas papers and pretty, tiny little findings and lots of glitter is so dang fun. Here are four house-shaped (are you surprised?) Santa themed Christmas Ornaments.


I used wooden blanks that I cut from a template I drew, but you could easily use heavy chipboard instead of wood. I also used bits and pieces of scrap paper left over from other projects...mostly G45 Christmas papers, but any bright, cheerful papers will work!


I really like these cabochon medallions....the glass cabs make the images appear larger and they look great and add a little bit more gleam to the ornaments.


I added some litle dots with a black marker around the corners and edges of things to add a bit of richness and detail.


And a little extra kitsch....some quick ornaments I made using 3x3 canvas (you could very easily use chipboard), some adorable papers from the Farmhouse Kitchen Collection and a little mini red pom pom fringe. I really love the impact black and white make especially with a little pop of Christmas color!

Supplies list for the Santa House Ornaments:
Papers came from G45's Christmas Emporium and Twas the night Before Christmas...all 6x6.
Cabochon/pendant settings
Mini Clock and Winding Key Set
Bronze Bookmark with Round Setting
Kriss Kringle Collage Sheet
Santa and Children Collage Sheet
Christmas Red Stickles
Lime Green Stickles
Tiny Dot Dresden Borders-Red

Other:
Filigree Flower
Swarovski Flat back crystals in Aurora
Burgundy ribbon

CHRISTMAS KITCHEN KITSCH ORNAMENTS

8x8 Heavy Chipboard ( I used 3x3 mini canvas' but could easily make these with chipboard)
Farmhouse Kitchen Collection Papers;
Holiday Baking Butcher Paper
Salad Copic Marker
Black and Ivory Prints 6x6 Paper Pad
Mini Pom Pom Fringe-Red

Red Pony Beads
Black ribbon

Tuesday, November 17, 2015

Winter Wonderland Advent Calendar

Christmas is just around the corner folks! And if you're thinking about making an advent calendar, it's a lot closer than you think!

I made this one for the fab folks at Alpha Stamps and it's kind of inspired by the whimsical, fancy Mad Hatter style of the company Mackenzie Childs.
The box is a good size at approx. 12x12 inches, so it makes a good statement on a mantle or tabletop. You could also wire it and hang it on a wall.


I love how the bright colors are a cheerful contrast to the black and white harlequin check on the walls. I fell in love with the Farmhouse Christmas Stripe Scrapbook paper because of the strip of stockings toward the bottom and decided to use that on the wall. I hand colored it with an array of Copic markers and added lots of glitter.


Looks like the family is coming in from a chilly ride on a one horse sleigh! There are lots of tasty treats and a bottle of bubbly waiting to warm them up!


I made the treats and the bottle from polymer clay with some really wonderful molds that I highly recommend. They are really good quality and you don't have to use a release spray to get your pieces out. I used Copics on these as well. Turns out alcohol inks are great on baked polymer clay! I used liquid pearls in Hydrangea to make the jelly center of the cake in the dome and lots of Stickles for snow on the gingerbread house.

I finished the back off with more stripey paper just to make it pretty from any angle.


And added some charming details like the sweet little tuxedo cat and all the presents. I used the wooden die-cut snowflakes for ornaments on the tree. I painted them with a light coating of glue and then sprinkled glitter on them. Love the sparkle!


I also used glass pearls for the drawer pulls, dotting the tops of each with a little stickles and then piping some around the base of the pearls to finish them off.


The cake plate was made using a bead cap, a piece of cardboard and some Dresden trim, primered then colored with Copics.
For a link to all the supplies I used, click HERE.

Supplies List:
Advent Calendar Shadowbox
Farmhouse Christmas Stripe Scrapbook Paper
Black and Ivory Diamonds Scrapbook Paper
Black and Ivory Ribbon Stripe Scrapbook Paper
Mini Silicone Cake Mold Set
Mini Gingerbread House Mold
Victorian Table Kit-Black
Black and White Reclining Cat
Cream Pearl Assortment
Mini Christmas Packages
Wood Snowflake Cut-Out Set
Retro Bottle Brush tree Set (substitution suggestion)
Christmas Red Stickles
Lime green Stickles
Liquid Pearls-Hydrangea
Thin Fleur Dresden Border-Black
Clear Cake Dome on Gold Tray
Double Dot Vintage Wild Berry Scrapbook Paper
Double Dot Vintage Wasabi Green Scrapbook Paper

Thanks for stopping by!

Saturday, October 31, 2015

Wednesday, September 9, 2015

What's in Your Basement?

Here are a couple of fun Halloween Houses inspired by this months Haunted House Kit over at Alpha Stamps.
Looks like a little Halloween party is going on on the left side. Some one is reading fortunes.......and what's that creepy little clown doing? Maybe he's on his way down to snoop around the basement. If he is, he's in for a big surprise.


The house on the right has it's own story to tell, what with birds and nests, lost keys and locked attics.
Hmmmm, I think that one might be a bit creepier than the obvious skellie in the basement.
I'll let you be the judge!


For a link to all the supplies, click HERE


SUPPLIES LIST
Supplies;

Moonlit Gossamer Scrapbook paper
Moonlit Collection Images
Skeleton Slides Collage Sheet (images in the upper windows)
Copic Marker #V15 (Mallow) I used this marker to color the Gossamer paper purple.
Moonlit Graveyard Shadow Scrapbook Paper (just the cream colored bits used for the background in the windows)
Graphic 45 An Eerie Tale Enchantment Scrapbook paper (for the roofs)
Graphic45 Rare Oddities Antiquities and Artifacts Scrapbook Paper
Black Zig Zag Dresden Borders
Ornate Metal Keys-Shabby Chic
Tim Holtz Locket Keys
Miniature Bookplates Die-Cut Set (for the windows with the kitties in them)


Additional:
Chipboard Bats
Hand cut windows (as gable windows)


Sunday, August 23, 2015

A Mild Obsession or Two

If you know me, you know that I love houses. Especially old houses with lots of personality. If they still have their original details all the better.
The root of this obsession goes back to my childhood and my other obsession, reading.
Reading was and is an addiction I'll happily have for the rest of my life, and when I was old enough to hold a book on my own it was fairy tales, ghost stories and mysteries that held my attention...if the story had a house in it it was golden!
I had a favorite book of fairy tales I believe was called "Fairy Tales From Around the World" that I read so often I wore it out.
My favorite story was called, "Baba Yaga" and I read it so many times I could practically recite it word for word.
As an adult, I have done a lot of research on goddesses, witches and wise women and have found none as mercurial and ambiguous as Baba Yaga.
There are many, many stories in the Slavic culture about Baba Yaga, who is portrayed as a witch, a goddess, a villain, a protector of forest and wildlife, a cannibal, a rescuer of children, a child stealer...the list goes on and on. What is a constant in all the stories is that she is fierce and powerful.
As a child, in my little world with my one story about her I was fascinated.
She scared the hell out of me and I loved her at the same time.

What I thought was especially wonderful about Baba Yaga was her house.


She lived in the forest in a house that had chicken feet. Yep, chicken feet! That did it for me....a house with chicken feet?!! Coolest thing ever.
Perhaps it's rare when a person realizes and remembers a passion when it's born, but that was one of those moments for me.
When I was a teenager, my friends were all reading "Tiger Beat" magazine and I was trolling over those house plans magazines, learning about floor plans and traffic flow and kitchen foot prints.

As an artist,  many of the things I make are centered on or around the theme of houses. And I am as curious about what is in or around a house (like libraries or gardens) as the stories about the folks who live in them.
When I make a house, there is usually a story that inspired it. Most times they are something from my imagination, but much of what inspires me are real houses that I've seen or been in that evoke a feeling or spark something off and away I go. One of those houses is the one I live in. It's a rambley old Tudor with a big wild garden and it's filled with many hundreds of books. A constant source of inspiration for me.
Sometimes my houses have feet......


(This one also serves as the header for my blog...it's one of my favorites)

And are made from polymer clay.

Some have taken the form of house shaped shrines,

Some are cards or chunky houses.

Sorry about how blue this one is. Some of these pics are old and i didn't know much about taking pictures way back when!
(I still don't know much, but I've learned some)

I make a lot of precious metal clay jewelry and houses play a big role in my designs.

Recently, I've been in a bit of an artistic doldrums and have gained a lot of inspiration from wonderful artists like Jane Davenport, who inspired me to draw this girl who I've scanned into my computer and begun to play a game with. I put her in many projects in as many different ways I can think of. Kind of my own 'Where's Waldo?"

This is the original drawing;
You can see her in a couple of different applications Here and Here.
Another artist I find inspiring is Mary Jane Chadbourne whose workshops on the  Artful Gathering Retreats
have done a lot for getting me out of my artsy slump. The previous post, Lady Divina's Cupboard and a little bit extra  has a couple of pics at the bottom of houses inspired by Mary Jane's workshop, Tinytopia on Artful Gathering Retreats. (see link above)

Another huge inspiration for me was a recent visit to the UK. My husband and I took a glorious three week trip to England and the architecture, age and character of the houses and buildings there gave me such a lift, (the city of York and the surrounding area especially captured my heart) I haven't stopped working since we got back.
Here is a very bad picture of a very messy work table and some work in progress.

 
These guys are part of a collection I've begun making since our return from the UK. 
I've turned almost exclusively to wood as sadly, I've become sensitive to polymer clay and can only work with it occasionally now. I have to say that although I miss the flexibility of the clay, I'm loving the sturdy permanence of wood and the exciting possibilities that lie ahead.
Seems like the traveling bug has bitten and all my houses are on the move!
Well, that and my fascination with Baba Yaga has never waned, so houses with feet or wheels?
Coolest thing ever.

It's been fun indulging in my house obsession and I thank you for visiting and sharing some of it with me!


Wednesday, August 19, 2015

Lady Divina's Cupboard and a little bit extra

Lady Divina, (also known as Jane Chester) after years of palm reading and crystal ball gazing, has packed up her side show tent and retired to the countryside.
She found a lovely cottage with a view and spends lots of happy hours puttering away in the pretty little garden she's planted there.
If you are lucky enough to be asked to tea, Jane may take you on a little tour of her past.
Against a long wall in her parlor is a large old cupboard where Jane keeps the memorabilia of her past life, including her crystal ball collection and the many bits and pieces that tell the story of a rich, full life.


Most of the supplies for this piece came from Alpha Stamps including the cupboard. (though the black table was something MacGyver built for me using dowels and a piece of scrap wood)

After I assembled it, I gave it a rough coat of gesso. I left all the doors off so I could paint backs and fronts easily.


 I didn't have a good shade of red acrylic paint on hand, so I mixed some Primary Magenta and Mars Black and got a nice, rich color that I was a lot happier with.
I painted the areas that were not going to be papered and let it dry completely.
I decided where I wanted to put papers, measured and cut them out and attached them using Golden's Matte Medium. Just FYI, I'm not advertising for them, I just like the product!
I got so into what I was doing, I forgot to take pictures of this stage of the process so please forgive the lack of visual.
After all was dry, I attached the doors, glued on the brass embellishment and the clock face at the top and began painting the decorative gold detail.
I didn't have a plan, I just painted swirls, making sure that they were as close to mirror image as I could get each side.
Here's a tip though;
If you're right-handed, start on the left side and vise-versa. It's easier to imitate what you've done if you can see it without moving your hand and saves you from accidentally messing up what you've already done.
Also, I start at the top and after each left side stroke of the brush (I'm right-handed) I copy it as best I can on the right side.
So, in other words, I work from the top of the piece, from left to right, one stroke at a time.


For the lettering, I wrote it out on a piece of graph paper and placing the slip of paper above where I wanted the letters to go, I used it as a guide for spacing and placement.


I glued the knobs on and started adding little treasures. By the way, I did eventually find that missing hinge!

Inside the cupboard are all manner of tools for divining the future and reading the past, including a skull for phrenology reference, palm reading guides, astrology charts, Jane's crystal ball collection, a wheel of fortune, a 'third eye' energy booster, a Ouija board and Tarot cards. Plus a few little knick-knacks and interesting bits that Jane picked up in her travels.


And if you are very fortunate (ahem) and a little brave Jane.....er Lady Divina, that is,  may invite you to sit a spell and unfold a bit of your future.

For links to supplies, click HERE

Supplies list:
Gypsy Fortune Teller #1 Collage Sheet
Gypsy Fortune Teller #2 Collage Sheet
Tiny Divination Cards Collage Sheet
10mm Crystal Ball
16mm Crystal Ball
15mm Round Glass Globe Dome
Large White Turquoise Skull Bead
Miniature Hurricane Lamp
Little Library Collage Sheet
Tiny Little Books Collage Sheet
Miniature Working Hour Glass
Small Square Brass Hinges
19mm Fancy Metal Drawer Pull
Antique 3D Gold Crown
Eyeball Cabs in Settings
Clock Face Buttons
Art Nouveau Curved Filigree - Antique Gold
Small Wooden Finial
Tiny Wooden Flower Pots
Vintage Gears set of 4
Brass Dragonfly Charms
Miniature Red Lantern (substitute suggestion for the brass one I used and can't
remember where it came from)


Additional:
Red Acrylic Paint
Gold Acrylic Paint
Black Acrylic Paint
Helmet Charm
Faux Ivory Cat Charm
Dresden Doll  Head
Various Bead Caps
G45 Communique Scrapbook Paper (reverse side)
Black Table (made by my husband)
Tiny House Sculpture (made by me)
Polymer Clay Pumpkins (made by me)

BEFORE YOU GO......
 Take a look at these cute pins and tiny little houses!


They are all one inch wide and the tallest (the house with the tree and love birds) is two and a half inches.
Because jewelry gets a lot of hard wear, I stuck to papers only for the pins and sealed them with an acrylic finish. These are a lot of fun and fairly quick to make. Since they are small, it's a great way to use scraps and bits of paper and inchie collage sheets.
Imagine some cute Christmas pins to give as gifts. They would also make adorable ornaments!
The little house with the clock is also shown on the top of Lady Divina's cupboard.
You can get the perfect little wooden pin to make your own jewelry or ornament Here.


A little branch from the Gnarly Tree and Crows  makes a great tree for the Love Birds House. I also used Black Eyeglass Frame Brads  and little bits from collage sheets including the Tiny Divinations Collage Sheet.
Bits of Dresden trim like Black Zig Zag Border used above and tiny dots of black and white paint make up the finished details.
Thanks for stopping by!

Wednesday, May 13, 2015

The Lepidopterist Explorer

Through the greenest jungles and the deepest rain forests, the butterfly scholar braves snakes, spiders and all manner of icky critters for a glimpse of the beautiful and elusive Ornithoptera goliath, or the Goliath Birdwing Butterfly, the second largest butterfly in the world.
Though our intrepid Lepidopterist is an avid collector of butterflies, she much prefers them without the pins and glass frames. Working with the old adage you get more flies with honey, she has charmed the butterflies into keeping company with her as she sketches and writes about their habits.
They have even volunteered to pilot and fly her balloon and supplies around.
Amazing...


Her steamer trunk has seen better days, but it sure is a useful thing to have when you're in the middle of the rainforest in  New Guinea!


Here she has made camp for the night and you can see all the interesting things she has brought with her and found on her travels.


The camp stool was made from 12 gauge electrical wire and a bit of scrap from a flour sack towel. The bed roll and pillow from the same towel scrap. The butterfly net was fashioned with some tulle and copper wire and a bit of glue. The 'cargo net' is a bronze colored hair net I found at the local drug store.
All the wonderful little bits and pieces have come from Alpha Stamps.

Here's the trunk all packed up and ready to go....


 For links to all the awesome supplies I used from Alpha Stamps, click HERE.

SUPPLIES:

Chipboard Steamer Trunk

Time Keeper Papers:
Marchant
Tinker
Cogs & Gears
Portfolio
(all of these papers were used on the balloon)

G45 Society Page Scrapbook Paper (the diamond pattern strips down the seams of the balloon, tinted with copic marker)
Copic #YG05 Salad
Distress Ink Pad-Vintage Photo
Brilliance Pigment Ink Pad-Galaxy Gold

Serengeti 6x6 Paper Pad (for the outside of the trunk and all the wee stamps 'stamped' on the lid)
Vintage Dot Scrapbook Paper-Wasabi (inside the trunk)
G45 Olde Curiosity Shoppe Scrapbook Paper (butterflies)
Prima Forever Green 6x6 Pad (butterflies)
Faux Suede Sheets (for the straps on the steamer trunk)
Bronze Binocular Charm
Junkyard Findings-Steampunk Air (goggles)
Little Library Collage Sheet (books)
Fluted Ring Pull (drawers and cabinets in trunk)
Tiny Faux Ring Handles (outside of trunk)
Small Compasses
3D Bronze Tea Time Teapot Charm
Miniature Hurricane Lamp

Additional:
Tulle (butterfly net)
22g copper wire (for the butterfly net
12g black wire (camp stool)
flour sack towel (camp stool, bed roll and pillow)
tiny wooden flower pot
hair net (cargo net for the trunk)


A note on the balloon and butterflies....
There are a bazillion online tutes on how to construct a paper balloon, and for that reason I did not post one. I did make up my own template mainly because I wanted a larger balloon, but you can easily enlarge or reduce any template you use on your printer.
I stuck the six panels together with self adhesive linen hinging tape. (I taped the balloon together panel by panel from the inside) I found it much easier to use than glue or regular tape. I think medical tape would also work well.
To hide the seams on the outside, I cut thin strips of paper and glued them down the sides.

There are seventy four butterflies on this piece. Most of them I wired individually with 22 gauge wire, which doesn't really show when photographing, so it gives the butterflies the illusion of weightlessness or of really flying.

Thank you for stopping by!

Thursday, April 9, 2015

The Red, Red Poppies. (Shadow of Oz Blog Party)

One of the most vivid memories I had as a child watching "The Wizard of Oz" was the gorgeous, but deadly poppy field. Even now, watching that scene unfold always gives me a shiver.
I think it's partly the way the Wicked Witch of the West murmured. "poppies, poppies...." as she cast her beautiful, awful spell.
The deep, rich color of the flowers, the swaying stems, the inevitable descent into slumber of Dorothy and her friends. It's surprisingly disturbing.
Shivers, I tell ya.
I always wondered, what would have happened to Dorothy if Glinda screwed up and made it rain instead of snow? What if she was distracted by misbehaving munchkins and missed the whole 'falling asleep in an opium poppy field' thing?

Maybe Dorothy woke up on her own a changed person. Maybe she found herself in a waking dream, forever altered, longing for home but unable to leave the field?

 Mixed medium canvas on 6x6 hardboard. The poppies are from a napkin I tore up, pumped up the color on the poppies with copic markers and applied to the canvas with matte medium. I painted the background with Mars black and titanium white acrylic paint...just dragged my brush across both colors and then swirled it around the canvas.


After the paint dried, I used a permanent black marker and drew around the poppies and the swirly bits of paint until I felt like it was enough.


The 'Dorothy' I used here is a drawing I did about a month ago and scanned into my computer.  I've been having a blast finding different ways to apply her image to things (see her HERE as a couple of altered art dolls).
I cut her image out and used colored pencils to give her a sickly pallor.
I applied her to the canvas using matte medium and then gave the whole piece a good coat to seal it up. 

Thank you Oma Linda for hosting this awesome, fun blog party!
For links to all the other party goers, click HERE. 
There are some wonderful folks over there eating h'ordeuvres and sipping beverages...go on over and say hello!